Create initial backups (seeds)
Last adaption: 08.2023
New:
- Additions to the initial backup via FTP
notemptyThis article refers to a Resellerpreview
Preliminary note
Initial backups can be created in different ways:
- A job that is executed on schedule for the first time
- A job that is activated manually
- Files created with the help of the initial backup, which are uploaded to the backup servers via FTP.
Initial backups can contain very large amounts of data, which cannot be transferred sensibly with regular backup jobs if the Internet connection is not optimal.
Here it can help to create local backup files that can then be sent at another location with a fast internet connection via ftp.
Run job as planned for the first time
After a job has been created, an initial backup can be created by scheduled execution.
The settings and schedule of the job are applied.
A new Job can be created under / Tab Jobs / Button Create job.
Detailed instructions on how to create can be found in the wiki for jobs.
Detailed instructions on how to configure the schedule can be found in the wiki for schedules.
notemptyDefer
The Deferral is used to pause a backup after a defined time and to resume it at the next scheduled run.
Since the initial backup may be very large, the backup phase can take a long time.This could result in the job being restarted on schedule during the backup phase, so that the existing backup is aborted and starts again from the beginning.
Also, on less powerful hardware, regular work could be impaired during the backup phase.
The deferral can be set in the schedules.
Run Job manually
If, regardless of the schedule, a backup is to be created directly, a job can also be started manually.
This can be done under the menu
/
Choose end user site / Reiter
Jobs
/ Schaltfläche
Action / Option
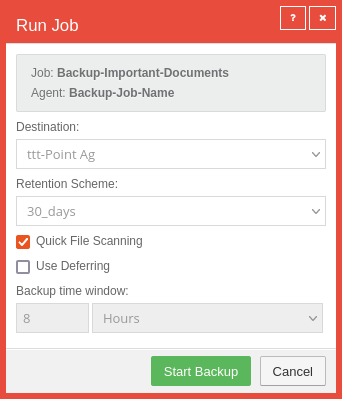
Run Job
| Destination: |
ttt-Point-Ag |
Choose destination
|
 Run Job manually
|
| Retention Scheme: |
30_days |
Choose prefered retention scheme (Intraday, 30 days oder 12 months)
|
| Quick File Scanning |
default |
If activated, the backup is executed without interruption
|
| Use Deferring |
default |
If activated, the backup is interrupted after the time specified below and resumed at the next scheduled execution.Should be activated for initial backups The Deferral is used to pause a backup after a defined time and to resume it at the next scheduled run. Since the initial backup may be very large, the backup phase can take a long time. This could result in the job being restarted on schedule during the backup phase, so that the existing backup is aborted and starts again from the beginning.
Also, on less powerful hardware, regular work could be impaired during the backup phase. |
| Backup time window: |
8 Hours |
Can only be set if defer is activated!
|
| Start Backup |
The backup will be started
|
|
|
Initial Backup with the Backup Assistant

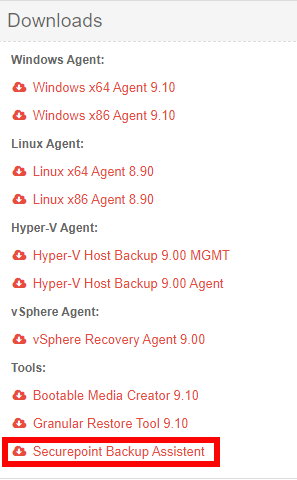
Download section of the Backup Portal
Download of the Backup Assistant
The Backup Assistant can be downloaded from the download area of the Backup Portal dashboard.
An Installation is not required.
Run Backup Assistant
The Backup Assistant must be run as administrator.
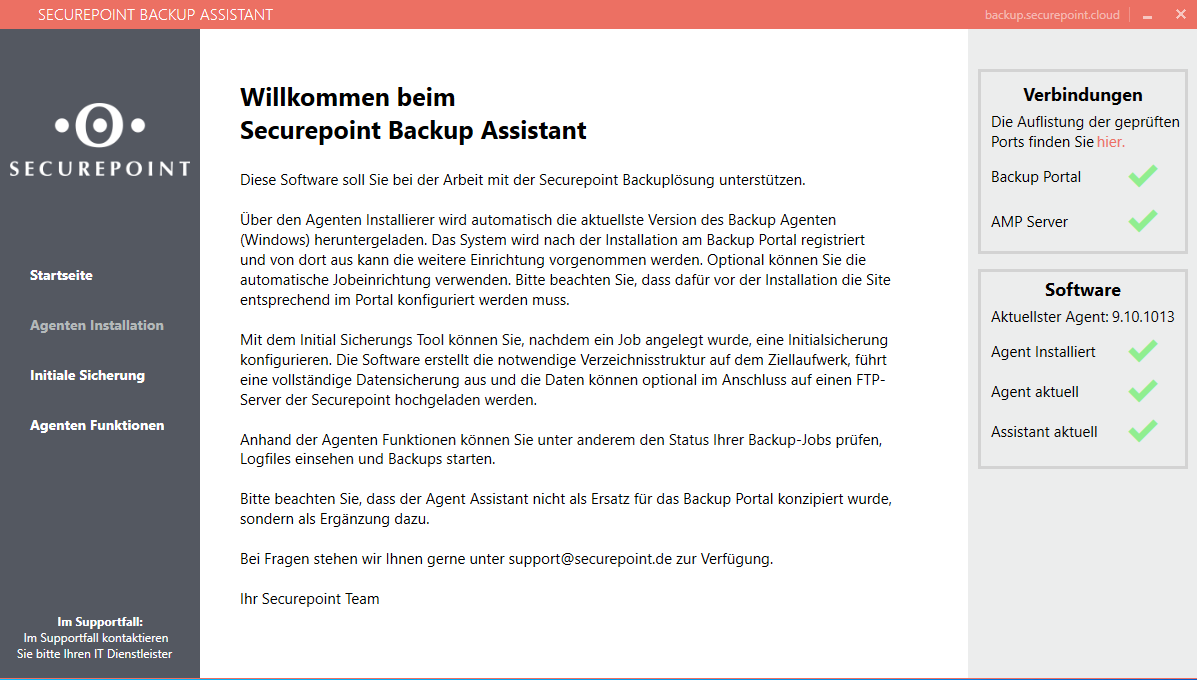
The Backup Assistant start page then opens. The Backup Assistant automatically checks the connections and the software of the backup.
If the backup tool is stored on an external hard drive, then it may make sense (especially if the internet connection is slow) to defer the backup and connect it to a faster internet connection the next time it is run.
Start page
| Connections
|
 Start page
|
| Backup Portal |
Checks the connection to the Backup Portal
|
| AMP Server |
Checks the connection to the AMP server
|
| Software
|
| Agent Installed |
Checks if the agent is installed correctly
|
| Agent up to date |
Checks if the agent version is the latest one
|
| Assistant up to date |
Checks whether the Assistant version is the latest one
|
|
|
Initial backup
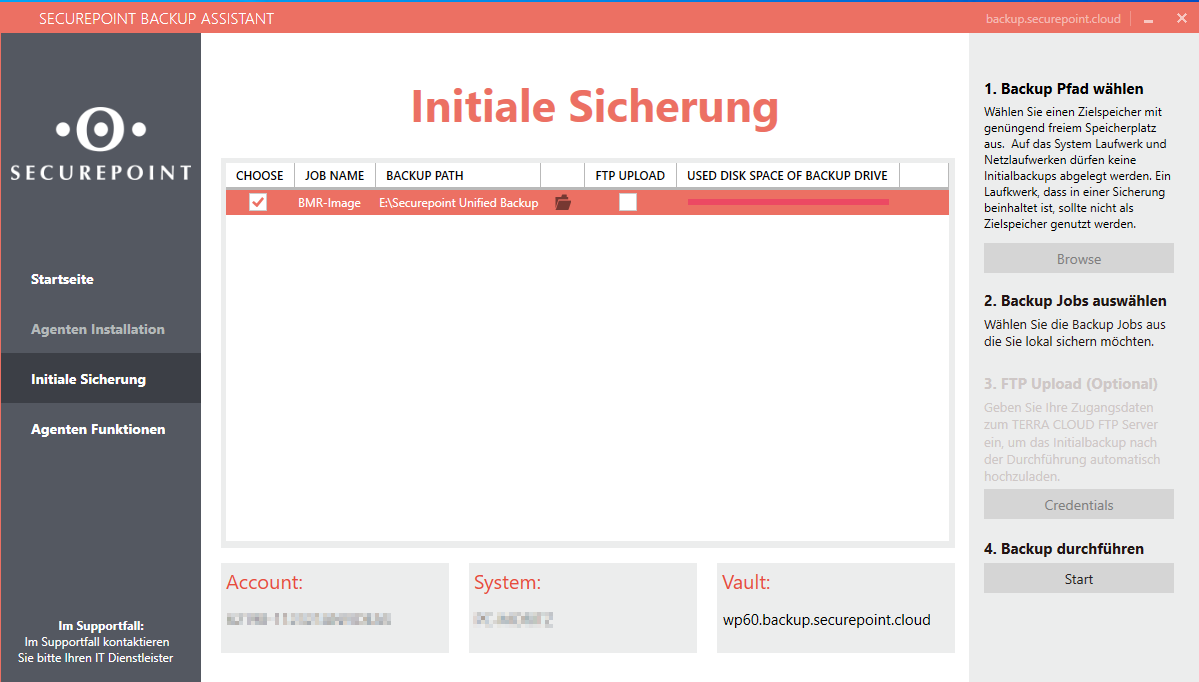
The table shows the jobs that have been created for the respective device in the Backup Portal.
In order for the initial backup to be carried out, the steps shown on the right must be performed:
|
 Initial backup
|
| 1. Select backup path |
Clicking on the Browse button opens the window in which the target storage can be selected.
notempty The target storage must not be on the system drive or a network drive!
|
| 2. Select backup jobs |
For the desired backup job, the click box in the Choose column must be clicked.
|
| 3. FTP Upload(Optional) |
This function enables the initial backup to be uploaded automatically after it has been carried out.
The following steps must be taken for this:
- Request access data for an initial backup via FTP from Securepoint Support
- Click on Credentials and enter the credentials you have received
- Upload the entire created folder structure to the FTP server
notempty If the upload is to be carried out from somewhere else, the entry of the access data can be skipped and the backup started.
|
| 4. Perform backup |
Click on Start to perform the initial backup.
|
|
|


