- The setup wizard has been updated
- The article Backups has been updated
Mailserver konfigurieren
Für den Betrieb des UMA muss auf dem Mailserver ein dafür erforderliches Journal Konto angelegt werden. Alle E-Mails die den Mailserver passieren, eingehende sowie ausgehende, müssen in das Journal Konto kopiert werden damit das UMA diese dann von dem Konto via IMAP abholen und archivieren kann.
IMAP Einstellungen
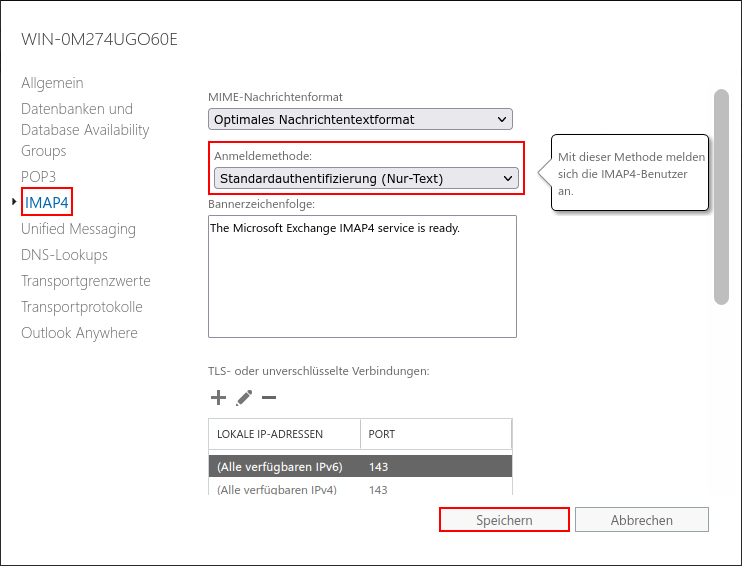
Authentifizierungsmethode des IMAP-Servers einstellen
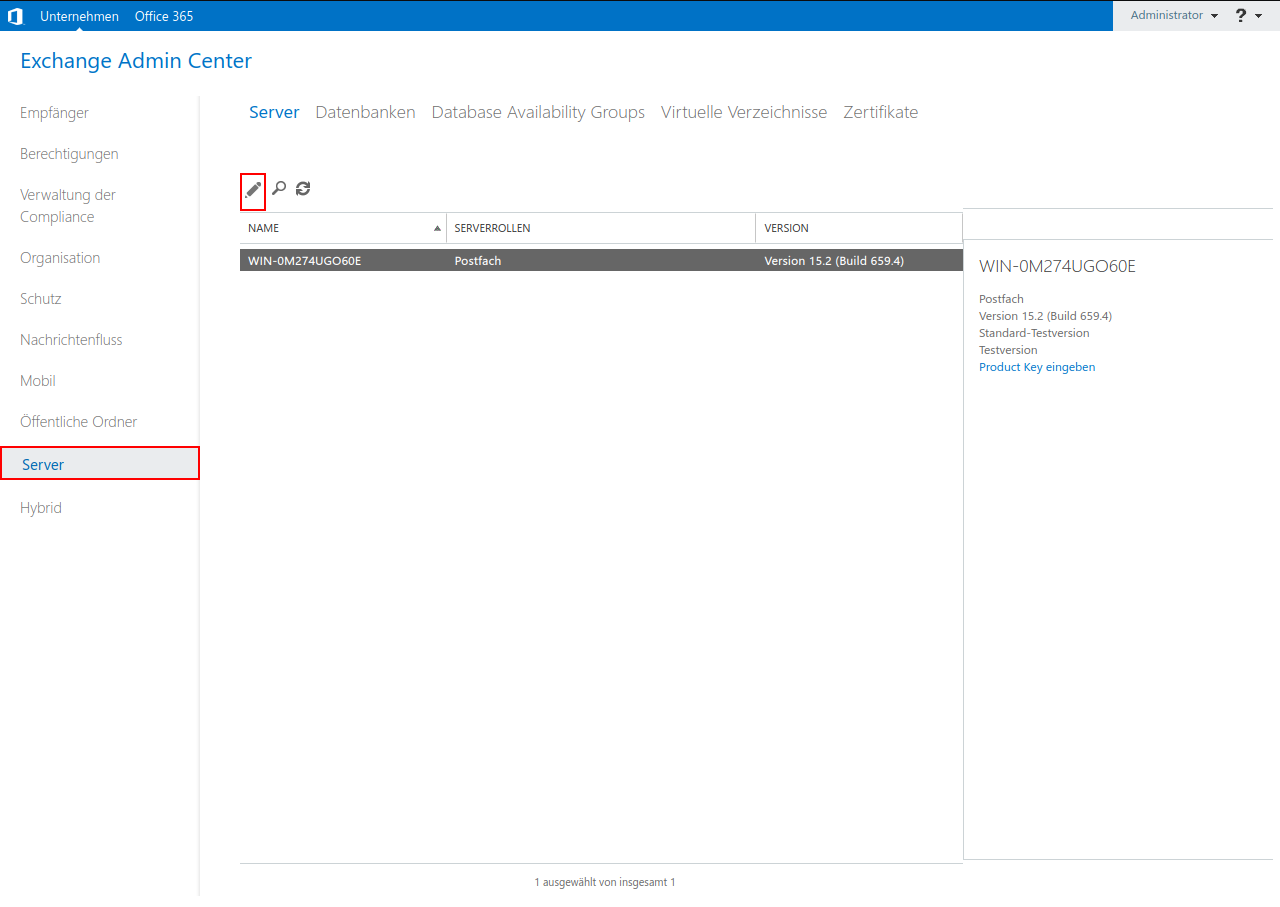
- Öffnen der Exchange-Verwaltungskonsole Abb.1
- Menüpunkt Server / Schaltfläche Bearbeiten
- Auswahl Menü IMAP4
- Anmeldemethode
Standardauthentifizierung (Nur-Text) Abb.2 - Übernehmen mit
Starttyp des Dienstes ändern
- Aufruf Server-Manager / Tool Computerverwaltung / Menü Dienste und Anwendungen / Untermenü Dienste
- Eintrag Microsoft Exchange IMAP4
- Kontextmenü (durch Klick mit der rechten Maustaste auf diesen Eintrag) Abb.3
- Menüpunkt Eigenschaften
- Registerkarte Allgemein / im Dropdownmenü des Feldes Starttyp den Wert auswählen Abb.4
- Klicken auf
- abschließen mit
Die gleichen Einstellungen müssen ebenfalls für den Dienst Microsoft Exchange IMAP4-Back-End durchgeführt werden. Abb.5 & 6
Anlegen des Postfaches
- Menü Empfänger
- Abschntt Postfächer Abb.7
- Klick auf um ein neues Benutzerpostfach anzulegen
- In dem nun geöffneten Fenster müssen ein Alias, ein Anzeigename und ein Name eingetragen werden Abb.8
- Es muss ein Benutzeranmeldename und ein Kennwort eingetragen werden.
Diese Daten werden später im UMA verwendet.
Abschließen mit
Hinzufügen einer neuen Journalregel
- Standardjournale Standardjournale werden für eine Postfachdatenbank konfiguriert. Dadurch kann der Journal-Agent alle Nachrichten in Journalen erfassen, die an und von Postfächern in einer bestimmten Postfachdatenbank gesendet werden. Wenn alle Nachrichten an alle Empfänger und von allen Absendern in Journalen aufgezeichnet werden sollen, müssen Sie Journale für alle Postfachdatenbanken auf allen Postfachservern in der Organisation konfigurieren.
- Premium-Journale Mit Premium-Journalen kann der Journal-Agent mithilfe von Journalregeln Journale mit größerer Granularität erstellen. Anstatt alle Postfächer in einer Postfachdatenbank in Journalen aufzuzeichnen, können Sie in Abstimmung auf die Anforderungen Ihrer Organisation Journalregeln konfigurieren, mit denen einzelne Empfänger oder Mitglieder von Verteilergruppen in Journalen erfasst werden. Zur Verwendung der Premium-Journalfunktion muss eine Exchange Enterprise-Clientzugriffslizenz (Client Access License, CAL) vorliegen.Quelle: http://technet.microsoft.com/de-de/library/aa998649(v=exchg.150).aspx
Hinzufügen einer neuen Standard-Journalregel
- Aufruf Exchange-Verwaltungskonsole
- Menü Server
- Untermenü Datenbanken
- Bearbeiten aufrufen mit Mausklick auf oder Doppelklick auf die Datenbank
- Menü Wartung Abb.10
- Als Journalempfänger den Namen des eben angelegten Benutzers für das UMA-Benutzerpostfach auswählen
- Übernehmen der Angaben mit
Hinzufügen einer neuen Premium-Journalregel (mit Exchange Enterprise-CAL)
- Wechsel in der Exchange-Verwaltungskonsole zum Menü Verwaltung der Compliance Abb.11
- Untermenü Journalregeln
- Öffnen des Fensters zur Einrichtung einer neuen Journalregel mit
- Unter Journalberichte senden an: wird das UMA Benutzerpostfach eingetragen, das gerade erstellt wurde (s.o.). Abb.12
- Namen für die Regel eintragen
- Da die Regel sich auf alle Empfänger beziehen soll, muss unter Beim Senden der Nachricht an oder Empfangen der Nachricht von... die Option ausgewählt werden
- Weiterhin soll die Regel auf alle Nachrichten, unabhängig vom Ursprung oder Ziel, angewendet werden, daher muss unter Folgende Nachrichten im Journal erfassen ... die Option ausgeählt werden
- Anlegen der Journalregel abschließen mit Klick auf
- Öffnen der Exchange-Verwaltungskonsole
- Menüpunkt Server / Schaltfläche Bearbeiten
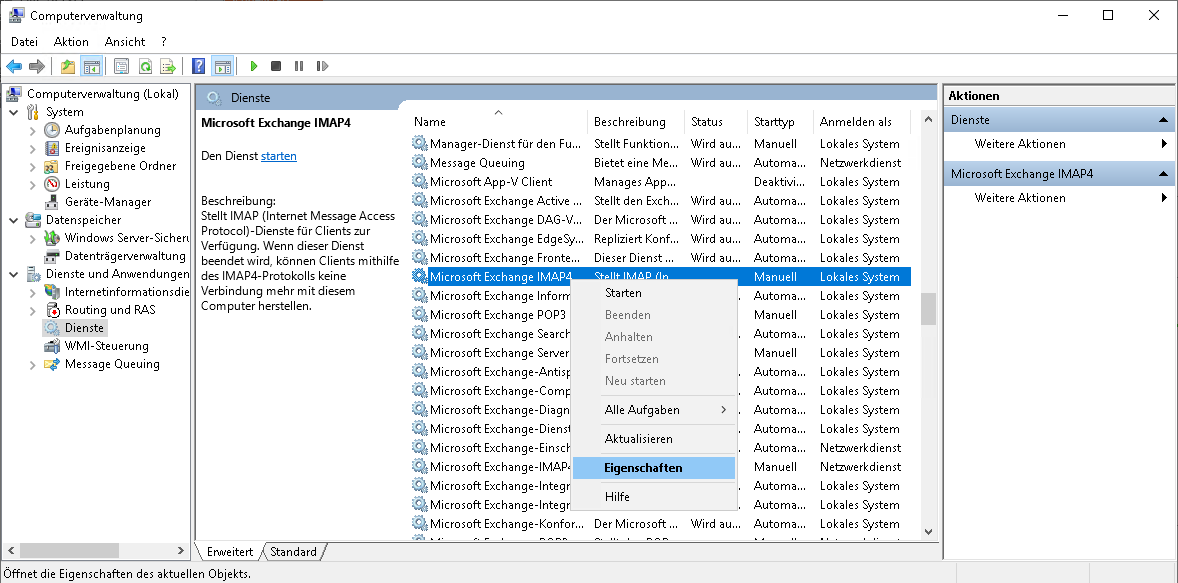
- Eintrag Microsoft Exchange IMAP4
- Kontextmenü (durch Klick mit der rechten Maustaste auf diesen Eintrag)
- Menüpunkt Eigenschaften
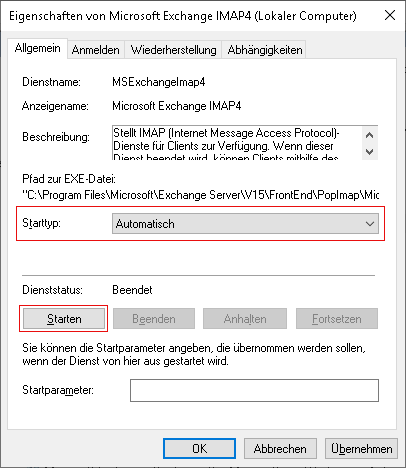
- Registerkarte Allgemein / im Dropdownmenü des Feldes Starttyp den Wert auswählen
- Klicken auf
- abschließen mit
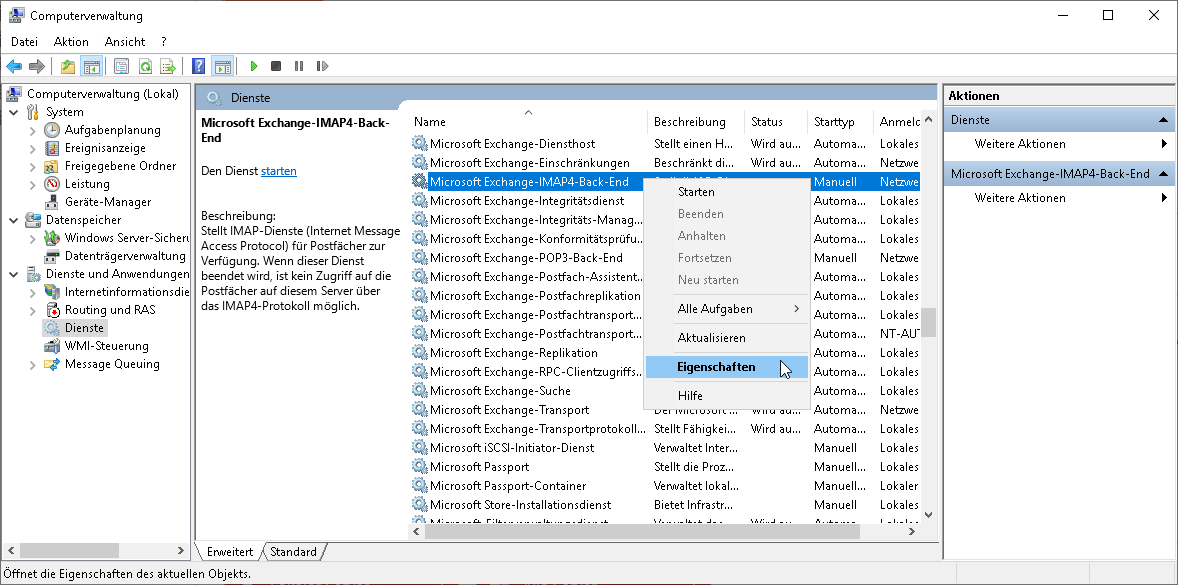
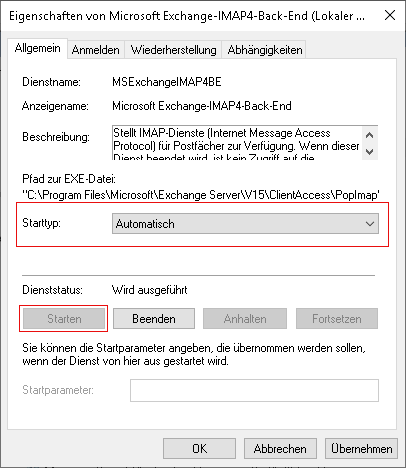
- Registerkarte Allgemein / im Dropdownmenü des Feldes Starttyp den Wert auswählen
- Klicken auf
- abschließen mit
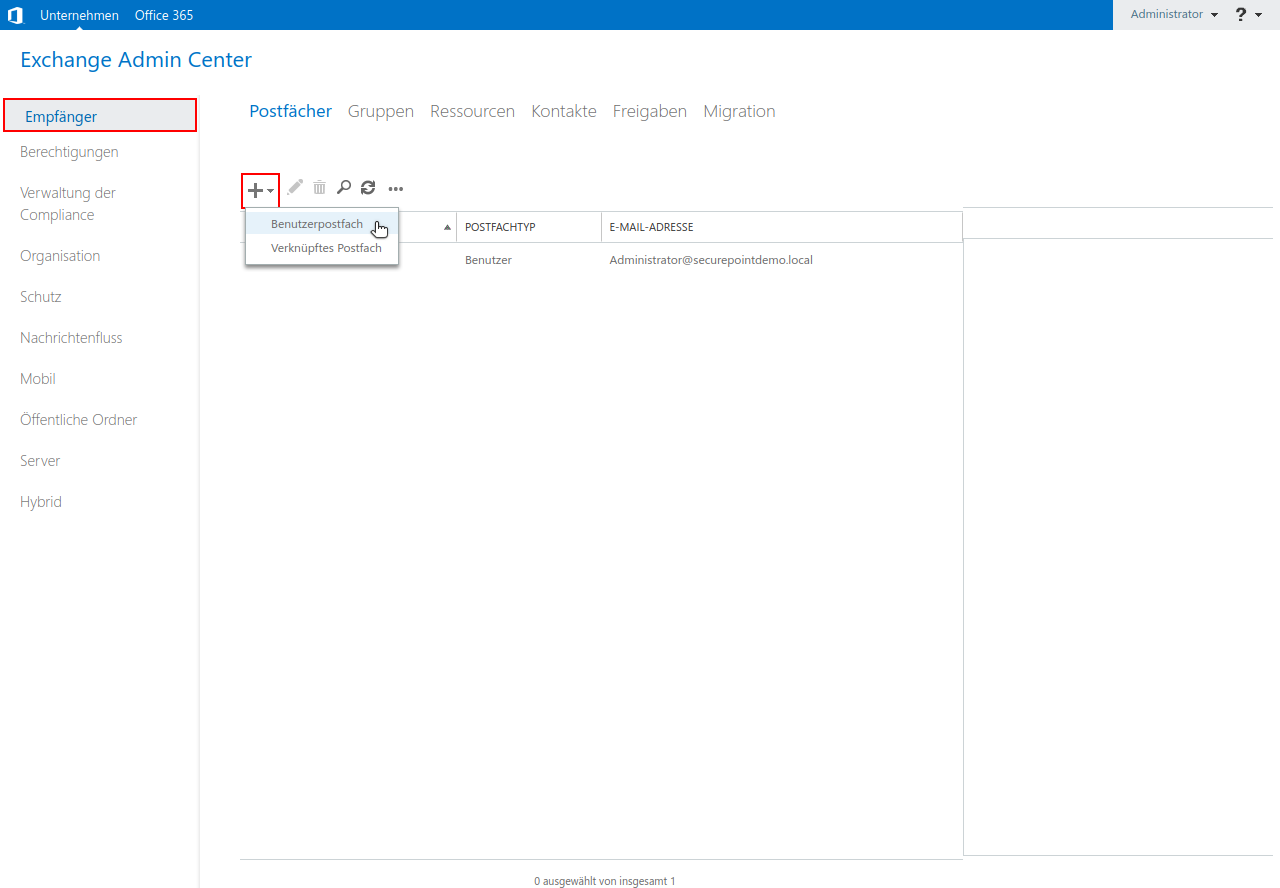
- Menü Empfänger
- Gruppe Postfächer
- Klick auf um ein neues Benutzerpostfach anzulegen
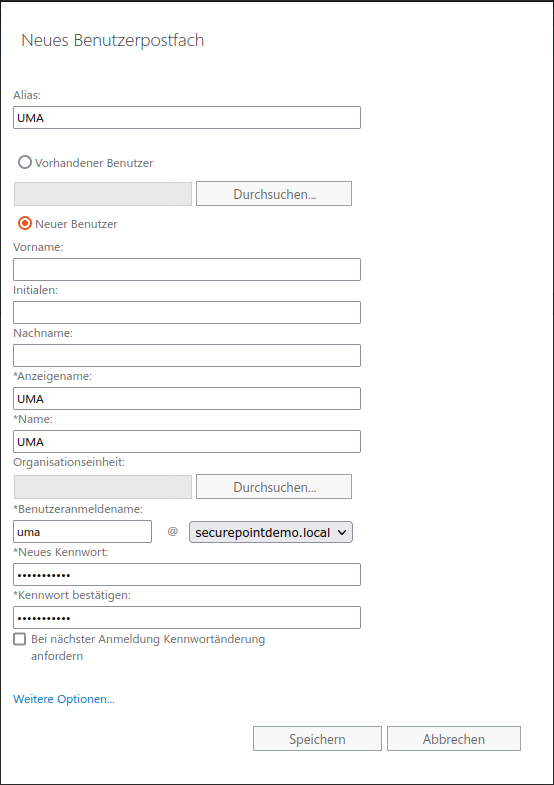
- Alias
- Anzeigename
- Name
- Benutzeranmeldename
- Kennwort
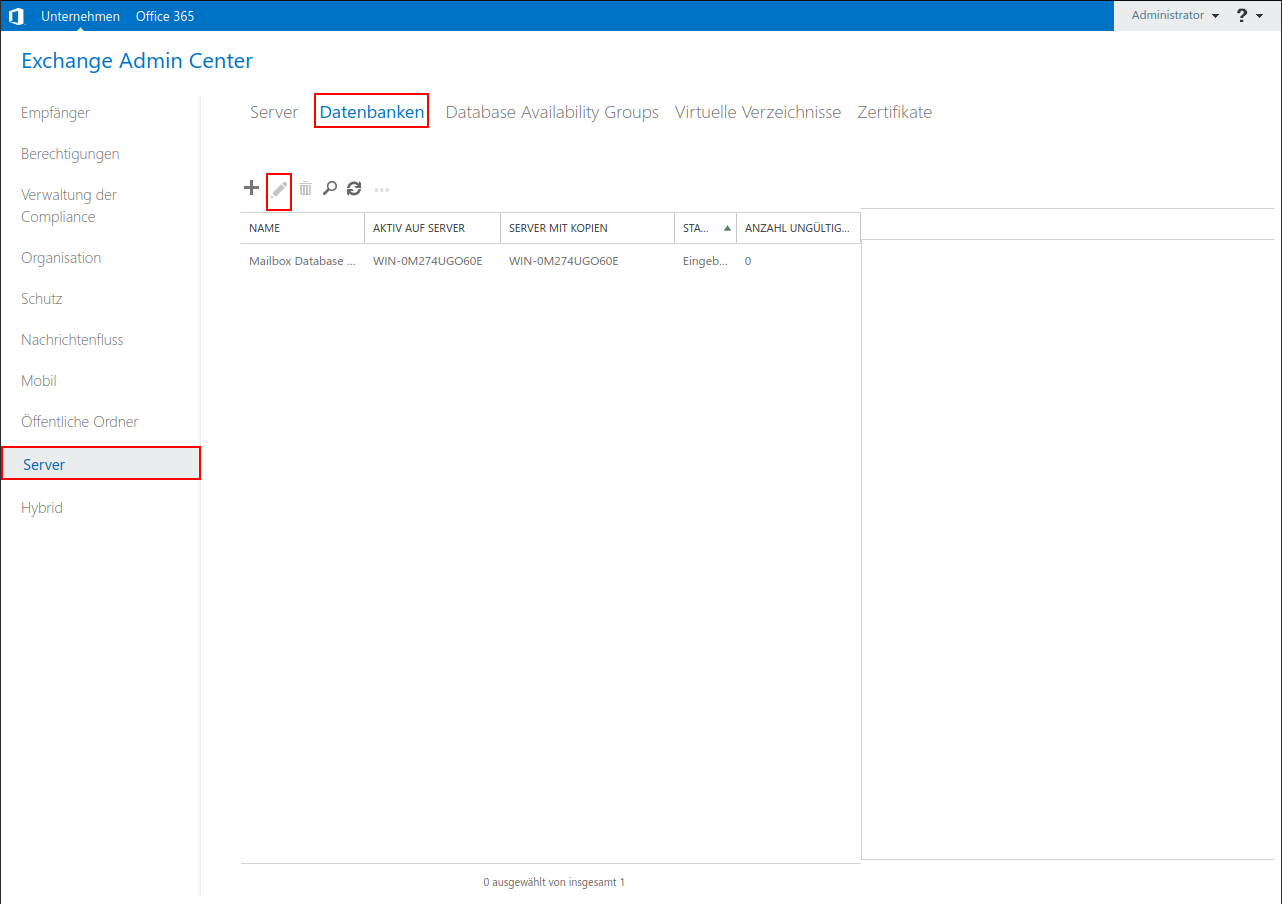
- Aufruf Exchange-Verwaltungskonsole
- Menü Server
- Untermenü Datenbanken Abb.9
- Bearbeiten aufrufen mit Mausklick auf oder Doppelklick auf die Datenbank
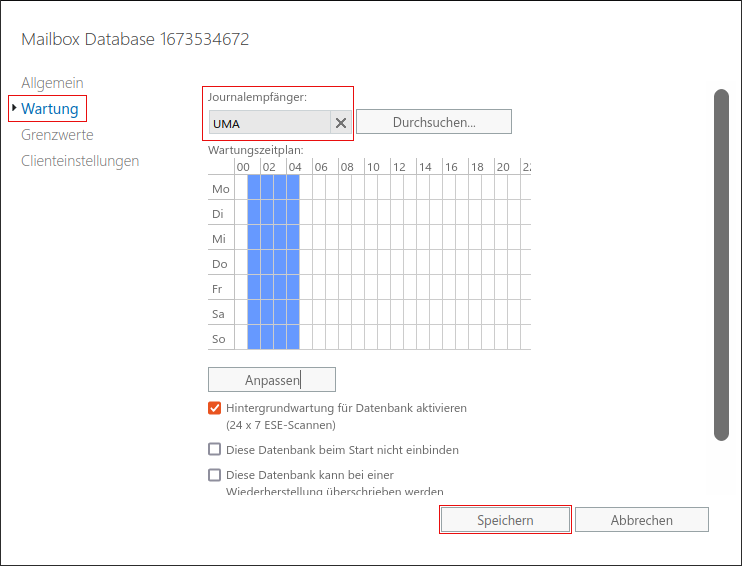
- Menü Wartung
- Journalempfänger: eben angelegten Benutzer für das UMA-Benutzerpostfach auswählen
- Übernehmen der Angaben mit
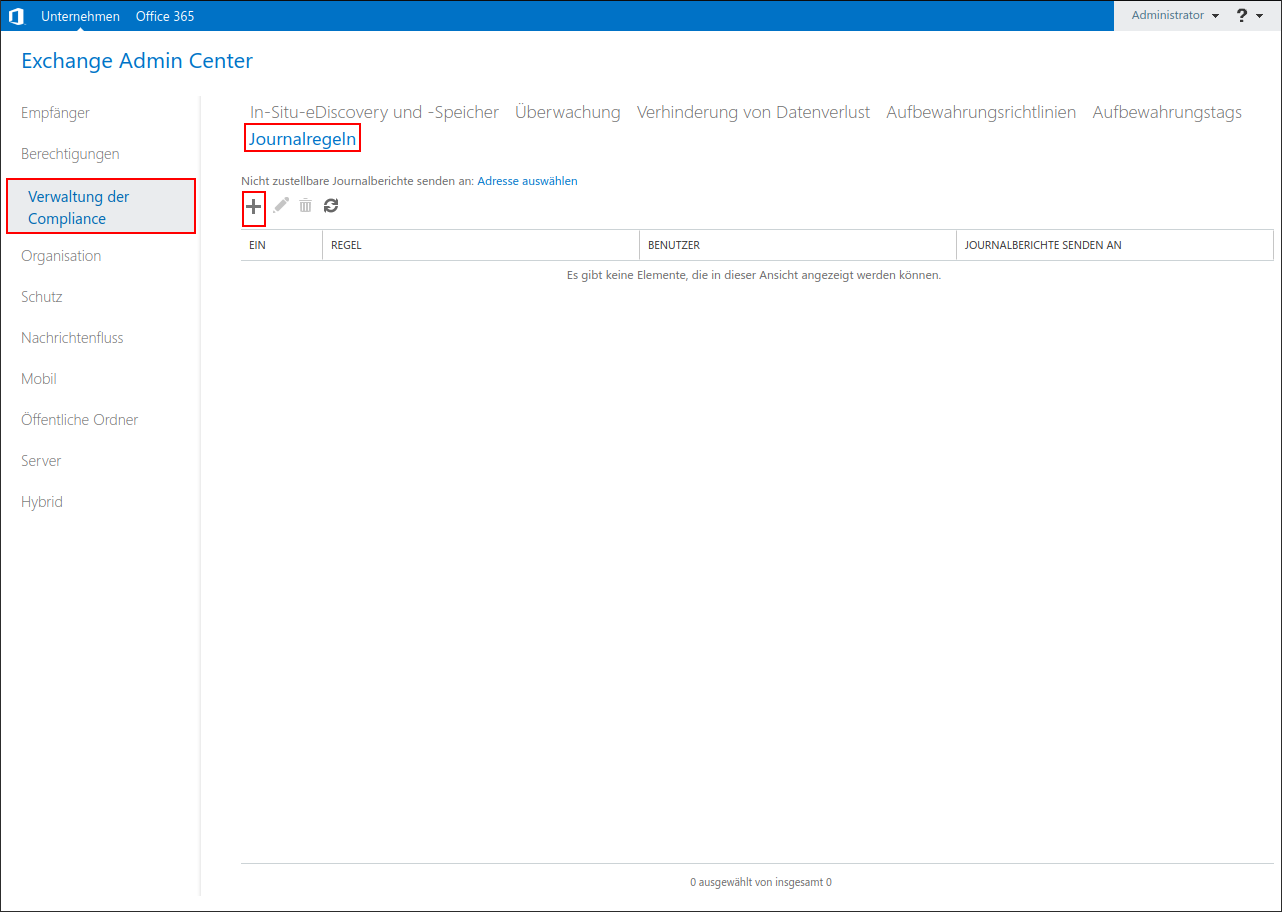
- Wechsel in der Exchange-Verwaltungskonsole zum Menü Verwaltung der Compliance
- Untermenü Journalregeln
- Öffnen des Fensters zur Einrichtung einer neuen Journalregel mit
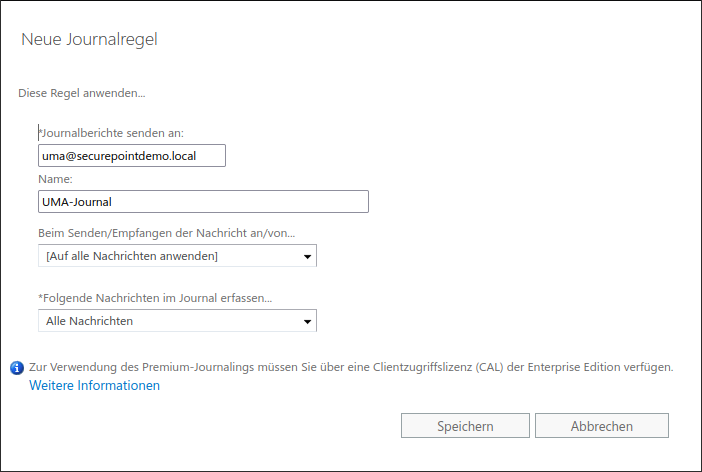
- Journalberichte senden an: das UMA Benutzerpostfach, das gerade erstellt wurde (s.o.).
- Name für die Regel
- Beim Senden der Nachricht an oder Empfangen der Nachricht von... die Option ausgewählen
- Bei Folgende Nachrichten im Journal erfassen ... die Option ausgeählen
- Anlegen der Journalregel abschließen mit Klick auf
Nach Anlage einer der beiden Journalregeln werden alle Nachrichten/E-Mails in das neu angelegte Postfach kopiert, wo sie von dem UMA via IMAP abgeholt werden können.
UMA konfigurieren
Das erfolgreich angelegte Konto im Exchangeserver muss nun im UMA hinterlegt werden:
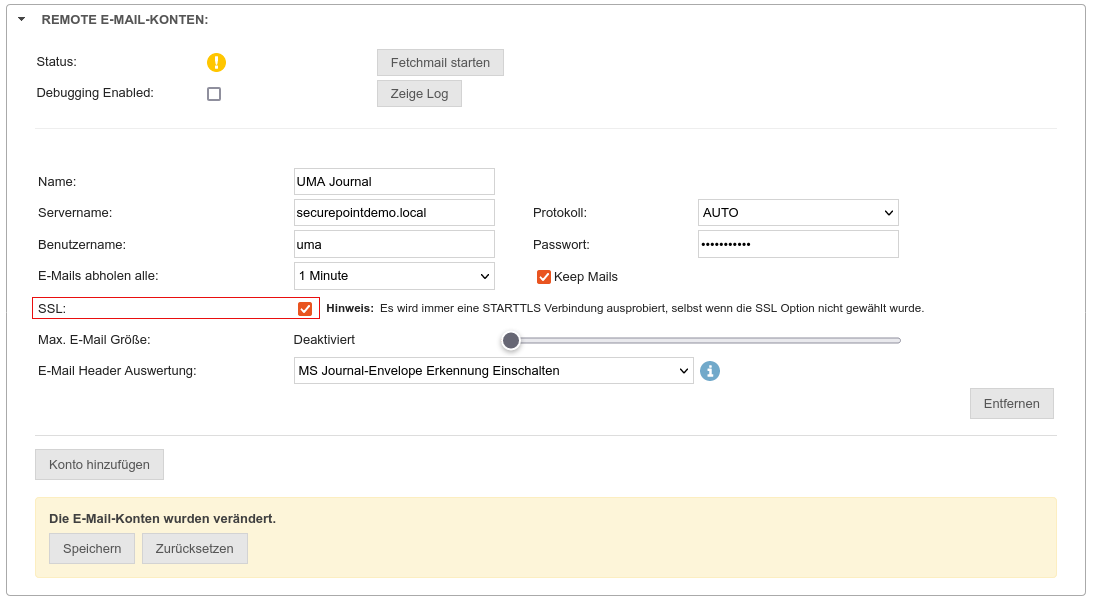
System-Einstellungen → E-Mail-Server → Remote E-Mail-Konten Schaltfläche
- Protokoll: Auto versucht immer zunächst einen Abruf per IMAP und anschließen mit POP3
- Keep Mails Sollte nur in der Einrichtungsphase aktiviert sein. Andernfalls läuft das Postfach über kurz oder lang voll
- SSL: Aktivierung erforderlich für die Kommunikation mit einenm Exchange Server
Netzwerkanbindung
Der erste Schritt stellt die Einbindung des UMA in das Netzwerk dar.
Positioning of the UMA in the internal network

The so-called hub mode is used to integrate the UMA into the existing network. This has the advantage that the existing network structure does not need to be changed. In addition, the mode is also able to archive emails based on protocols other than POP3, IMAP or SMTP (e.g. via Outlook via MAPI).
Network Settings
In the delivery state some settings are preconfigured. For example, the IP address and administrator access.
Preferences:
| IP address: | 192.168.175.254 |
| Subnet mask: | 255.255.255.0 |
| User name: | admin |
| Password: | insecure |
Adjusting the IP address
To access the UMA web interface, either
- The computer with which the UMA is to be configured is located in the UMA network, i.e. in the subnet 192.168.175.0/24, or
- The UMA is set to the existing network.To add the UMA to the existing network, the IP address must be adjusted.
The console port is used for this purpose.
- On an appliance, the console is accessed by connecting a monitor and keyboard to the hardware. Here the IP address can be configured before the UMA is integrated into the existing network.
- On a VM, the console can be reached directly via a connection to the hypervisor
Login is performed using the preconfigured administrator account. Since there is only one administrator on the UMA, only the password is requested for the login:
Default password: insecure
In the console environment, the administrator has very limited rights in the machine.
In this example, the subnet 192.168.145.0/24 is used. It is recommended that you select the subnet where the email server is located.
Make sure that the selected IP address for the UMA is not used by another device on the network.
The IP address of the UMA is changed with the following command:
ipconfig ip-address/subnet mask Gateway-ip z.B.: ipconfig 192.168.145.110/24 192.168.145.1
The IP address change carried out in this way is temporary and is reset to the delivery status after a restart.For permanent storage, the IP address must be changed in the Web Interface.
Then the UMA is connected to the network.
Access to the administration interface
The configuration is done via the web interface of the UMA. Using an Internet browser, the setup is performed via an encrypted connection.
After connecting to the network, an Internet browser is used to enter the IP address including the port of the UMA in the URL input field:
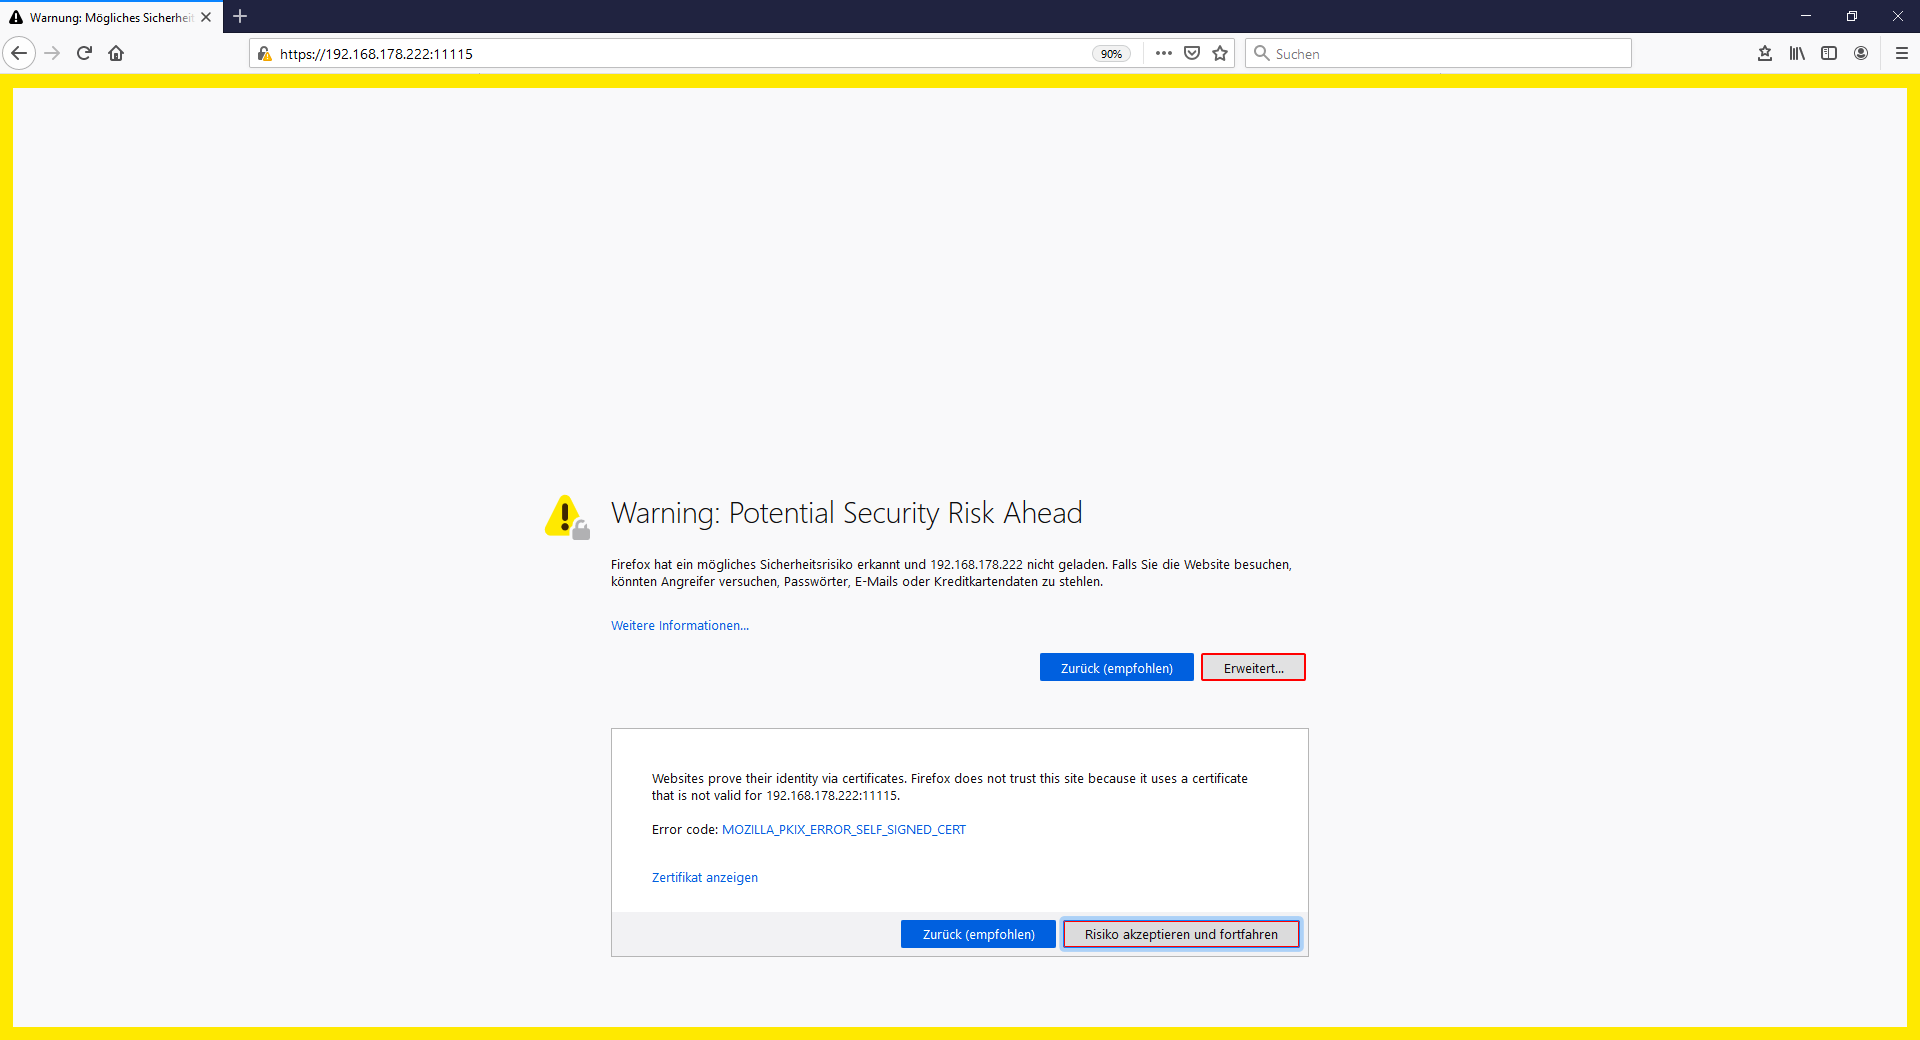
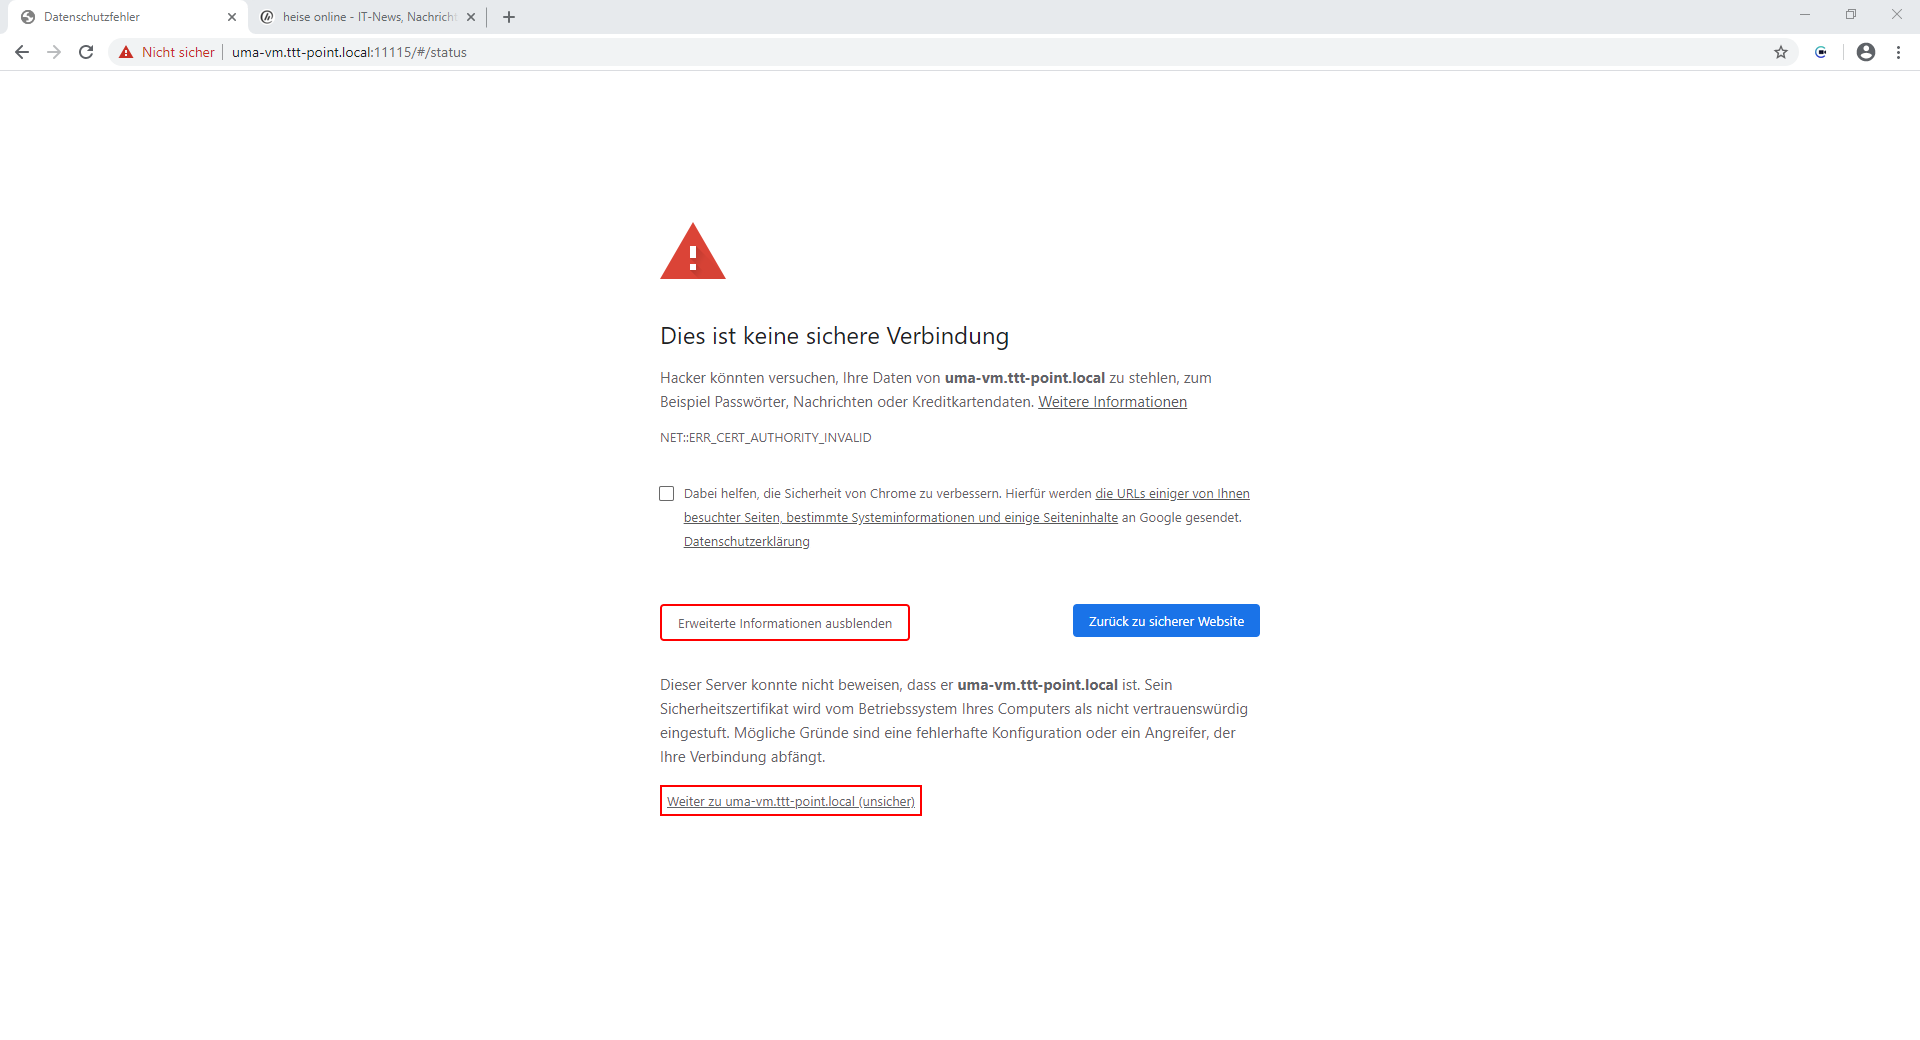
https://192.168.145.110:11115
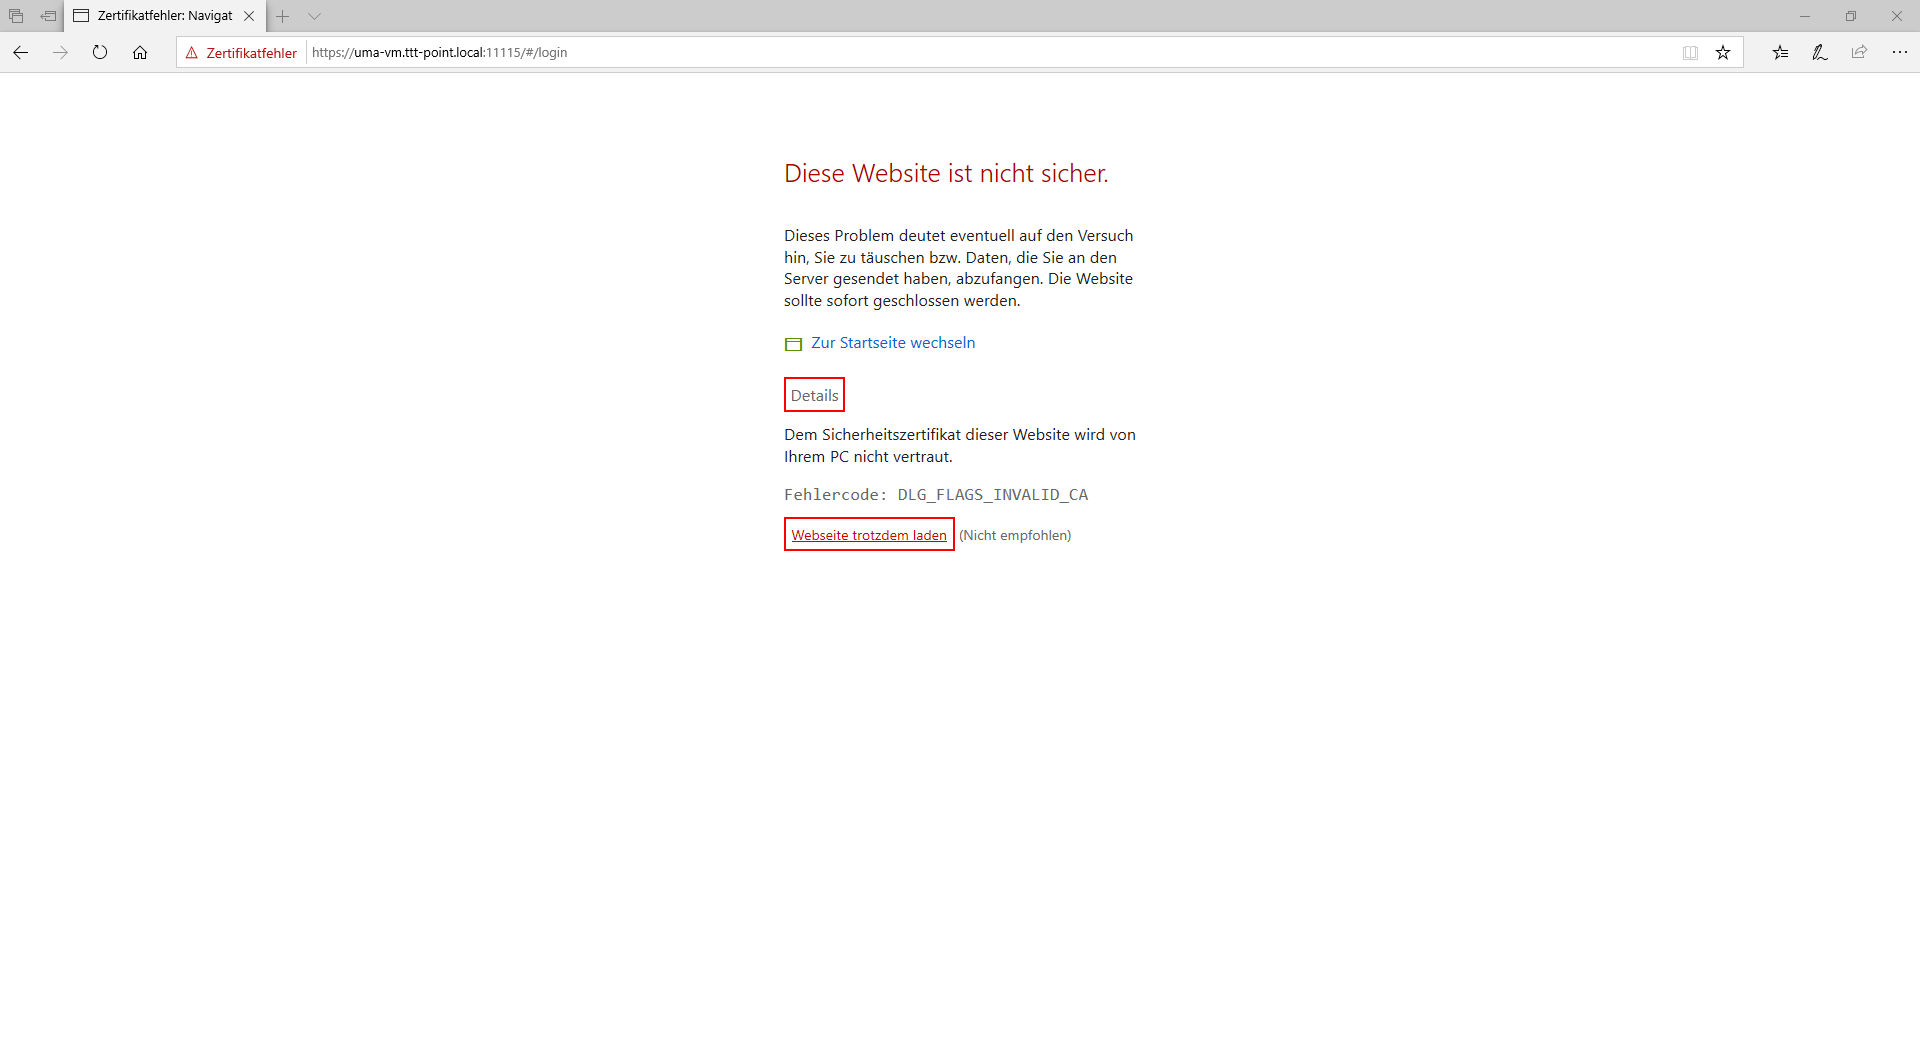
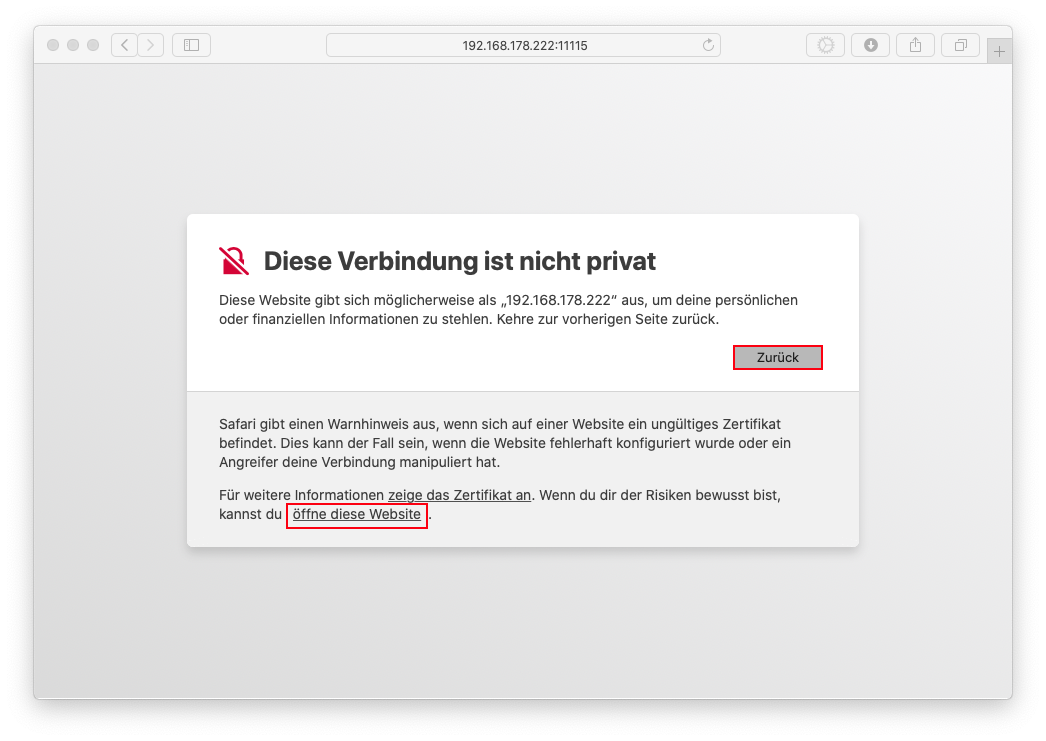
Since this is an encrypted connection with a certificate created by the UMA itself, which the browser cannot yet know, this connection must be explicitly permitted. The browser's warning notice must be ignored!
UMA-Administration-Center
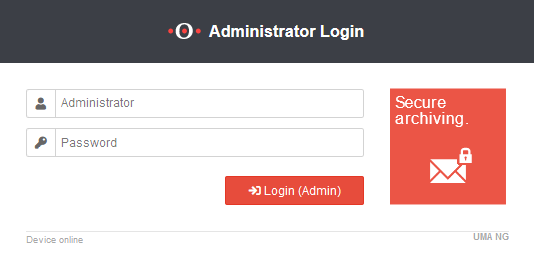
Next, the login window of the UMA Administration Center is displayed. User name and password of the UMA are in the delivery state:
| User name: | admin |
| Password: | insecure |
After a click on the button Login(Admin) or pressing the Enter key, a window appears with the licence conditions, which must be confirmed.
This is followed by the setup wizard for the initial setup of the UMA. Due to it's scope, a separate article has been dedicated to this in Setting Up the UMA with the Setup Wizard.
Der Einrichtungsassistent
Wesentliche Einstellungen zur Inbetriebnahme werden im Einrichtungsassistenten erfasst.
Fundamental settings
Depending on whether the UMA is being installed for the first time or whether a backup is to be restored after a new installation, various steps are required:
New installation with existing backup
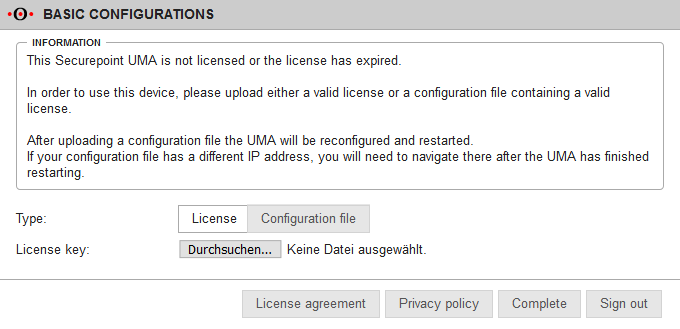
As type configuration file is selected. This must have been exported before on the old UMA under Adminsitration Tab Backup or from UMA NG v3 under Maintenance Tab Backup in the section Configuration Import/Export.
With the button Complete among other things the data from step 1 of the setup wizard are taken over:
- Network configuration
- UMA IP address
- Gateway, DNS
- Host name, domain
- Admin password and email address
- Remote Smarthost settings
After the reboot, step two of the setup wizard is called directly.
Initial installation
As type is selected license. The license mandatory for operation can be downloaded reseller portal
Setup Wizard
| Step | Description | 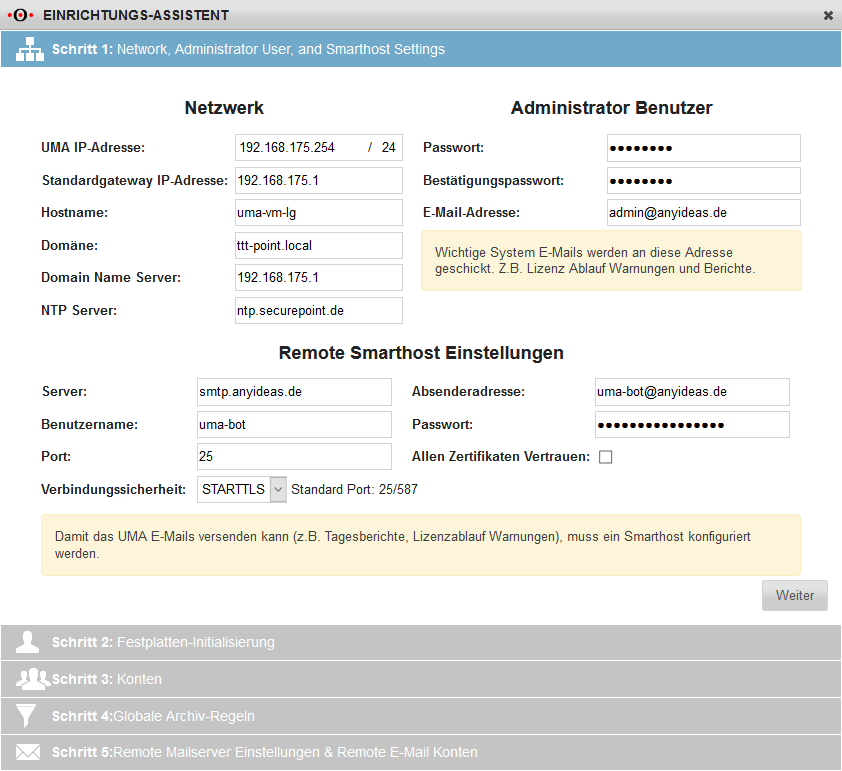 | |||||||||||||||||||||||||||||||||||||||||||||||||||||
|---|---|---|---|---|---|---|---|---|---|---|---|---|---|---|---|---|---|---|---|---|---|---|---|---|---|---|---|---|---|---|---|---|---|---|---|---|---|---|---|---|---|---|---|---|---|---|---|---|---|---|---|---|---|---|---|
| Step 1 |
| ||||||||||||||||||||||||||||||||||||||||||||||||||||||
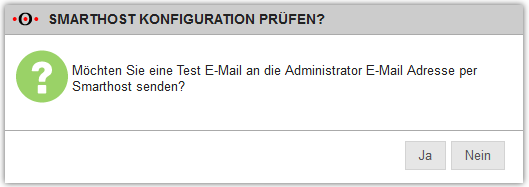
| Sending test mail. Confirm sending with . If no mail arrives, please check the access data for the smarthost and the network connection |
 | ||||||||||||||||||||||||||||||||||||||||||||||||||||||
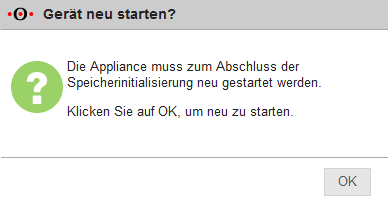
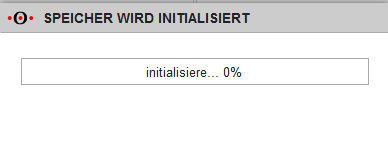
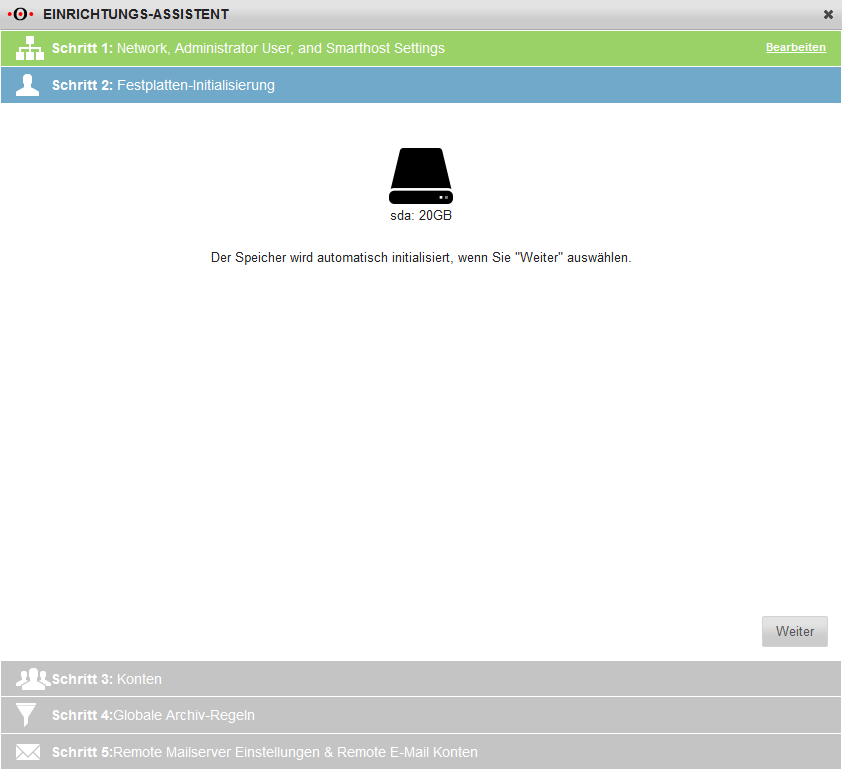
| Step 2 | Initialize storage hard drive The hard drives for the archive must be initialized. This is done automatically with the archive hard drives recognized by the UMA. |
 | |||||||||||||||||||||||||||||||||||||||||||||||||||||
| Step 3 | Set up accounts: Depending on the type of authentication (Repository Type:)
|
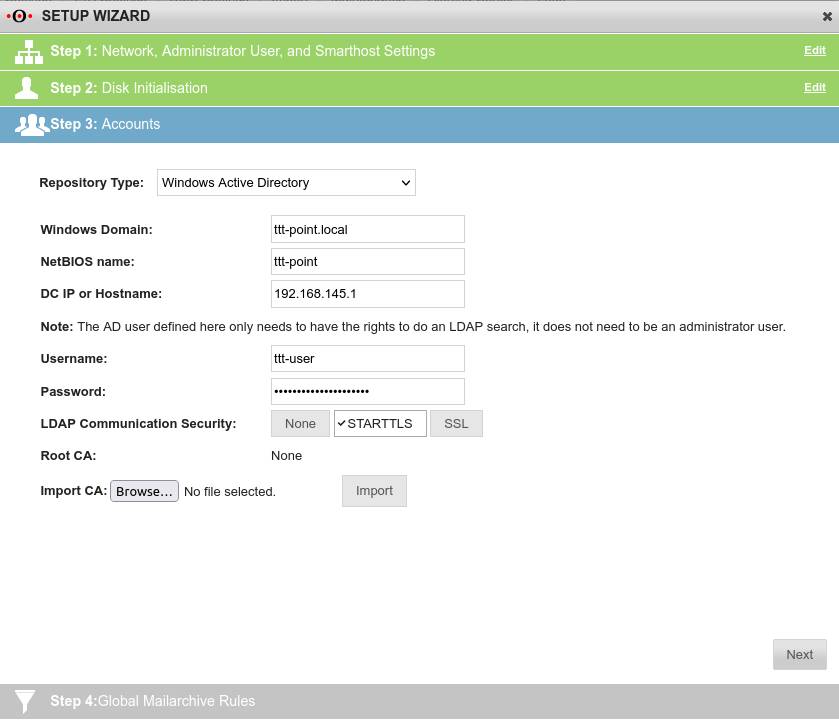 | |||||||||||||||||||||||||||||||||||||||||||||||||||||
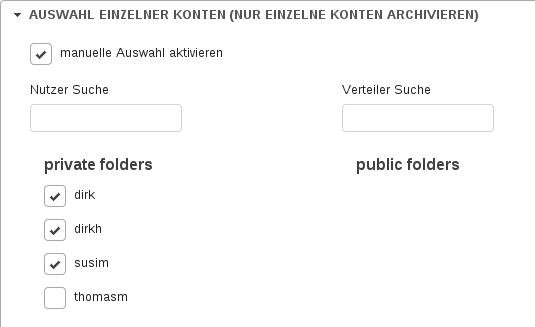
| Windows Active Directory Windows domain: The corresponding domain in which the Active Directory resides. workgroup: Must match the NetBIOS name of the domain Account selectionAccount selection
When using an authentication service such as Active Directory, care should be taken to determine which email accounts really need to be archived. | |||||||||||||||||||||||||||||||||||||||||||||||||||||||
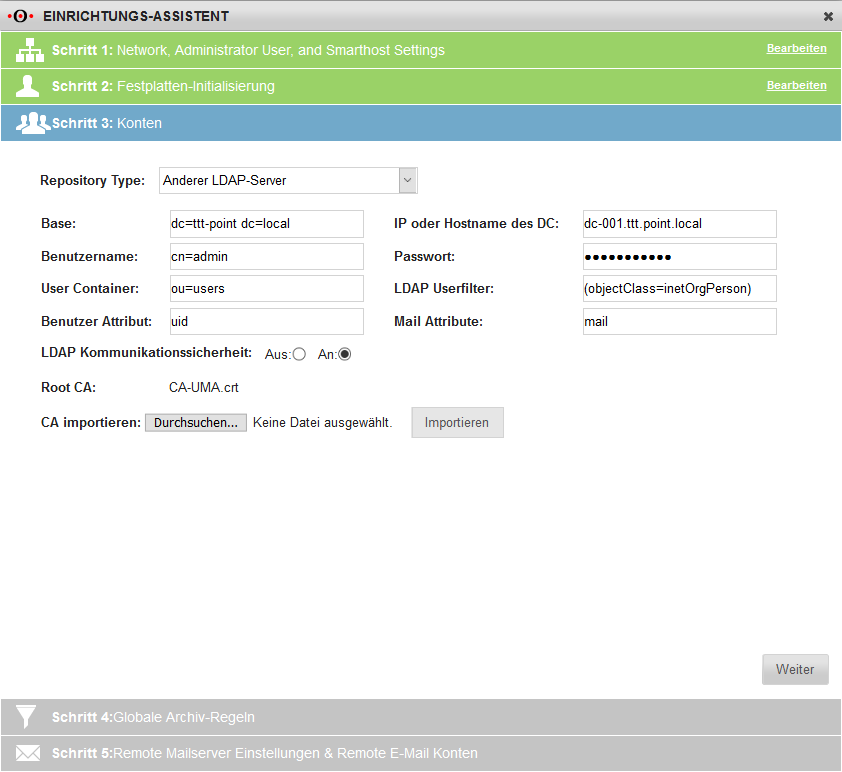
| LDAP For the use of another LDAP server, the following is entered in the fields:
|
 | ||||||||||||||||||||||||||||||||||||||||||||||||||||||
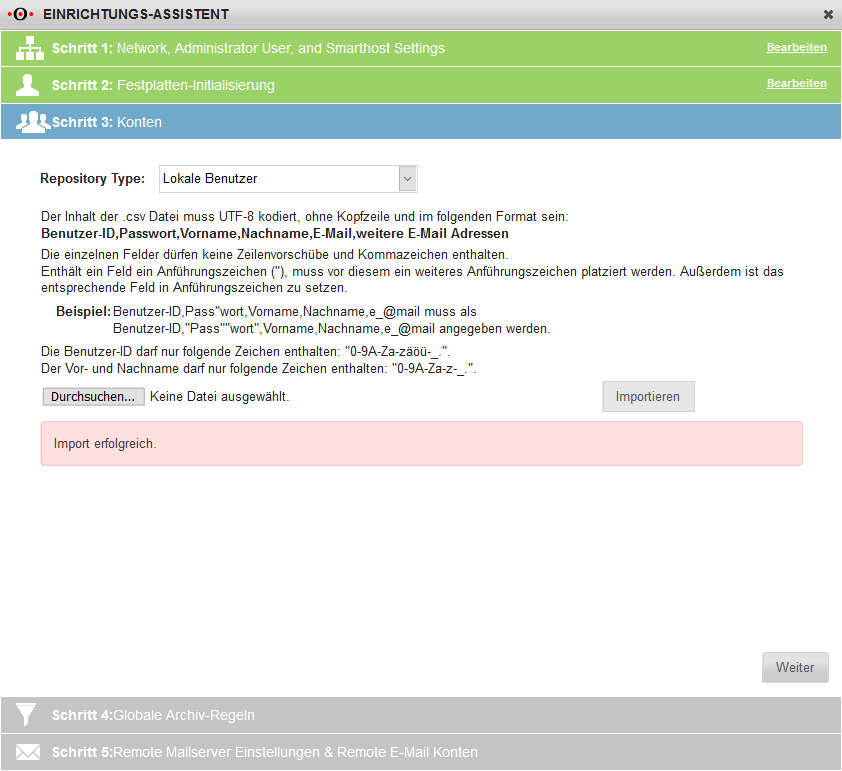
| Local users If no authentication server is operated, the users can also be stored locally in a list. For this purpose, there is the possibility to import a list in CSV format via the button. The content of the *.csv file must have the following format: userid,password,firstname,lastname,email,optionalemail |
 | ||||||||||||||||||||||||||||||||||||||||||||||||||||||
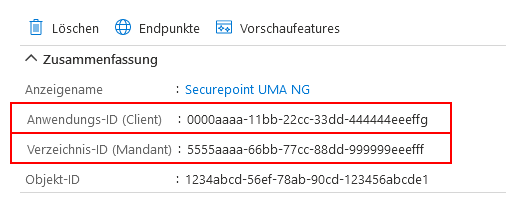
| Azure AD | 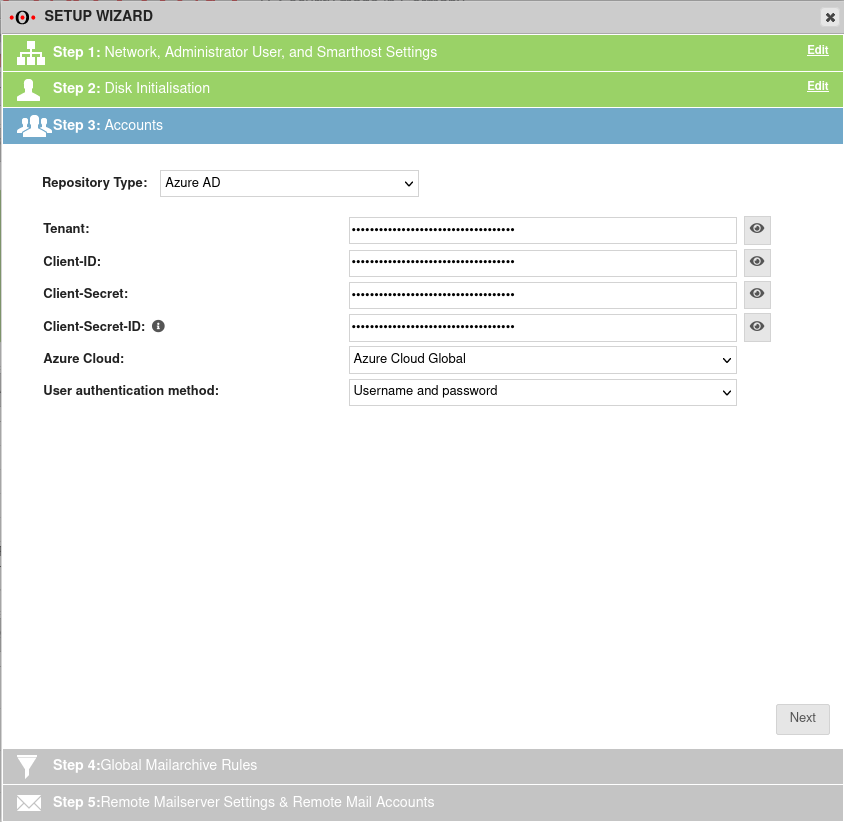 | ||||||||||||||||||||||||||||||||||||||||||||||||||||||
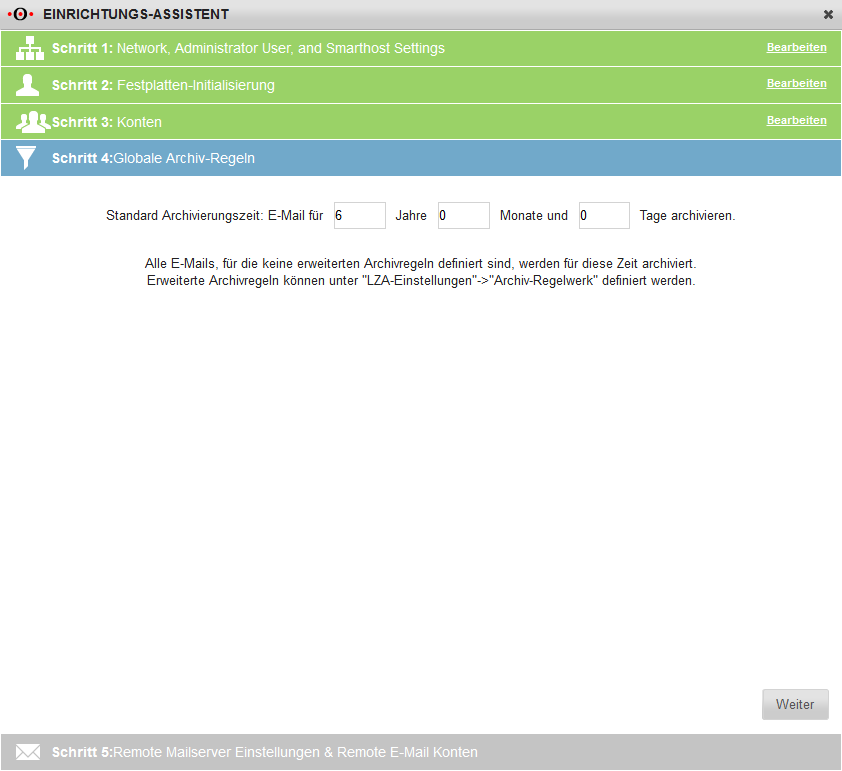
| Step 4 | Archive rules define the duration of archiving. The global rule applies if no other rule takes effect. The default is 6 years Continue with button |
 | |||||||||||||||||||||||||||||||||||||||||||||||||||||
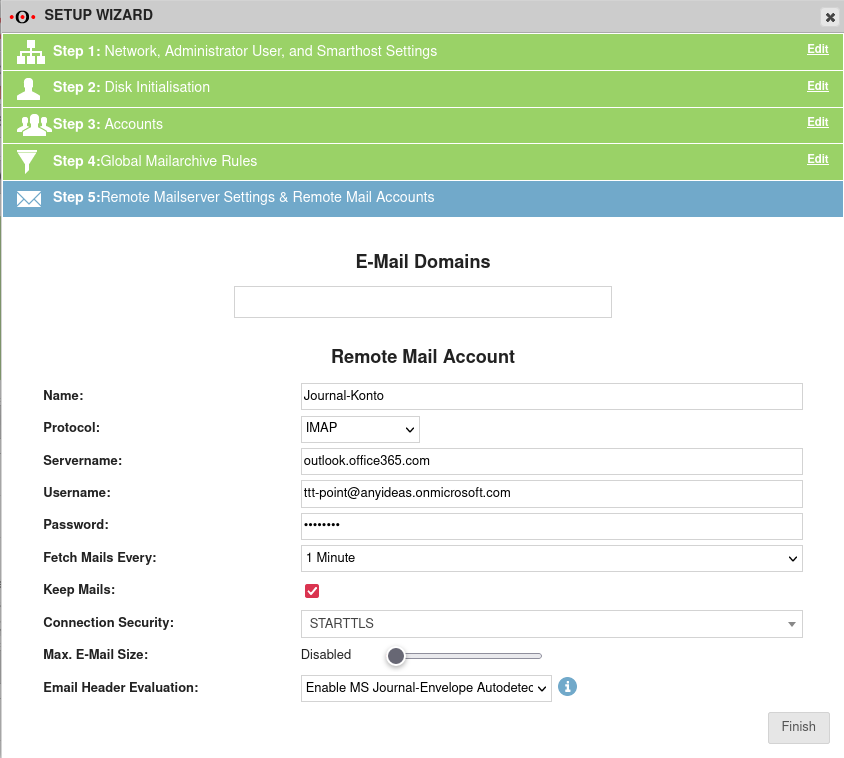
| Step 5 |
Remote email accounts receive all journal emails from a mail server. Protocol: POP3 / IMAP
|
 | |||||||||||||||||||||||||||||||||||||||||||||||||||||
|
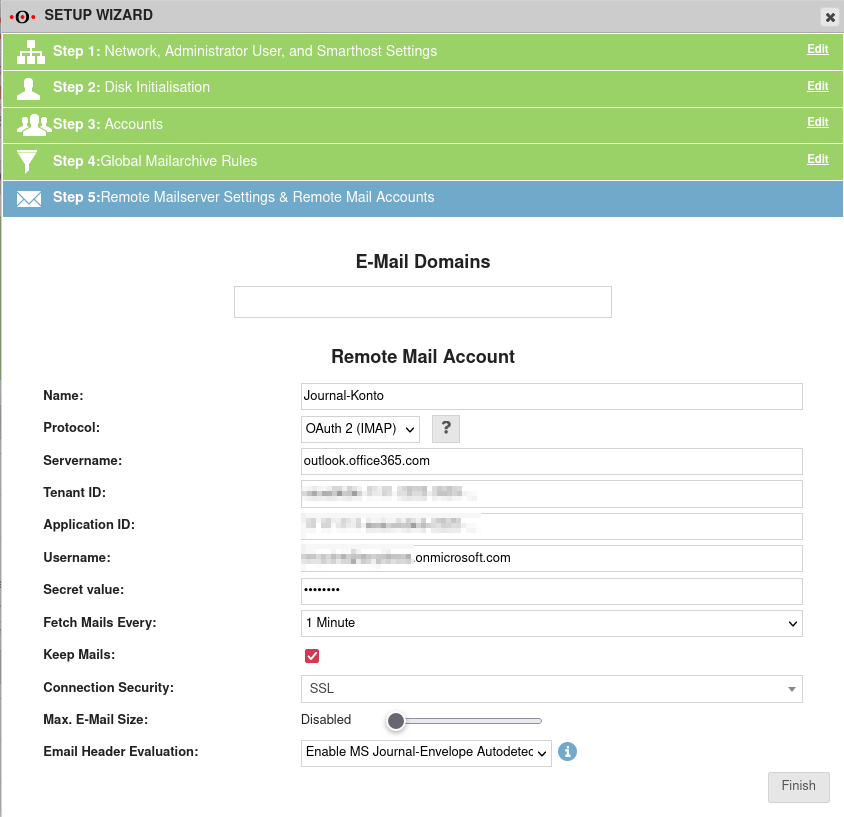
Protocol: OAuth (IMAP) New as of UMA NG v3.3 Requirement: Configured apps in Azure with OAuth (→Wiki)
|
 | ||||||||||||||||||||||||||||||||||||||||||||||||||||||
Setup Wizard | |||||||||||||||||||||||||||||||||||||||||||||||||||||||
Backups konfigurieren
Backups sind auf verschiedenen Medien möglich:
- Windows Share
- SFTP
- USB
Kein Backup - kein Mitleid...
Introduction
The UMA is an audit-proof archiving system. All archived information should be kept unchanged and be easily and permanently available to users.
When considering a holistic backup strategy, this information must be considered so that it can be made available again in the event of a failure of the UMA and the subsequent reinstallation.
The backup strategy is extended by one of the following backup options of the UMA.
Backup of the UMA configuration
Section Configuration Import/Export
Since the archive store of the UMA is encrypted and the backup files are also encrypted during creation, it is necessary to backup this key.
The container encryption information is located in the UMA configuration. Therefore it must be backed up first.
The button creates a file which can then be . A click on this button saves the UMA configuration as a file named "uma-config.db" in the folder designated for your downloads.
Only in this way it is guaranteed that this is also available in case of emergency.
Additionally, the Encryption Key, which can also be found on the Backup tab, can also be backed up.
With it, a restore is also possible without configuration data.
Backup devices
The archive system can either be backed up on a network storage or on an external storage medium. External storage media are connected to the appliance via an USB port. Both external hard drives and flash storage media (USB sticks, etc.) are supported.
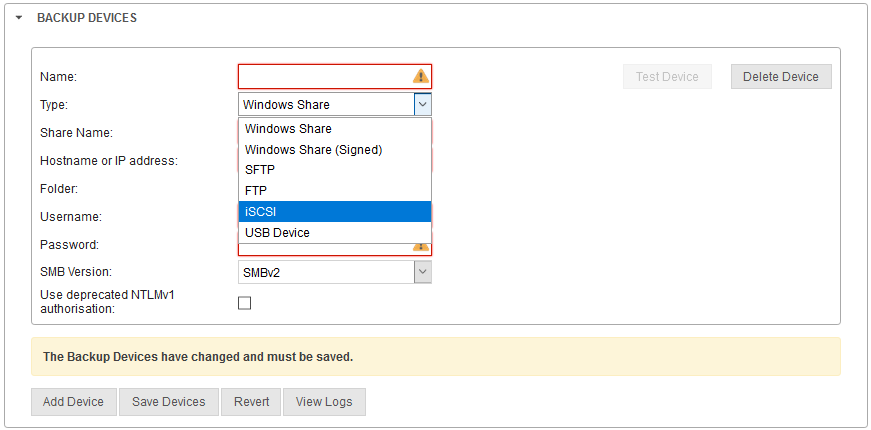
First, in the section Backup Devices the device or devices to which the backups are to be saved are defined. The following types are distinguished:
- iSCSI (Recommended)
- Windows Share
- Windows Share (signed)
- SFTP
- FTP
- USB device
iSCSI (Recommended)
Establishment
First, an iSCSI target must be set up on a NAS or server. Please follow the instructions for the corresponding storage devices or servers.
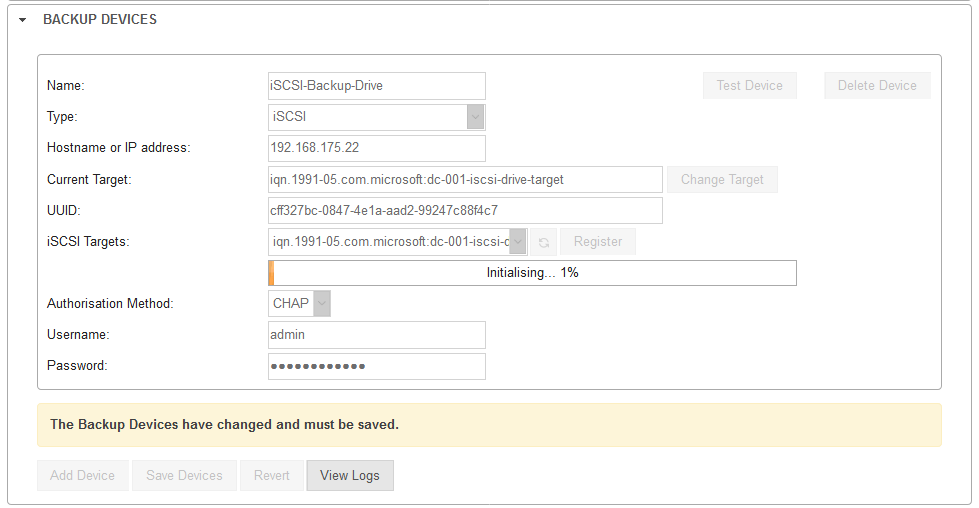
The following settings must be made in the UMA:
- Choose a meaningful name
- select backup type iSCSI
- Enter the IP address of the drive or server on which the iSCSI Target was created
- Via the button the connection is established and the information about the target is requested
- Complete the process by pressing the button
- All previous data on this drive will be overwritten
- After completing the registration, the created backup device must be saved using the button
- Finally a test must be performed using the button, which should of course be confirmed with a success message from the UMA
The iSCSI (internet Small Computer System Interface) is a very efficient network data transfer method.
The storage devices on which the data are then to be stored are called "targets". Many server systems or NAS (Network Attached Storage) can be set up as iSCSI targets.
| Caption | Value | Description |
|---|---|---|
| Name | iSCSI-Backup-Drive | Meaningful name with which a backup job can access this device |
| Type | iSCSI | Device type |
| Host name or IP address: | 192.168.192.192 | Host name or IP address of the drive or server where the iSCSI Target was created |
| Current Target: | Value is determined and entered automatically | |
| UUID: | Value is determined and entered automatically | |
| Searches for iSCSI targets under the specified host name or IP address | ||
| iSCSI Targets: | Please select an iSCSI target | Since it is possible to set up multiple iSCSI targets on a target drive, the desired target must be selected here. |
| Establishes the connection and enters the UUID | ||
| Authorization method: | CHAP | If an authentication method was configured, the access data for the target can be stored here. |
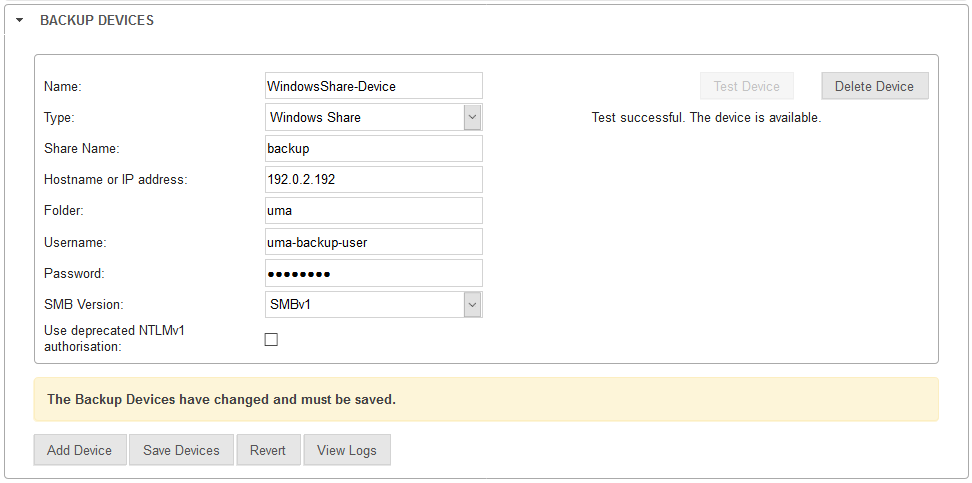
A Windows share is a shared drive or folder accessible over a network using the SMB (Server Message Block) protocol, usually on a Windows server or on a NAS.
It is important that the correct share name is entered.
| Caption | Value | Description |
|---|---|---|
| Name | WindowsShare-Device | Meaningful name with which a backup job can access this device |
| Type | Windows Share | Device type |
| Share Name | backup | The name of the shared folder |
| Host name or IP address: | 192.168.192.192 | Host name or the IP address of the device on which the share was set up |
| Folder | uma | If you want to save in a subdirectory of the share, enter the name of the corresponding folder here
|
| or |
If you save directly to the release, the field can remain empty or contain a slash /. | |
| Username | uma-backup-user | Credentials on the target server for the backup |
| Password | ••••• | |
| SMB Version | SMBv1 SMBv2 SMBv3 |
Used SMB version. |
| Use deprecated NTLMv1 authorization: | Enables the NTLMv1 authorization
|
Uses SMB signatures for the connection.
The same settings apply as for Windows Share
exception:
- No SMB version is specified
- NTLMv2 is always used for authorization
FTP
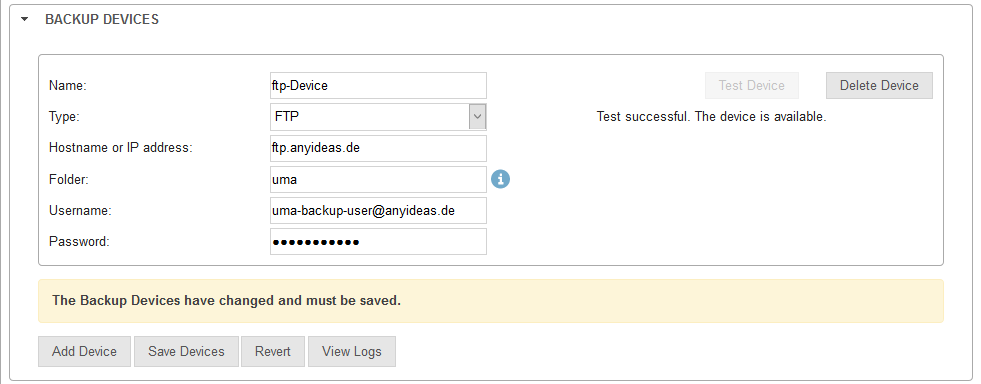
Please note for which folders FTP has been shared with the user on the server.
.
| Caption | Value | Description |
|---|---|---|
| Name | FTP-Device | Meaningful name with which a backup job can access this device |
| Type | FTP | Device type |
| Host name or IP address: | ftp.anyideas.de | Host name or IP address of the ftp server |
| Folder | /Backup/UMA/ | When sharing the entire host and a folder structure Hostname/Backup/UMA |
| or |
If only the UMA folder is shared in a Hostname/Backup/UMA folder structure, the field may remain empty or contain a / slash. | |
| Username | uma-backup-user | Credentials on the target server for the backup |
| Password | ••••• |
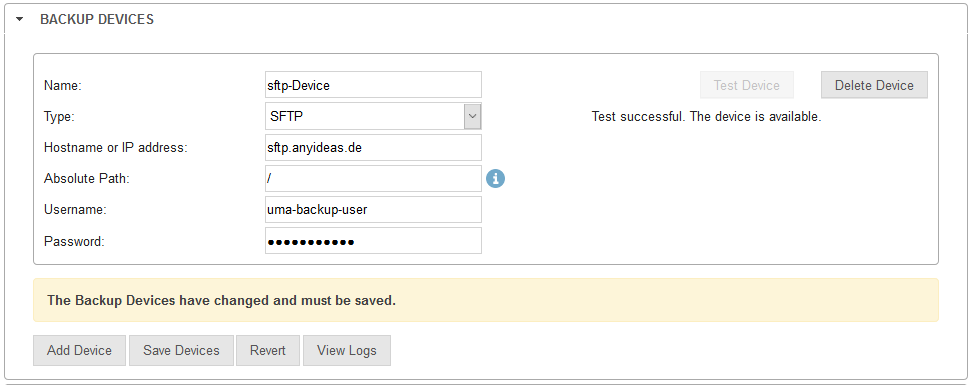
SFTP
The complete path must be entered here in any case.
| Caption | Value | Description |
|---|---|---|
| Name | SFTP-Device | Meaningful name with which a backup job can access this device |
| Type | SFTP | Device type |
| Host name or IP address: | sftp.anyideas.de | Host name or IP address of the sftp-server |
| Absolute Path: | /Backup/UMA/ | When sharing the entire host and a folder structure Hostname/Backup/UMA |
| / | When sharing only the UMA folder in a Hostname/Backup/UMA folder structure, the field must contain a / slash. The field Absolute path must not be left empty.
| |
| Username | uma-backup-user | Credentials on the target server for the backup |
| Password | ••••• |
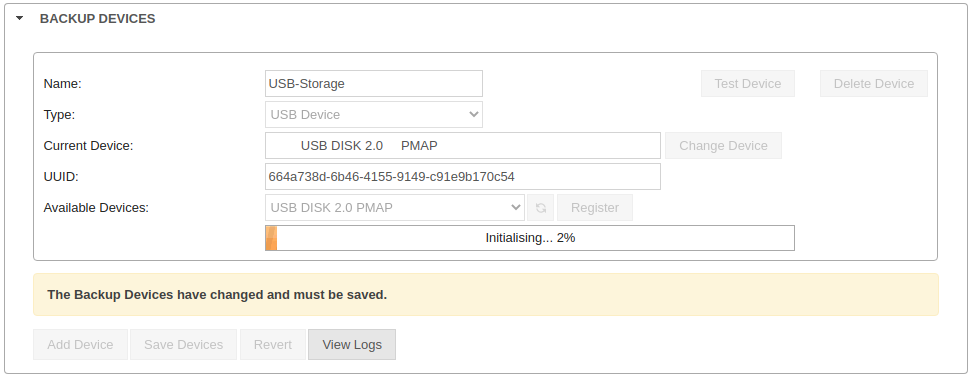
USB
A USB drive is always practical when a backup is to be created "just quickly". Both hard disks and flash memory such as USB sticks are supported here.
The following settings must be made in the UMA:
- Choose a meaningful name
- select backup type USB Device
- Via the button the connection is established and the information about the target is requested
- Complete the process by pressing the button
- After completing the registration, the created backup device must be saved using the button
- Finally a test should be performed using the button, which should of course be confirmed with a success message from the UMA
| Caption | Value | Description |
|---|---|---|
| Name | USB Backup Device | Meaningful name with which a backup job can access this device |
| Type | USB device | Device type |
| Current device | Value is determined and entered automatically | |
| UUID: | Value is determined and entered automatically | |
| Triggers a search of the connected USB devices | ||
| Available devices: | Please select an USB device | If several USB devices are connected, the desired device can be selected |
| Establishes the connection and enters the UUID | ||
Test device
After saving the created backup device, the connection to this device must be tested. To do so, press the button, which will trigger a success message after a short time.
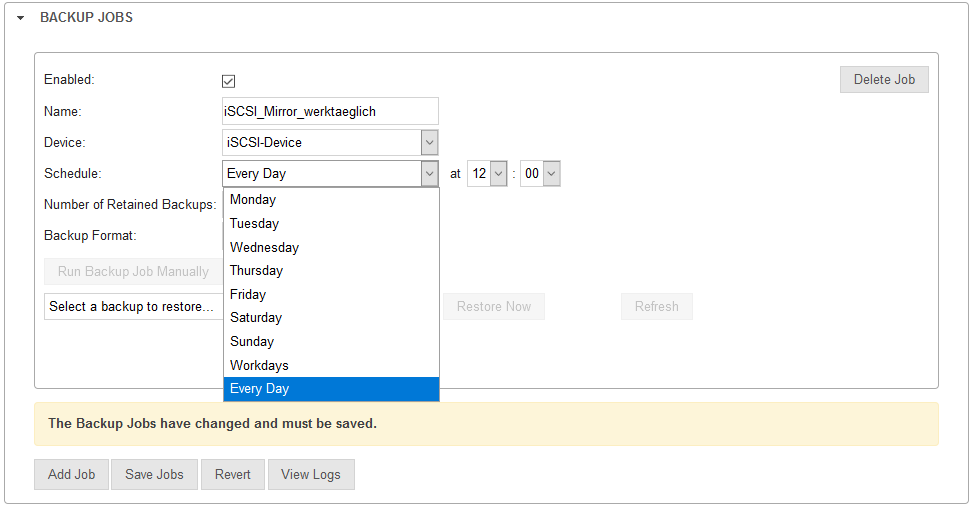
Backup Jobs
A backup job controls when, on which device and with which backup format a backup should be created. Furthermore, it is defined here how many backups are to be kept for the restore process.
First, the job is given a name and a device is selected on which the backups are to be stored.
Schedule
If a backup is performed, a snapshot of the archive is created first.
These include, among others:
- Dovecot:
This checks the user name and email address, the filter rules and initiates the indexing of incoming emails- LTA-Push:
This service takes care of the transport from the LTA folders to the XML long-term archive- LTA service:
Converts the emails into XML format, creates a "hash tree" and retrieves the qualified timestamp.
This is fetched daily from 22:00 on.
Furthermore, the backup can be performed every working day (Monday - Friday) or every day.
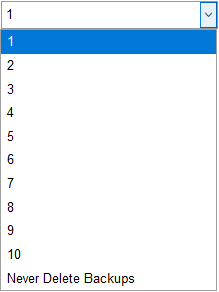
Number of retained Backups
Besides the creation of a single backup, it is also possible to keep several of different days. You can choose between the last one (1) and the ten last ones (10).
It is also possible to keep all backups, but this is only useful when using the Time Machine backup format.
For the format Mirror there is always only one backup.
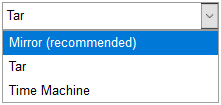
Backup Format
To be selected here:
| Caption | Description |
|---|---|
Mirror (recommended)Mirror (recommended)
|
Creates an incremental backup using rsync. This method is particularly stable and tolerant of disconnections. Requires an encrypted drive and can therefore only be used with the backup devices iSCSI and USB
|
Tar Tar
|
With this archive format a complete backup file is always created |
Time Machine Time Machine
|
An incremental format that saves only the changes after an initial full backup. You can select any point in time when restoring. Requires an encrypted drive and can therefore only be used with the backup devices iSCSI and USB
|
Create Backup
With the button of the same name the can be started at any time
Checking the backup
If the first backup was created, it must be ensured that it can be restored. This can be done with the button .
A specific backup can be selected depending on the number of backups held: Choose a backup to restore
Desaster Recovery
To ensure that the backup can also be restored on newly installed hardware, a disaster recovery test is always included in a full backup.
For example, a UMA can be installed on a virtual machine. The previously backed up UMA configuration file is then imported on this virtual machine. Using the installation wizard or under System Settings / Archive Storage the mounted archive hard disk is initialized and then the backup is restored via .
Once the backup is successful, it can be assumed that it works.
Restore Backup
Since the backup jobs have different formats and/or different locations, the function is inserted with the individual jobs.
A backup must be selected beforehand: Select a backup to restore
The will update the list of backups and a click on will start the restore.
Delete Backup
To be able to delete a backup that is no longer needed, under Backup Jobs at select the backup to be deleted.
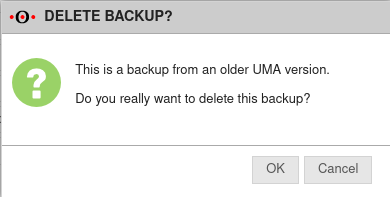
If the button is clicked without a backup selected, a pop-up message will appear.
This serves to query whether this backup should really be deleted.
The deletion process may take some time.
Final information
Contained are in an archive backup
- all emails
- Email attachments
- Documents
- and backup information (e.g. the encryption key)
Not included are
- Index databases
These must be recreated again.
This usually happens when the user wants to access his documents via the UMA user interface for the first time after restoring a backup.
The first login will then take a little longer than usual, because the index database for this user has to be created again first.
