Jump to:navigation, search
Wiki


Configuring an IPSec VPN connection with a Sophos firewall as the remote peer
New article: 01.2023
notempty
This article refers to a Resellerpreview
-
De.png
En.png
Fr.png

Preliminary note

  • This best practice uses the software versions
    • Securepoint UTM: v12.2.3.1
      Version 12.2.5.1 or higher should be used
        
    • Sophos: SFOS v19.0.0 GA-Build317
  • Setting options may change, be renamed or moved in future software versions.

This should not restrict the basic functionality

  • Supported VPN types:
    • IPSec with IKEv1
    • IPSec with IKEv2

  • SSL / OpenVPN is not supported:
    • Sophos uses proprietary configuration files (.apc instead of .ovpn)
    • There are only a few configuration options


The following network situations were tested:

  • Sophos (Public, fixed IP) <-> UTM (Public, fixed IP)
  • Sophos (Public, fixed IP) <-> UTM (NAT without port forwarding)
  • Sophos (Public, fixed IP) <-> UTM (NAT with port forwarding)
  • Sophos (NAT without port forwarding) <-> UTM (Public, fixed IP)
  • Sophos (NAT with port forwarding) <-> UTM (NAT without port forwarding)

Additional routers

If the Securepoint UTM or Sophos Firewall is also behind another router (e.g. a Fritzbox that provides Internet access), the following ports must be forwarded there:

  • No NAT on either side: Port 500/UDP (ISAKMP)
  • NAT on one side: Port 500/UDP + 4500/UDP (NAT-T)


Configuration on the Securepoint UTM

The connection setup on the UTM is done as described in the Wiki article IPSec Site-to-Site.
The following parameters must be considered:

Assistant

Securepoint UTM IPSec assistant: → VPN →IPSecTab Connections Button Add IPSec connection
Step 2

Log view Recommended setting
IKE protocol: IKEv2
(For unsolvable problems, use IKEv1)

Phase 1

Tab General

Start behavior: Outgoing / Incoming Incoming, on the side where the device is most "directly" connected to the Internet.
Ranking:
  1. Public, fixed IP
  2. Public, dynamic IP
  3. Private IP behind NAT router (Fritzbox)
  4. Sophos startup behavior in IKEv1 mode cannot be adjusted
    It tries to establish the connection itself, but also accepts connections
DPD On Active
Encryption: Recommended values:
  • AES256 (strongest encryption)
  • AES192
    or
  • AES128
  • The length of the encryption key affects the performance of the connection
Authentication: Recommended values:
  • SHA2_512
  • SHA2_384
  • SHA2_256
Diffie-Hellman Group: ecp521, ecp384, ecp256, modp8192, modp6144, modp4096
  • We recommend ecp521
  • Strict On Active
    IKE Lifetime: Child_SA Lifetime ≦ IKE_SA Lifetime < 8 Hours
    Reason: On Sophos, the Child_SA Lifetime must be less than or equal to the IKE_SA Lifetime
    Rekeying unlimited

    Phase 2

    Encryption: AES256, AES198, AES128
    Authentication: SHA2_512, SHA2_384, SHA2_512
    Diffie-Hellman Group: ecp512, ecp384, ecp256, modp8192, modp6144, modp4096
  • We recommend ecp521
  • IKE_SA Lifetime: Child_SA Lifetime ≦ IKE_SA Lifetime < 8 Hours
    Reason: On Sophos, the Child_SA Lifetime must be less than or equal to the IKE_SA Lifetime
    Reboot after abort: If necessary: On Active (Only on the outgoing side)
    Group subnet combinations: Option is not supported by Sophos or is not available
  • If this option is enabled on the Securepoint UTM, only for the first subnet combination an SA is created and as a result a connection is established
  • Configuration on the Sophos Firewall

    Creating an IPsec profile

    Create an IPsec profile:

    • Login to the Sophos administration interface (Port 4444).
    • Menu: Configure / Site-to-Site VPN
    • IPsec tab
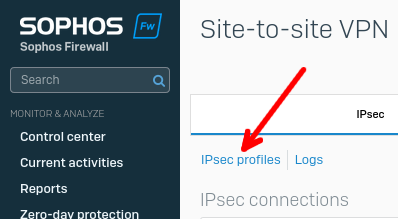
    • Submenu (link): IPsec profiles

    The profile is used to determine the IKE protocol version (IKEv2/IKEv1), the DPD settings, and mainly to define encryption algorithms.

    IPSec SP-Sophos 1-en.png
    Fig.1
    IPSec SP-Sophos 2-en.png
    Fig.2
    In the IPsec profiles tab, create a profile with the Add IPSec SP-Sophos 2b-en.png
    Fig.3
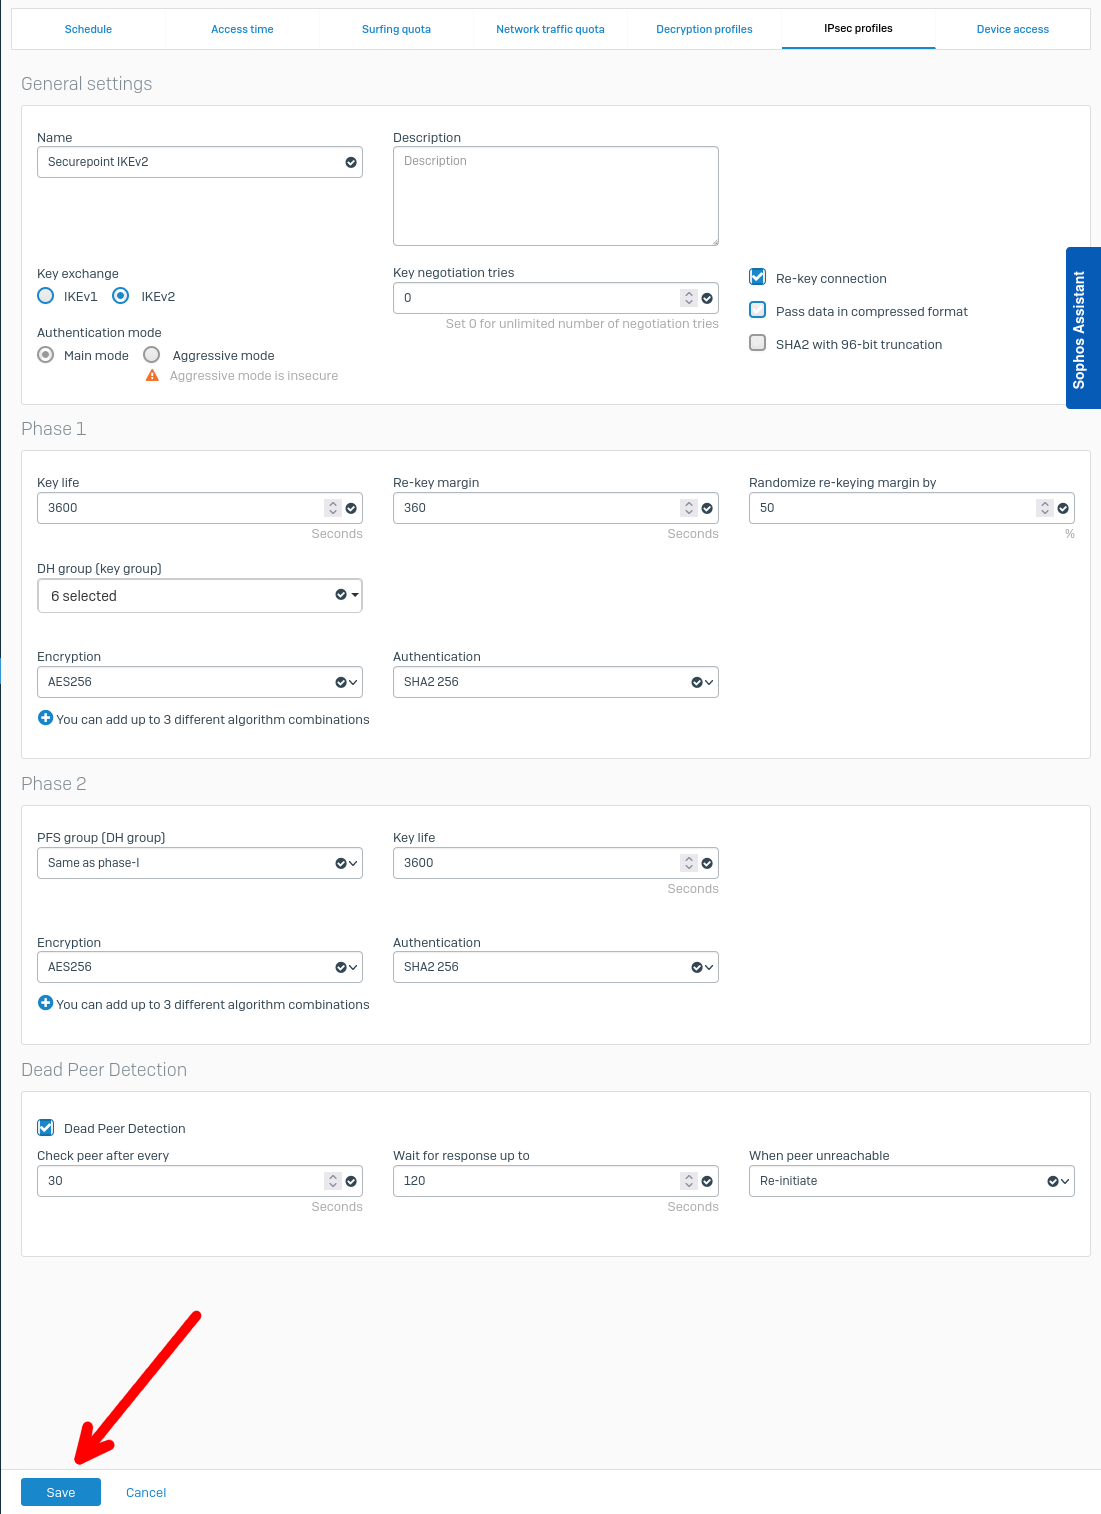
    General settings
    Name
    Securepoint IKEv2
    Meaningful name under which the IPsec profile is stored
  • Entry required
  • IPSec SP-Sophos 3-en.png
    Fig.4
    Description
       
    Can be optionally specified for each IPsec profile
    Key exchange
    IKEv2
    IKE protocol version
    (Sophos startup behavior cannot be adjusted for IKEv1.)
    Authentication method
    Main mode
    The Securepoint UTM supports as authentication method (also exchange mode) for security reasons exclusively the main mode / Main-Mode and not the Aggressive Mode.
    Key negotiation attempts
    0
    Maximum number of attempts to establish the connection. The value 0 allows an unlimited number of attempts at negotiation.

    Phase 1
    Key lifetime
    3600
    Time in seconds until a new IKE SA is negotiated.
    Corresponds to the value 1 hour of IKE Lifetime in the IKE tab of Phase 1 in the UTM.
  • The Sophos default value must be adjusted
  • DH group (key group)
    ecp521, ecp384, ecp256, modp8192, modp6144, modp4096
    Defining the IKE Diffie-Hellman Group for IKEv2 Phase 1
    Encryption
    AES256
    Setting the encryption standard for IKEv2 Phase 1
    Authentication
    SHA2_256
    Setting the authentication standard for IKEv2 Phase 1

    Phase 2
    PFS group (DH group)
    Same as phase 1
    Defining the IKE Diffie-Hellman Group for IKEv2 Phase 2
  • The Sophos default value must be adjusted
  • Key lifetime
    3600
    Zeit, bis eine neue IKE CHILD SA ausgehandelt wird.
    Entspricht dem Wert 1 Stunde der Schlüssel-Lebensdauer im Reiter Allgemein der Phase 2 in der UTM ?
    Encryption
    AES256
    Setting the encryption standard for IKEv2 Phase 2
    Authentication
    SHA2_256
    Setting the authentication standard for IKEv2 Phase 2
    Dead Peer Detection (DPD)

    Checks at a set interval whether the tunnel still exists.
    If the tunnel was terminated unexpectedly, it will be re-initiated.

    Peer check all
    30
    Time in seconds until next check
    Wait for response up to
    120
    Time until the IPSec tunnel is treated as unreachable after an incorrect check
    If peer unreachable
    Reinitiate
    • Disconnect when the Securepoint UTM initiates the connection.
    • Reinitiate when the Sophos Firewall initiates the connection.
    • The Sophos default value may need to be adjusted
    Clicking on the button labeled this way the IPSec profile Saves

    Creating the IPsec connection

    • Menu: Configure / Site-to-Site VPN
    • IPsec tab
    • Section IPsec connections
    • Button Add
    IPSec SP-Sophos 4-en.png
    Fig.5
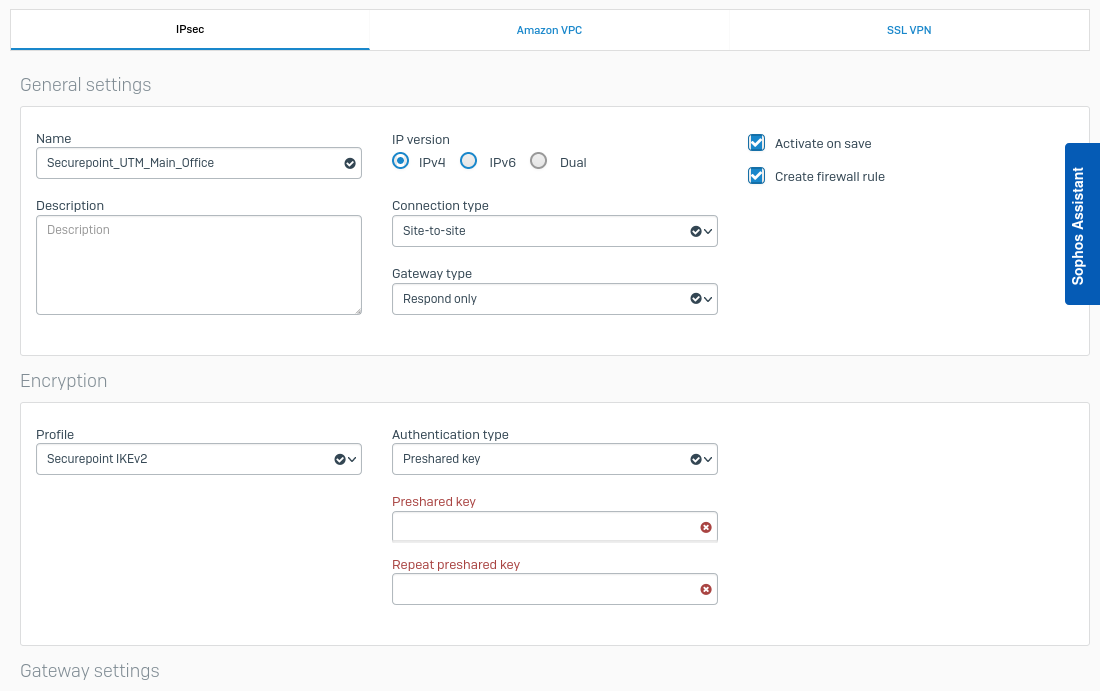
    General settings
    Name
    Securepoint_UTM_Main_Office
    Name under which the IPsec connection is stored
  • Entry required
  • IPSec SP-Sophos 5-en.png
    Fig.6
    Description
       
    Can optionally be specified for each IPsec connection
    IP version
    IPv4 / IPv6 / Dual
    IP version over which the tunnel is to be established (IPv4/Ipv6).
    Connection type
    Site-to-site
    Site-to-site connection
    Gateway type
    Reply only
    • Responses only (≙ Incoming):
      Sophos Firewall waits for an SPSec connection and does not initiate the tunnel connection
    • Establish connection (≙ Outgoing):
      The Sophos Firewall initiates the tunnel connection
    • The Sophos default value may need to be adjusted
    Enable when saving Starts the connection according to Gateway type when saving
  • The Sophos default value should be adjusted
  • Create firewall rule Automatic creation of required port filter rules

    Encryption
    Profile
    Securepoint IKEv2
    Select the previously created IPsec profile
  • The Sophos default value must be adjusted
  • Authentication method
    Distributed key
    Possible options:
    • Distributed key (=Pre Shared Key, PSK).
    • Digital certificate
    • RSA key

    Gateway settings
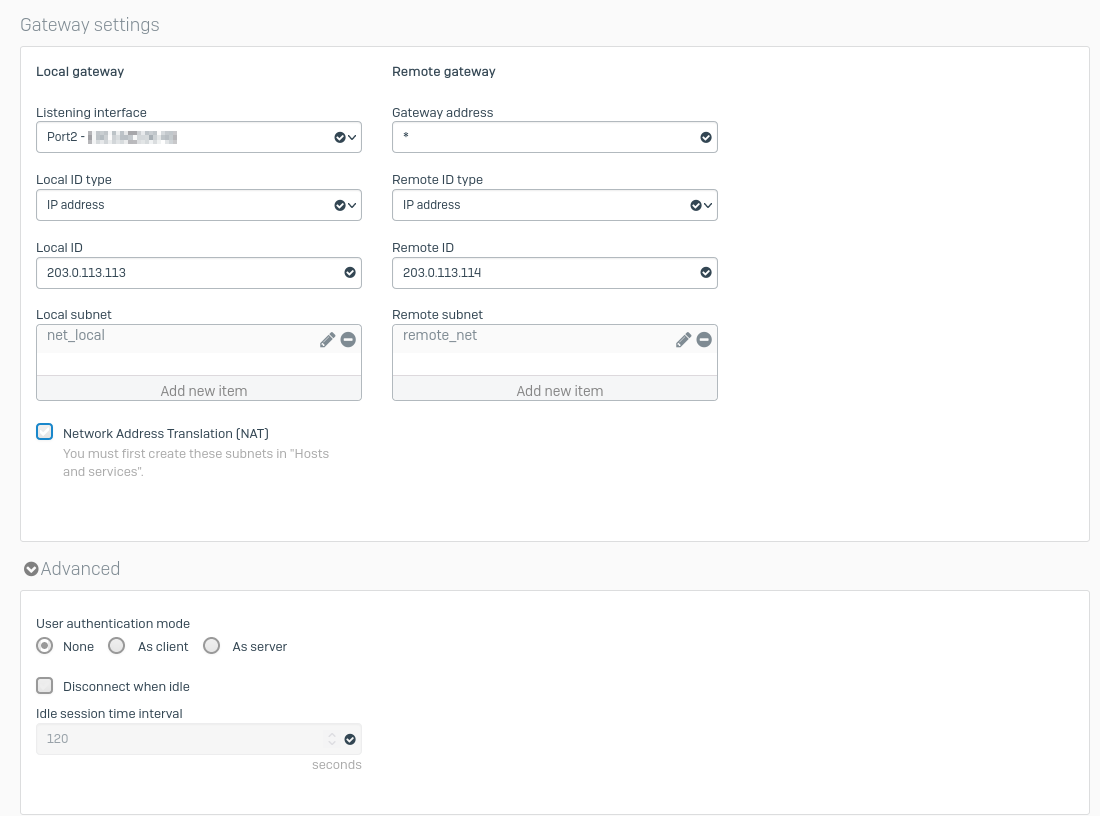
    Local gateway
    Listening interface
       
    Interface via which the tunnel is to be established
  • Entry required
  • IPSec SP-Sophos 6-en.png
    Fig.7
    Local ID type
    Select local ID
    Freely selectable (can be a DNS name, an IP address or an email address).
    Local ID
       
    Freely selectable
  • This value must be entered on the Securepoint UTM in the IPSec assistant in Step 4 - Remote Gateway as Remote Gateway ID
  • Local subnet
    Add new element
    Local network on the Sophos firewall to be included in the tunnel.

    If the network element does not exist in the list, it can be created in this step

    Remote gateway
    Gateway address
    *
    Address of the remote gateway (≙Securepoint UTM)
  • The value * should be set if the Sophos Firewall does not initiate the connection and the UTM does not have a fixed IP address with which to make the requests.
  • Remote ID type
    Select remote ID
    Freely selectable (can be a DNS name, an IP address or an email address).
    Remote ID
       
  • This value must be entered on the Securepoint UTM in the IPSec assistant in Step 3 - Local as Local Gateway ID
  • Remote subnet

    Add new element
    Remote network on the Securepoint UTM that is to be accessible via the tunnel.

    If the network element does not exist in the list, it can be created in this step

    Extended
    User authentication
    None
    Leave default unchanged at None
    Disconnect in idle mode Do not activate

    Create connection with the button Save

    Create network elements

    For this purpose, a new element can be created using the Add option in the Local subnet and Remote subnet dialogs while creating the IPSec connection. IPSec SP-Sophos 7-en.png
    Fig.8 - after clicking in the respective field
    Create remote network element
    The values for the Remote subnet (i.e. the network of the Securepoint UTM which should be reachable via the tunnel)
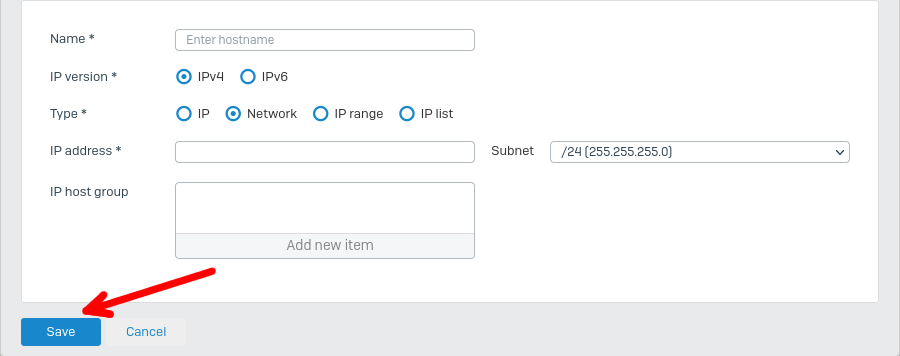
    Name Enter hostname Name of the network element IPSec SP-Sophos 8-en.png
    Fig.9
    IP version IPv4 IPv6 Type of IP addresses (IPv4/IPv6) in the remote network (here: the network of the Securepoint UTM).
    Type Network The type network must be selected.
    IP address     Network address of the remote UTM network
    Subnet /24 (255.255.255.0) Subnet mask of the remote UTM network

    Save network element by clicking on the Save

    Troubleshooting

    IPsec Log

    Fig.10

    Viewable under the Control Center menu item in the Monitor & Analyze section, link Log view at the top right of the Sophos Admin Panel.

    Fig.11
    • After selecting this option a popup window opens
    • Select the log category Firewall in the dropdown menu here.


    Fig.12
    • Now it is possible to select the log category VPN in the drop-down menu.


    Tcpdump

    TCPdump, access via SSH is required.
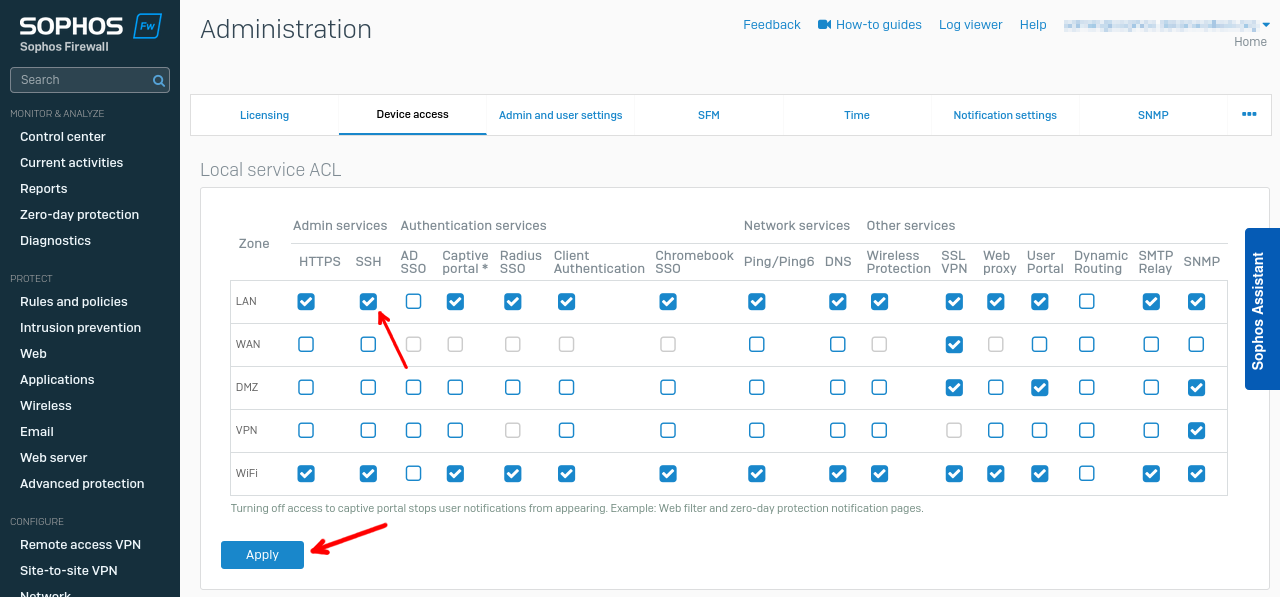
    Enable on the Sophos Firewall:
    • Menu Administration / Appliance Access / Access Control List (ZSL) for local services
    • Enable the Admin Services / SSH column for LAN or WAN SSH on WAN should only be enabled temporarily when needed.
    • Apply the setting with the so called button
    IPSec SP-Sophos 11-en.png
    Fig.13
    • Connect to the Sophos Firewall via SSH (port 22) using the Sophos admin credentials.
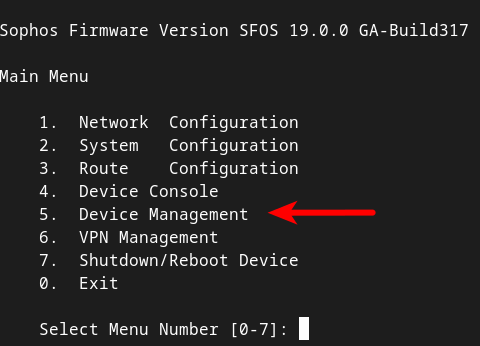
    • In the Main Menu select option 5. Device Management
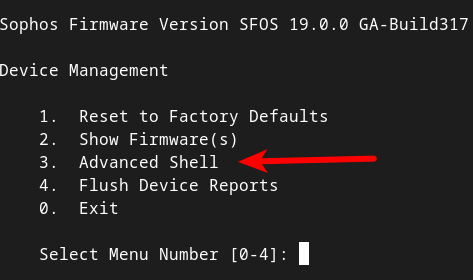
    • In the Device Managment menu, select 3. Advanced Shell option.
    IPSec SP-Sophos 13.png
    Fig.15
    IPSec SP-Sophos 12.png
    Fig.14
    • Commands like tcpdump, ping or ip can now be executed
    IPSec SP-Sophos 14.png
    Fig.16