- New function to secure the ports in use: Connection Rate Limit
- Importing existing configurations in the wizard (v12.6.0)
- The port end point in set-up step 2 can be set manually (v12.6.0)
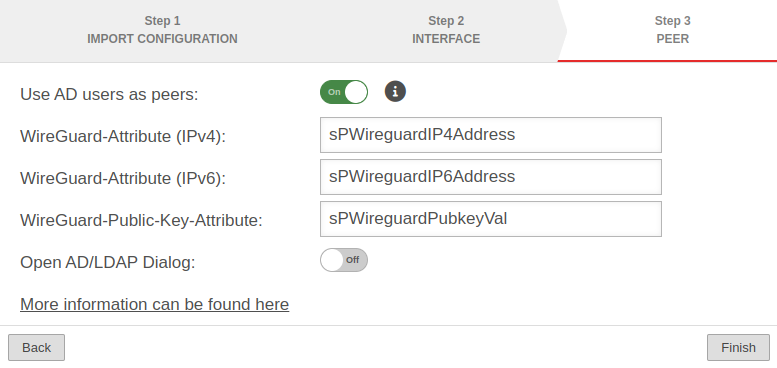
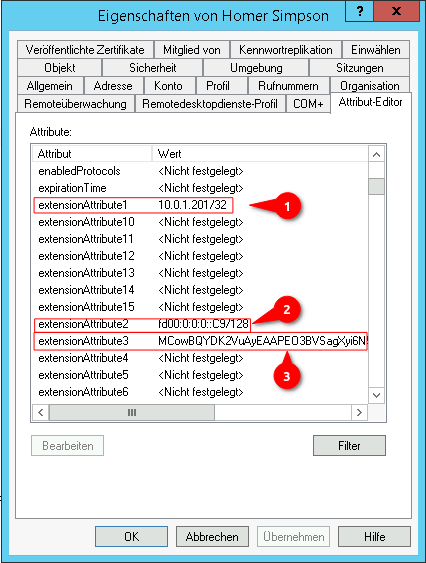
- AD user selectable as peer (v12.6.0)
- Updated to Redesign of the webinterface (v12.6.0)
- New function to secure the ports in use: Connection Rate Limit
- Updated to Redesign of the webinterface (v12.6.0)
- Importing existing configurations in the wizards for Location A and Location B (v12.6.0)
- The port end point in set-up step 2 can be set manually for Location A and Location B (v12.6.0)
- AD user selectable as peer for Location A and Location B (v12.6.0)
- Note added that NetBIOS must be activated in the configuration for a Fritz!Box (v12.6.0)
notempty
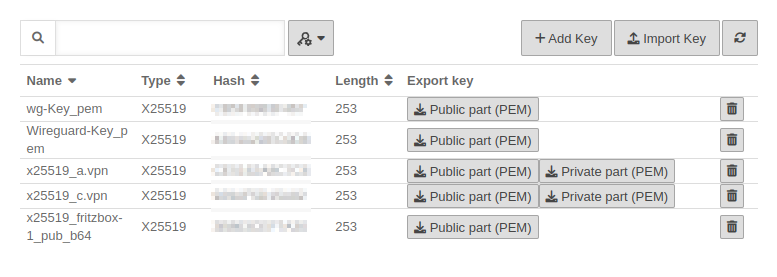
Key management
When creating a WireGuard connection, there are several options for generating and managing the necessary key values. Each of these options has its advantages and disadvantages.
For two options, the required private or public key value is created directly in the WireGuard connection setup wizard.
The third option requires existing keys of type x25519.
Create WireGuard connection
- A WireGuard connection provides access for multiple peers if necessary
- Each connection is secured with its own key pair
- All peers of a connection use its public key
- Each peer needs its own key pair for authentication
In addition, each peer should be secured with a strong PSK.
Given may the following configuration:
| Location A | location B | Transfer network | |
|---|---|---|---|
| FQDN | a.vpn.anyideas.de | b.vpn.anyideas.de | – |
| Local network IPv4 | 10.1.0.0/16 | 10.2.0.0/16 | 10.0.1.0/24 |
| Local tunnel IPv4 | 10.0.1.1/24 | 10.0.1.2/24 | – |
| Local network IPv6 | fd00:a:0:0::0/64 | fd00:b:0:0::0/64 | fd00:0:0:0::0/64 |
| Local tunnel IPv6 | fd00:0:0:0::1/64 | fd00:0:0:0::2/64 | – |
| UTM | Roadwarrior | Transfer network | |
|---|---|---|---|
| FQDN | a.vpn.anyideas.de | – | – |
| Local network IPv4 | 10.1.0.0/16 | – | 10.0.1.0/24 |
| Local tunnel IPv4 | 10.0.1.1/24 | 10.0.1.201/24 | – |
| Local network IPv6 | fd00:a:0:0::0/64 | – | fd00:0:0:0::0/64 |
| Local tunnel IPv6 | fd00:0:0:0::1/64 | fd00:0:0:0::C9/64 | – |
Configuration at location A
|
Start assistant with the button Step 1 - Import configurationLocation A Step 1 - Import configuration
| |||
| Caption | Value | Description | UTMuser@firewall.name.fqdnVPNWireGuard 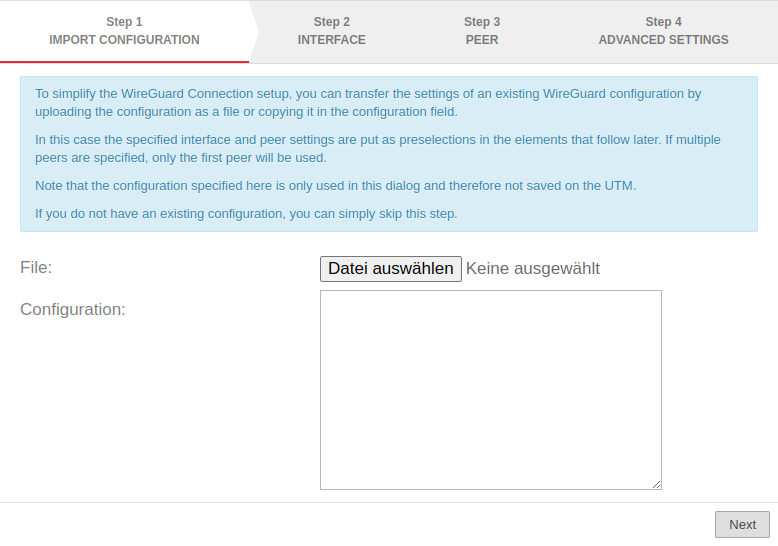 WireGuard assistant - Step 1 WireGuard assistant - Step 1
|
|---|---|---|---|
| file: notempty new as of v12.6.0 |
If a WireGuard server configuration already exists, the server configuration can be uploaded as a file. The corresponding settings are automatically entered in the respective elements in the following steps. | ||
| Configuration: notempty new as of v12.6.0 |
If a WireGuard server configuration already exists, the server configuration can be copied into this configuration field. The corresponding settings are automatically entered in the respective elements in the following steps. [Interface] Address = 10.0.0.1/24 Address = C0FF::EEEE/64 ListenPort = 51824 PrivateKey = interfacePrivateKeyaaaaaaaaaaaaaaaaaaaaaaaa= [Peer] AllowedIPs = 10.0.0.2/32, 10.0.0.3/32 AllowedIPs = 10.0.0.4/32 Endpoint = 1.2.3.4:51825 PersistentKeepalive = 30 PresharedKey = peerPresharedKeyaaaaaaaaaaaaaaaaaaaaaaaaaaa= PublicKey = peerPublicKeyaaaaaaaaaaaaaaaaaaaaaaaaaaaaaa= | ||
Step 2 - InterfaceLocation A Step 2 - Interface
| |||
| Interface: | wg0 | Name of the interface that will be created for the connection (automatic default, cannot be changed) | 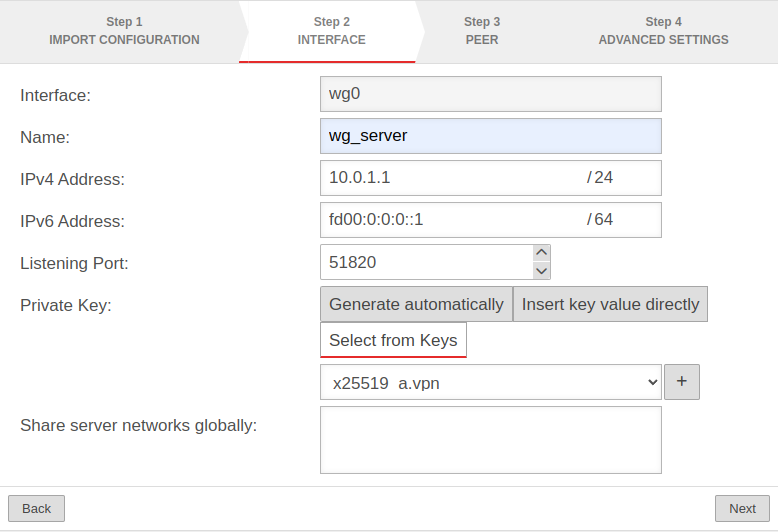 |
| Name: | wg_server | Unique name for the connection | |
| IPv4 address: | IPv4 address for the network interface of the transfer network at location A This determines the network IP of the transfer net (here: 10.0.1.1/24) | ||
| IPv6 address: | IPv6 address for the network interface of the transfer network at location A (optional) This determines the network IP of the transfer net (here: fd00:0:0:0::1/64) | ||
| Listening Port: | 51820 | Default-Port for WireGuard connections | |
| Private key: | |||
| A private key value is generated automatically. | |||
| The key value is entered directly. notempty The key value cannot be read out later for security reasons. notempty If a file was imported or the configuration entered in Step 1 - Import configuration, this option is automatically selected and the private key value is read from the configuration file and entered here.
| |||
| View Hide |
Views / hides the key value | ||
| Generate | The key value is generated | ||
| Private key in x25519 format. Only those keys that also have a private key part can be selected. | |||
| Add key | If there is no local key in x25519 format yet, this button can be used to generate one. | ||
| Share server networks globally: | Networks on the (local) server side that the WireGuard tunnels of the peers can access in principle.notempty For the actual access additional network objects and portfilter rules are needed!
| ||
Step 3 - PeerLocation A Step 3 - Peer
| |||
| Use AD users as peers: | No | When activated On, the data for Roadwarrior can be read from an AD. Here Step 3 - Peer with AD connection is described.
|
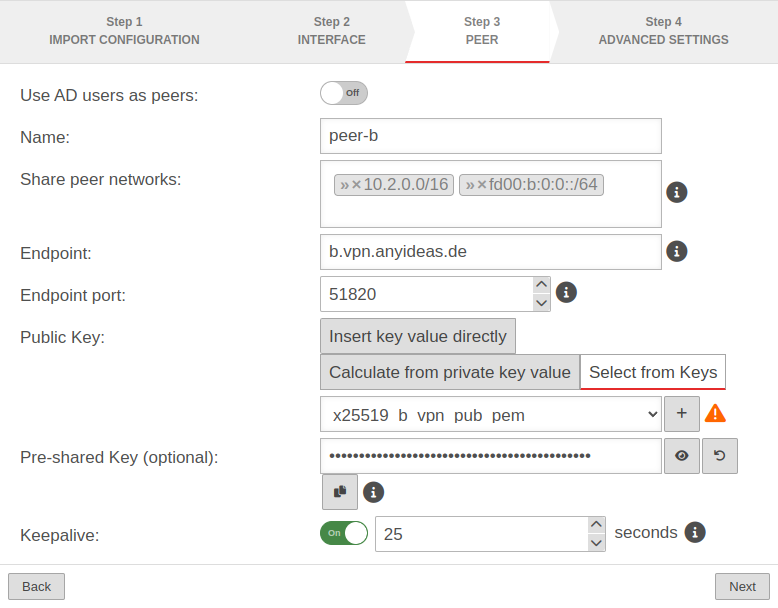 |
| Name: | peer_rw | Description of remote terminal | |
| Share peer networks: | » ✕10.2.0.0/16 » ✕fd00:b:0:0::/64 | Local network IP of the remote terminal notempty For the actual access additional network objects and portfilter rules are needed!
| |
| Endpoint: | b.vpn.anyideas.de | Public IP or within the public DNS resolvable FQDN of the remote terminal | |
| Endpoint Port: |
51820 | listening-port of the remote terminal | |
| Public key: | |||
| The key value is entered directly. notempty If a file was imported or the configuration entered in Step 1 - Import configuration, this option is automatically selected and the private key value is read from the configuration file and entered here.
| |||
| Calculates the key value from the private key value entered in Step 2 Interface' notempty The key value cannot be read out later for security reasons.
| |||
| View Hide |
Views / hides the key value | ||
| Generate | The key value is generated | ||
| Copy to clipboard | Copies the key value to the clipboard | ||
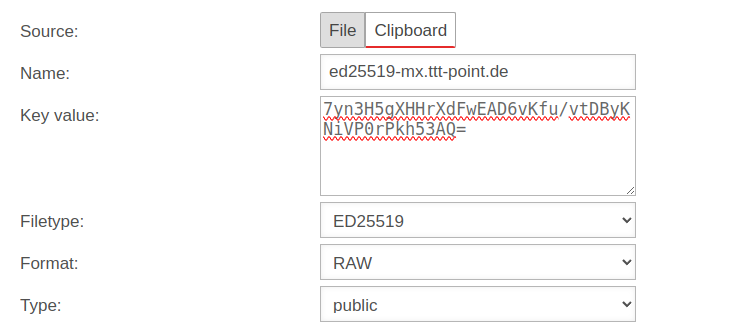
| Public key of the roadwarrior in x25519 format. Only keys that have 'no private key can be selected. Only keys for which there is not yet a connection on this interface can be selected. The PublicKey must be unique within a connection, as the routing of incoming packets is carried out via it. If the same PublicKey is to be used for a peer, e.g. for a fallback, another WireGuard connection must be created for this. | |||
| Add key | If the public key of the remote terminal is not yet known, this button can be used to open the import of the key management. Export and import of the keys is also possible via the clipboard | ||
| Pre-Shared Key (optional): | ••••••••••••••••••••••••••• | Pre-shared key for further securing the connection | |
| View Hide |
Views / hides the key value | ||
| Generate | Generates a very strong pre-shared key | ||
| Copy to clipboard | Copies the PSK to the clipboard | ||
| Keepalive: | Off | Regularly sends a signal. This keeps connections open on NAT routers. On Activation is recommended. | |
| 25 Seconds | Interval in seconds at which a signal is sent | ||
Step 4 - Advanced settingsLocation A Step 4 - Advanced settings
| |||
| Create routes to the peer's networks: | Yes | Activation On is recommended. Routes are created to the networks / hosts that were entered in step 3 under Share peer networks with the interface as gateway that was displayed in step 2. |
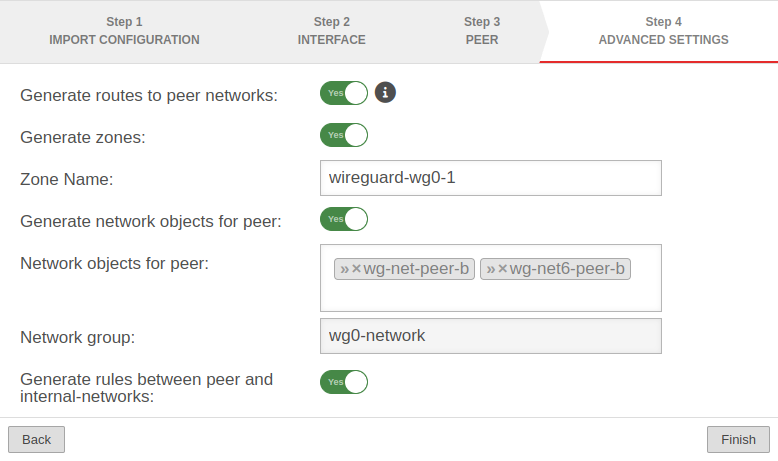 |
| Generate zones: | Yes | Generates a new zone for the WireGuard port | |
| Zone Name: | wireguard-wg0 | Name for the WireGuard connection zone | |
| Generate network objects for peer: | Yes » ✕wg-net-peer_rw» ✕wg-net6-peer_rw |
Creates Yes button when enabled for network objects (IPv4 and if necessary IPv6) of the remote terminal. Automatic suggestion can also be changed. | |
| Network group: | wg0-network | Network group of the connection is displayed | |
| Generate rules between peer and internal-networks: | No | Generates Yes autogenerated rules that make commissioning easier. notempty It is essential to replace these rules with your own rules that allow only necessary services with necessary network objects. notemptyThese custom rules must always be created with the WireGuard interface and the internal network, even if the WireGuard tunnel leads to a DMZ network.
| |
| Exits the wizard
| |||
Configuration at location B Configuration at location B
Start assistant with the button location B Step 1 - Import configurationlocation B Step 1 - Import configuration
| |||
| Caption | Value | Description | UTMuser@firewall.name.fqdnVPNWireGuard  WireGuard assistant - Step 1 WireGuard assistant - Step 1
|
|---|---|---|---|
| file: | If a WireGuard server configuration already exists, the server configuration can be uploaded as a file. The corresponding settings are automatically entered in the respective elements in the following steps. | ||
| Configuration: | If a WireGuard server configuration already exists, the server configuration can be copied into this configuration field. The corresponding settings are automatically entered in the respective elements in the following steps. [Interface] Address = 10.0.0.1/24 Address = C0FF::EEEE/64 ListenPort = 51824 PrivateKey = interfacePrivateKeyaaaaaaaaaaaaaaaaaaaaaaaa= [Peer] AllowedIPs = 10.0.0.2/32, 10.0.0.3/32 AllowedIPs = 10.0.0.4/32 Endpoint = 1.2.3.4:51825 PersistentKeepalive = 30 PresharedKey = peerPresharedKeyaaaaaaaaaaaaaaaaaaaaaaaaaaa= PublicKey = peerPublicKeyaaaaaaaaaaaaaaaaaaaaaaaaaaaaaa= | ||
location B Step 2 - Interfacelocation B Step 2 - Interface
| |||
| Interface: | wg0 | Name of the interface that will be created for the connection (automatic default, cannot be changed) | 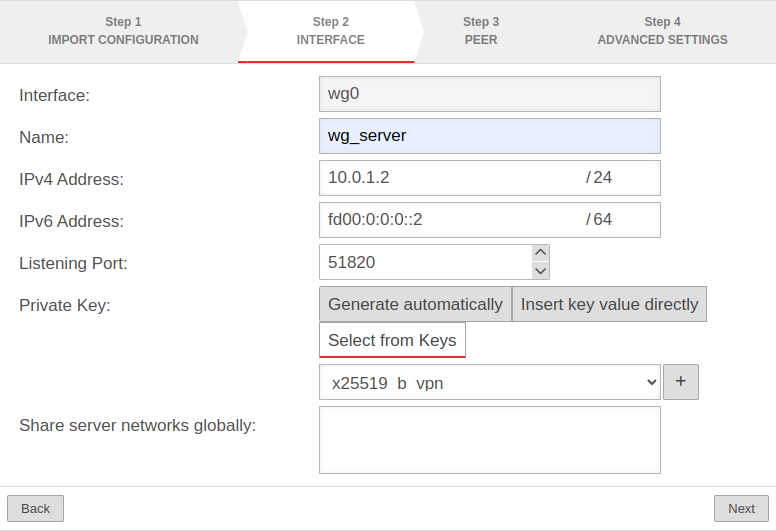 |
| Name: | wg_server | Unique name for the connection | |
| IPv4 address: | 10.0.1.2/24 | IPv4 address for the network interface of the transfer network at location B Here you have to select an IP from the network that was set at location A (here: 10.0.1.2/24) | |
| IPv6 address: | fd00:0:0:0::2/64 | IPv6 address for the network interface of the transfer network at location A (optional) Here you have to choose an IP from the network that has been defined at location A(here: fd00:0:0::2/64) | |
| Listening Port: | 51820 | Default-Port for WireGuard connections | |
| Private key: | |||
| A private key value is generated automatically. | |||
| The key value is entered directly. notempty The key value cannot be read out later for security reasons. notempty If a file was imported or the configuration entered in Step 1 - Import configuration, this option is automatically selected and the private key value is read from the configuration file and entered here.
| |||
| Views / hides the key value | |||
| Private key in x25519 format. Only those keys that also have a private key part can be selected. | |||
| If there is no local key in x25519 format yet, this button can be used to generate one. | |||
| Share server networks globally: | Networks on the (local) server side that the WireGuard tunnels of the peers can access in principle.notempty For the actual access additional network objects and portfilter rules are needed!
| ||
location B Step 3 - Peerlocation B Step 3 - Peer
| |||
| Use AD users as peers: | No | When activated On, the data for Roadwarrior can be read from an AD. | 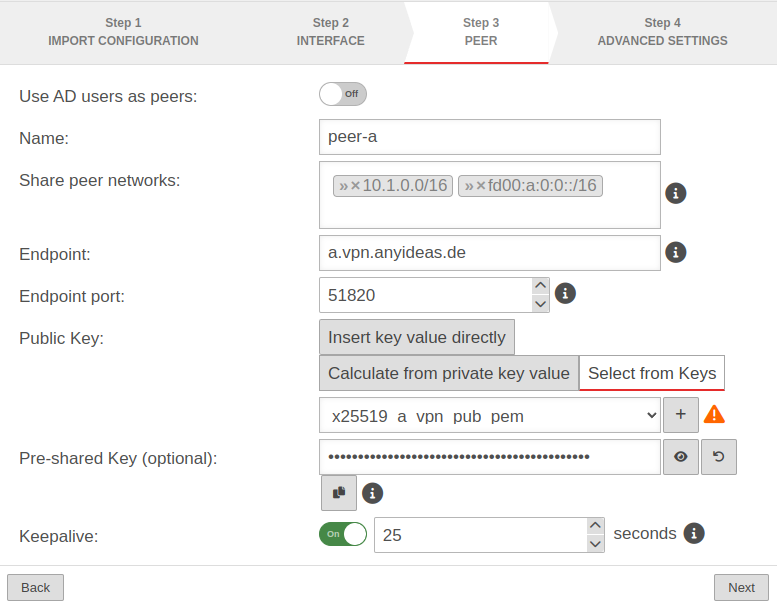 |
| Name: | peer-a | Description of remote terminal (here: Location A) | |
| Share peer networks: | » ✕10.1.0.0/16» ✕fd00:a:0:0::/64 | Local network IP of remote terminal (here: Location A) | |
| Endpoint: | a.vpn.anyideas.de | Public IP or within the public DNS resolvable FQDN of the remote terminal (here: Location A) | |
| Endpoint Port: |
51820 | Listening-port of the remote terminal (here: Location A) | |
| Public key: | |||
| The key value is entered directly. | |||
| Calculates the key value from the private key value entered in Step 2 Interface' | |||
| Views / hides the key value | |||
| Public key of the roadwarrior in x25519 format. Only keys that have 'no private key can be selected. Only keys for which there is not yet a connection on this interface can be selected. The PublicKey must be unique within a connection, as the routing of incoming packets is carried out via it. If the same PublicKey is to be used for a peer, e.g. for a fallback, another WireGuard connection must be created for this. | |||
| If the public key of the remote terminal is not yet known, this button can be used to open the import of the key management. Export and import of the keys is also possible via the clipboard | |||
| Pre-Shared Key (optional): | …R0Z0DWUs+iCDFYzpP4= | Pre-shared key for further securing the connection | |
| Generates a very strong pre-shared key | |||
| Copies the PSK to the clipboard | |||
| Keepalive: | Off | Regularly sends a signal. This keeps connections open on NAT routers. On Activation is recommended. | |
| 25 | Interval in seconds at which a signal is sent | ||
location B Step 4 - Advanced settingslocation B Step 4 - Advanced settings
| |||
| Create routes to the peer's networks: | No | Activation On is recommended. Routes are created to the networks / hosts that were entered in step 3 under Share peer networks with the interface as gateway that was displayed in step 2. |
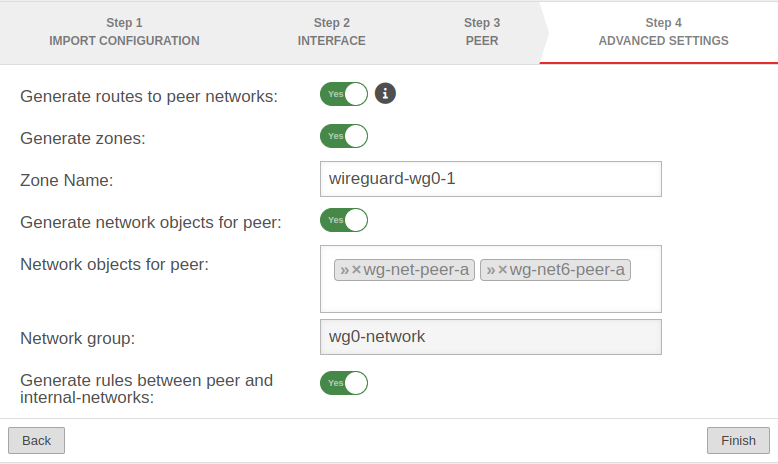 |
| Generate zones: | No | Generates a new zone for the WireGuard port | |
| Generate network objects for peer: | No » ✕net-wg-peer-a |
Creates Yes button when enabled for network objects (IPv4 and if necessary IPv6) of the remote terminal. Automatic suggestion can also be changed. | |
| Generate rules between peer and internal-networks: | No | Generates Yes autogenerated rules that make commissioning easier. notempty It is essential to replace these rules with your own rules that allow only necessary services with necessary network objects.
| |
Fritzbox as remote terminal
| |||
| The following steps are a short description of the procedure. For a more detailed description, please consult the Wiki article WireGuard S2S with a Fritz!Box. If a third-party hardware is used as remote station, the following approach is recommended:
[Interface]
notemptyPrivateKey = $PRIVATE_KEY_FRITZBOX
ListenPort = $LISTENPORT_WIREGUARD_FRITZBOX
Address = $LOCAL_IP_FRITZBOX/$NETMASK
Enabling the option Allow NetBIOS over this connection may solve problems, e.g. with SMB orTP. .
|
|||
Widget
There is a widget in the admin interface for the overview of WireGuard connections. Further information can be found in the Wiki article UTM Widget.
Connection Rate Limit
Throttling of access from certain source IPs to recurring ports
notempty
If the rate limit is set too low, unexpected effects may occur, e.g. services may be restricted.
notempty
The function can initially only be configured via the CLI
SSL-VPN accesses can be protected against aggressive scans or login attempts, for example.
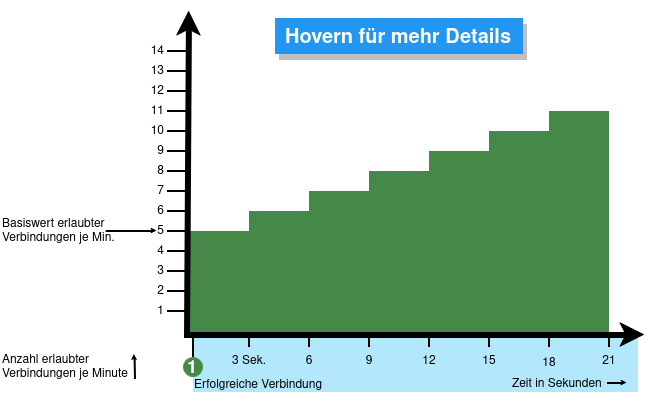
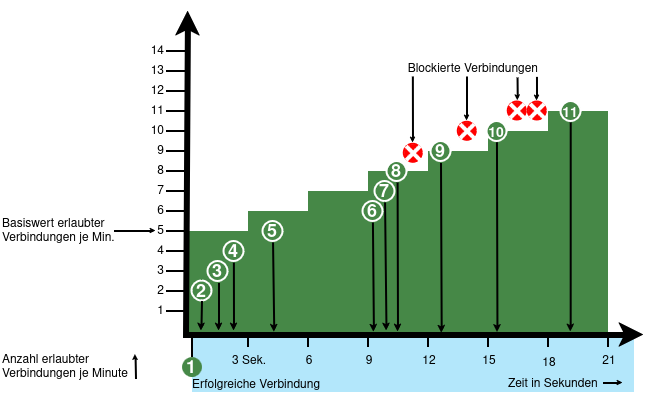
From v12.6.2, the UTM can limit the number of TCP and/or UDP connections from an external IP address to one port.
The following conditions apply:
- Only incoming connections for which a default route exists are monitored
- The connections from an IP address to a port of the UTM are counted within one minute
- When activated, 5 connections / connection attempts per minute are permitted.
The connections are then limited:- The additionally permitted connections are distributed evenly within 60 seconds of the first connection.
- With a CONNECTION_RATE_LIMIT value of 20, an additional connection is added every 3 seconds.
- 10 seconds after the first login, 3 further connections could be established (each from the same IP address to the same destination port)
- Blocking an IP address only affects access to the port that has been used too often.
Other ports can still be accessed.
- The function is activated by default for new installations on 20 UDP connections / minute on all ports
- For Updates the function must be manually activated
| extc-Variable | Default-Value | Description |
|---|---|---|
| CONNECTION_RATE_LIMIT_TCP | 0 | Number of permitted TCP connections of an IP address per port 0 = Function deactivated, no blocking is performed |
| CONNECTION_RATE_LIMIT_TCP_PORTS | Ports to be monitored. Empty by default=all ports would be monitored (if activated). Individual ports are separated by spaces: [ 1194 1195 ] | |
| CONNECTION_RATE_LIMIT_UDP | 20 / 0 Default setting for new installations from v12.6.2: 20 For update installations the value is 0, so the function is deactivated. |
Number of permitted UDP connections of an IP address per port |
| CONNECTION_RATE_LIMIT_UDP_PORTS | Ports to be monitored. Empty by default=all ports are monitored (only for new installations!). Individual ports are separated by spaces: [ 1194 1195 ] |
Configuration with CLI commands
| CLI command | Function |
|---|---|
| extc value get application securepoint_firewall Alternatively as root user: spcli extc value get application securepoint_firewall | grep RATE |
Lists all variables of the securepoint_firewall application. The variables beginning with CONNECTION_RATE_LIMIT_ are responsible for the connection limit. application |variable |value --------------------+-------------------------------+----- securepoint_firewall |… |… |CONNECTION_RATE_LIMIT_TCP |0 |CONNECTION_RATE_LIMIT_TCP_PORTS| |CONNECTION_RATE_LIMIT_UDP |20 |CONNECTION_RATE_LIMIT_UDP_PORTS| |
| extc value set application securepoint_firewall variable CONNECTION_RATE_LIMIT_TCP value 20 system update rule |
Limits the allowed number of TCP connections from a single IP address to a specific port to 20 per minute |
| extc value set application securepoint_firewall variable CONNECTION_RATE_LIMIT_TCP value 0 system update rule |
Deactivates the monitoring of TCP connections |
| extc value set application securepoint_firewall variable CONNECTION_RATE_LIMIT_TCP_PORTS value [ 443 11115 ] system update rule |
Restricts the monitoring of TCP connections to ports 443 and 11115 There must be spaces before and after the square brackets [ ]! |
| extc value set application securepoint_firewall variable CONNECTION_RATE_LIMIT_TCP_PORTS value [ ] system update rule |
A NULL value removes the restriction to certain ports There must be spaces before and after the square brackets [ ]! |
| extc value set application securepoint_firewall variable CONNECTION_RATE_LIMIT_UDP value 20 system update rule |
Limits the allowed number of UDP connections from a single IP address to a specific port to 20 per minute Default setting for new installations from v12.6.2: 20 For update installations the value is 0, so the function is deactivated. |
| extc value set application securepoint_firewall variable CONNECTION_RATE_LIMIT_UDP value 0 system update rule |
Deactivates the monitoring of UDP connections |
| extc value set application securepoint_firewall variable CONNECTION_RATE_LIMIT_UDP_PORTS value [ 1194 1195 ] system update rule |
Restricts the monitoring of UDP connections to ports 1194 and 1195. (Example for 2 created SSL-VPN tunnels). There must be spaces before and after the square brackets [ ]! |
| extc value set application securepoint_firewall variable CONNECTION_RATE_LIMIT_UDP_PORTS value [ ] system update rule |
A NULL value removes the restriction to certain ports There must be spaces before and after the square brackets [ ]! |
extc value set application securepoint_firewall variable CONNECTION_RATE_LIMIT_TCP value 20 notempty Finally, the CLI command system update rule must be entered so that the values in the rules are applied.
|
For example, to allow a maximum of 20 connections per minute per IP address and port. For TCP, monitoring is restricted to ports 443 and 11115. All ports are monitored for UDP connections. |

