- Designations and screenshots updated at Login credentials for OAuth 2
- Login credentials for OAuth 2
Introduction
Emails from a single mailbox, multiple mail accounts from a mail server, or emails from an Outlook PST file via the PST import tool can be imported into the UMA.
Requirements
The values for Tenant ID, Application ID and Client secret must be adopted from Azure.
This article includes descriptions of third-party software and is based on the status at the time this page was created.
Changes to the user interface on the part of the manufacturer are possible at any time and must be taken into account accordingly in the implementation.
All information without warranty.
- Tenant ID
- Client ID
- Client secret
- Launch Azure Active Directory admin center
- Note down/Copy Tenant ID from the Azure Active Directory menu
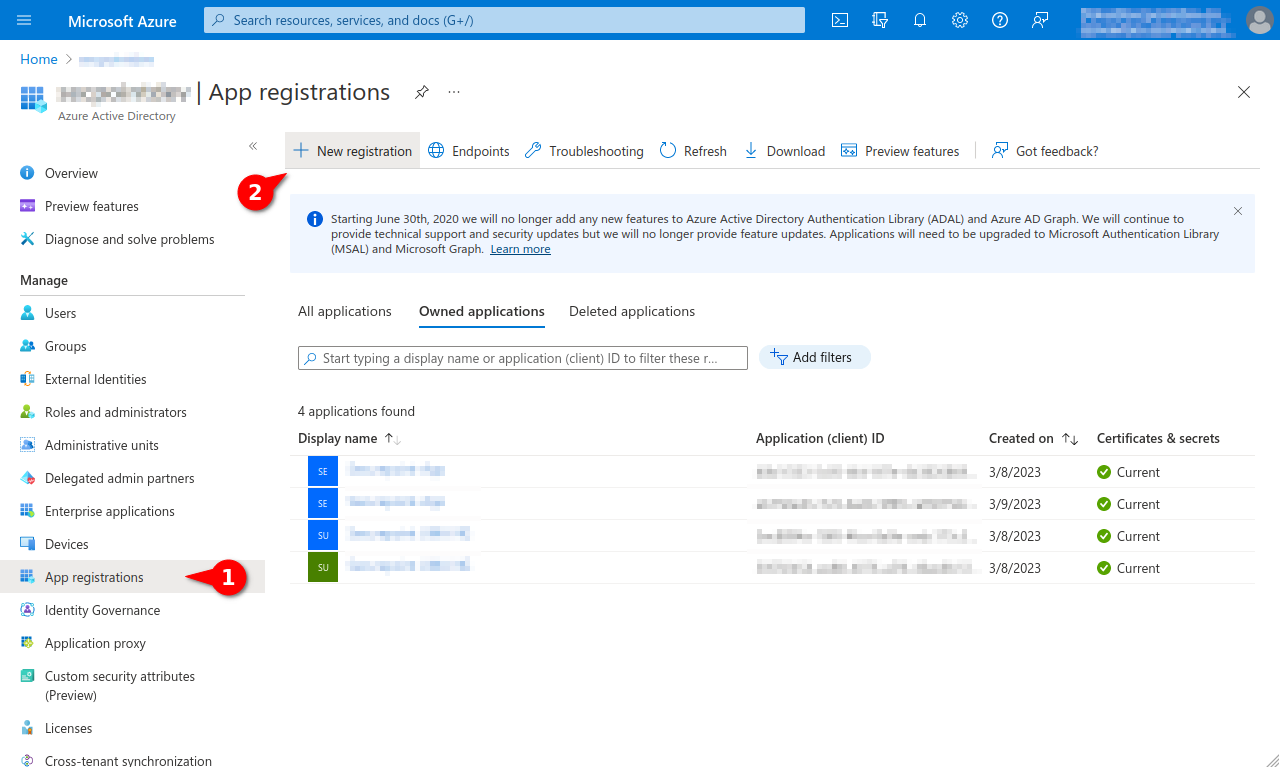
- Register new app under theApp registration menu under the New registration button
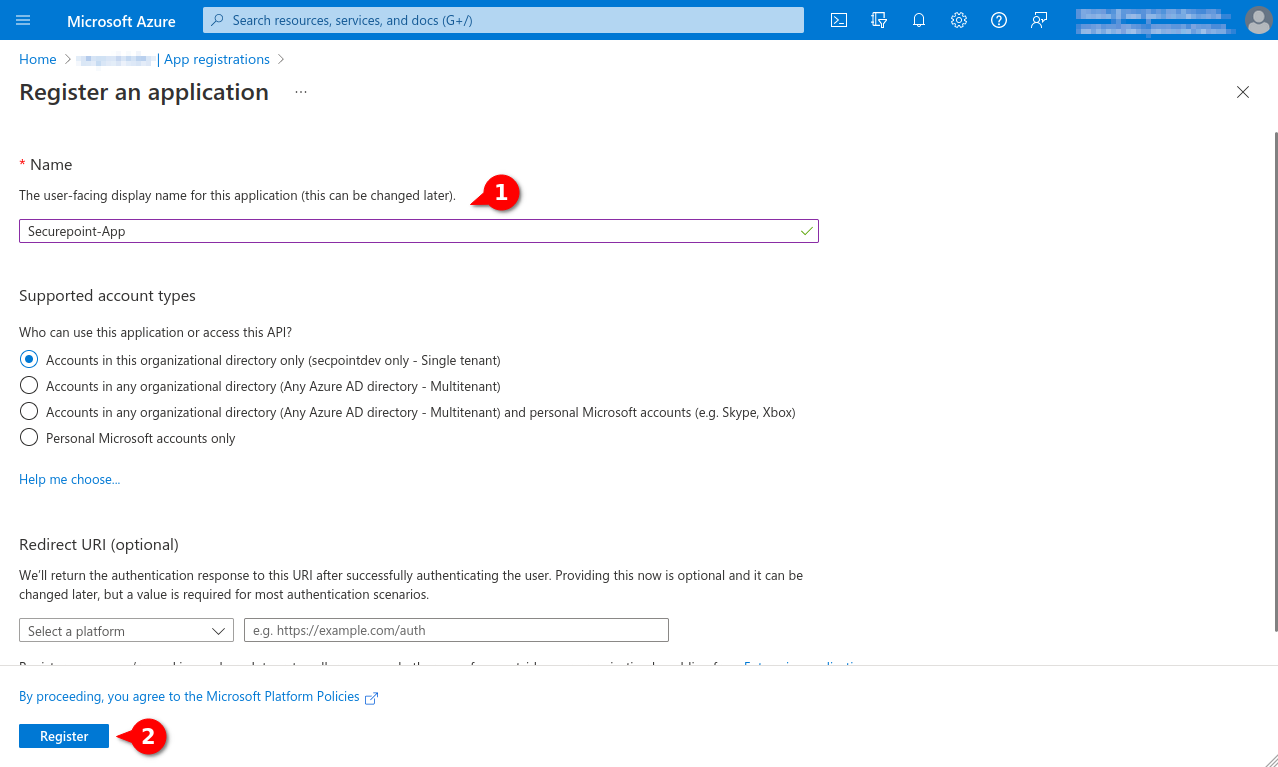
- Assign a unique name and click the register button
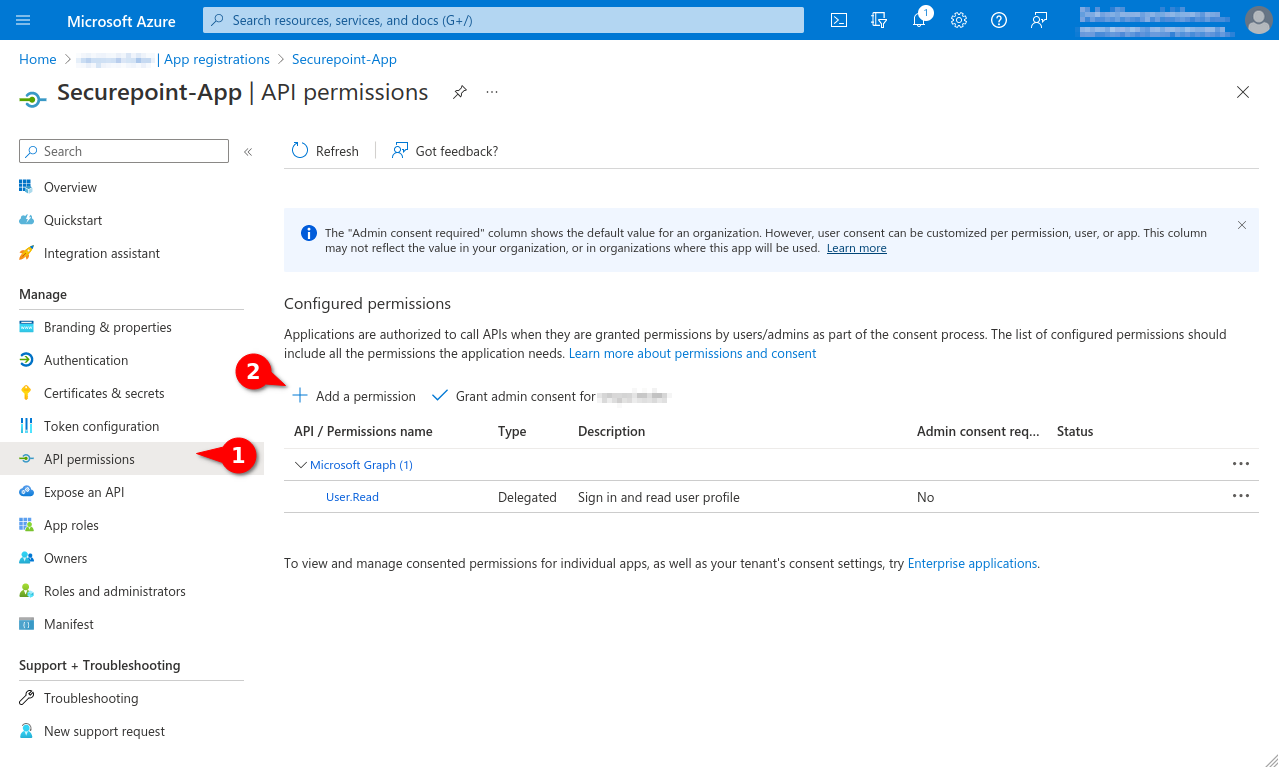
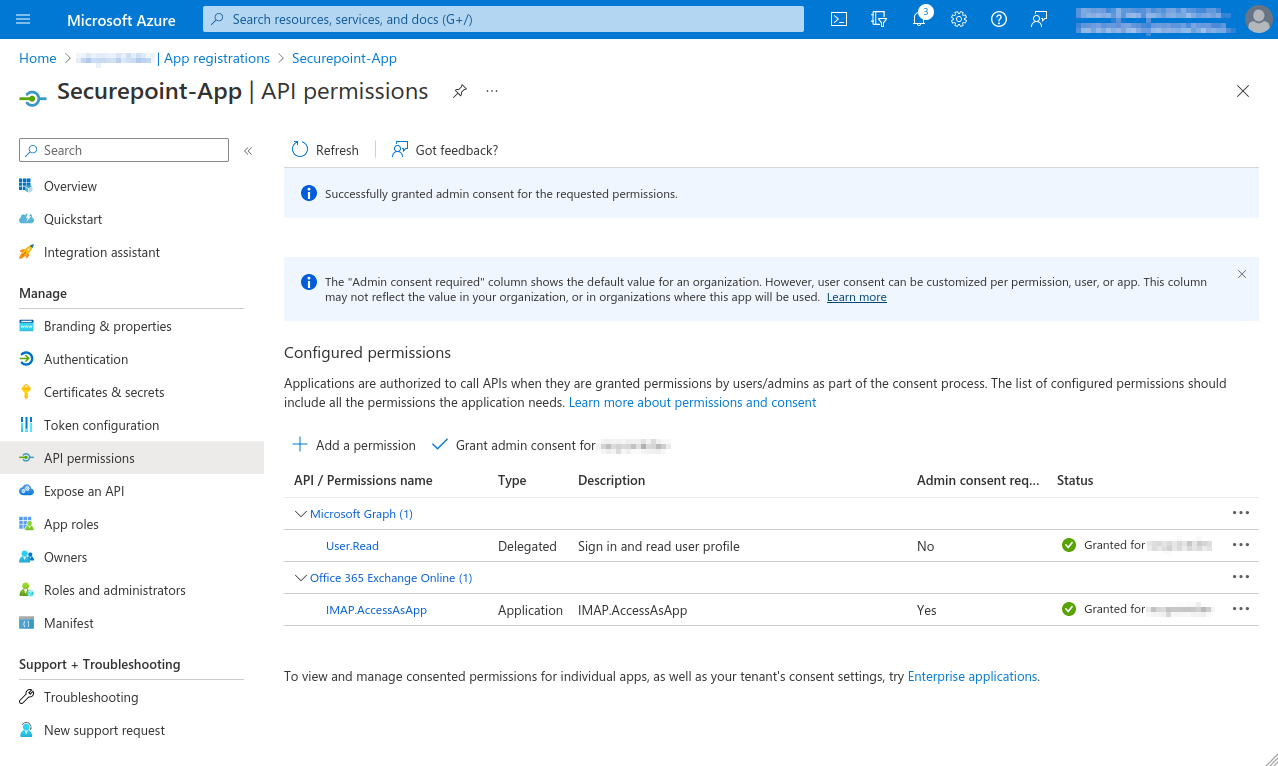
- In the API permissions menu, click the Add a permission button.
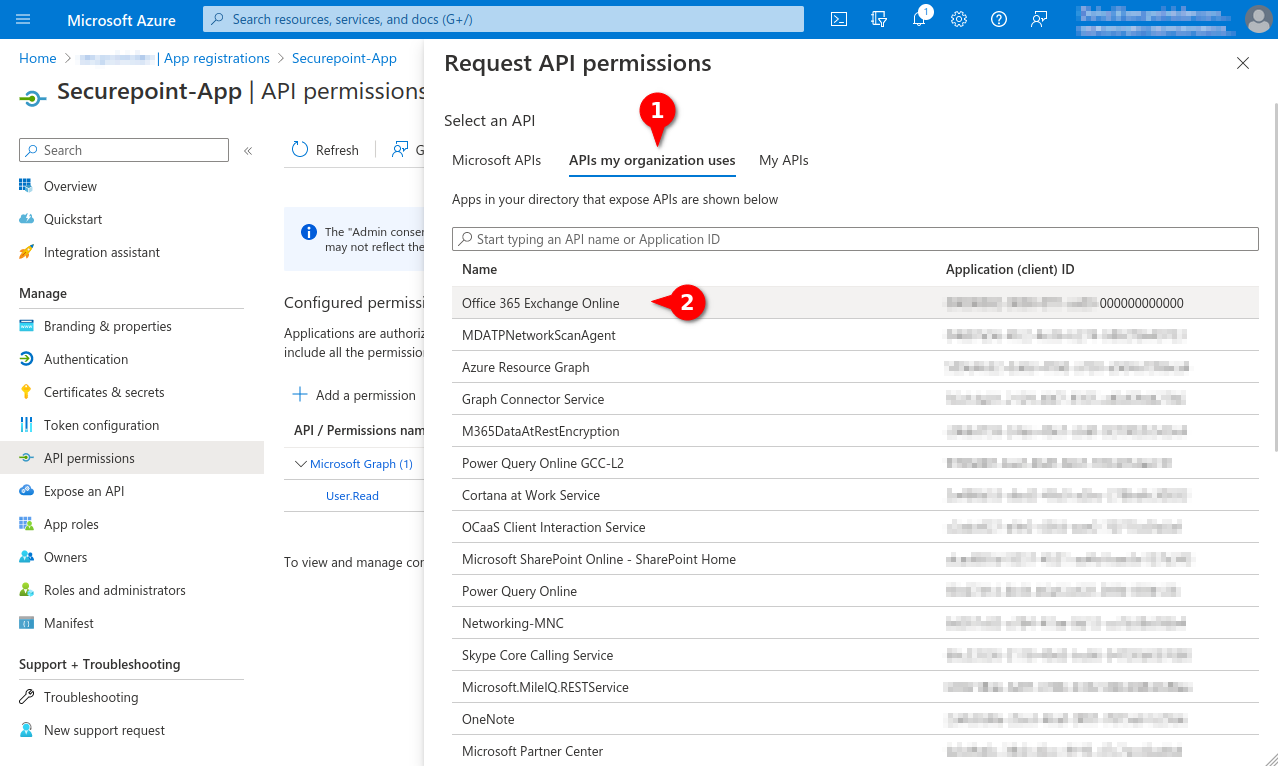
- Select permission for Office 365 Exchange Online in the APIs my organization uses tab
- Add IMAP.AccessAsApp permission for Office 365 Exchange Online
- In the menu API permissions activate the entry Grant admin consent for [...].
- Create a Client secret in the Certificates & secrets menu
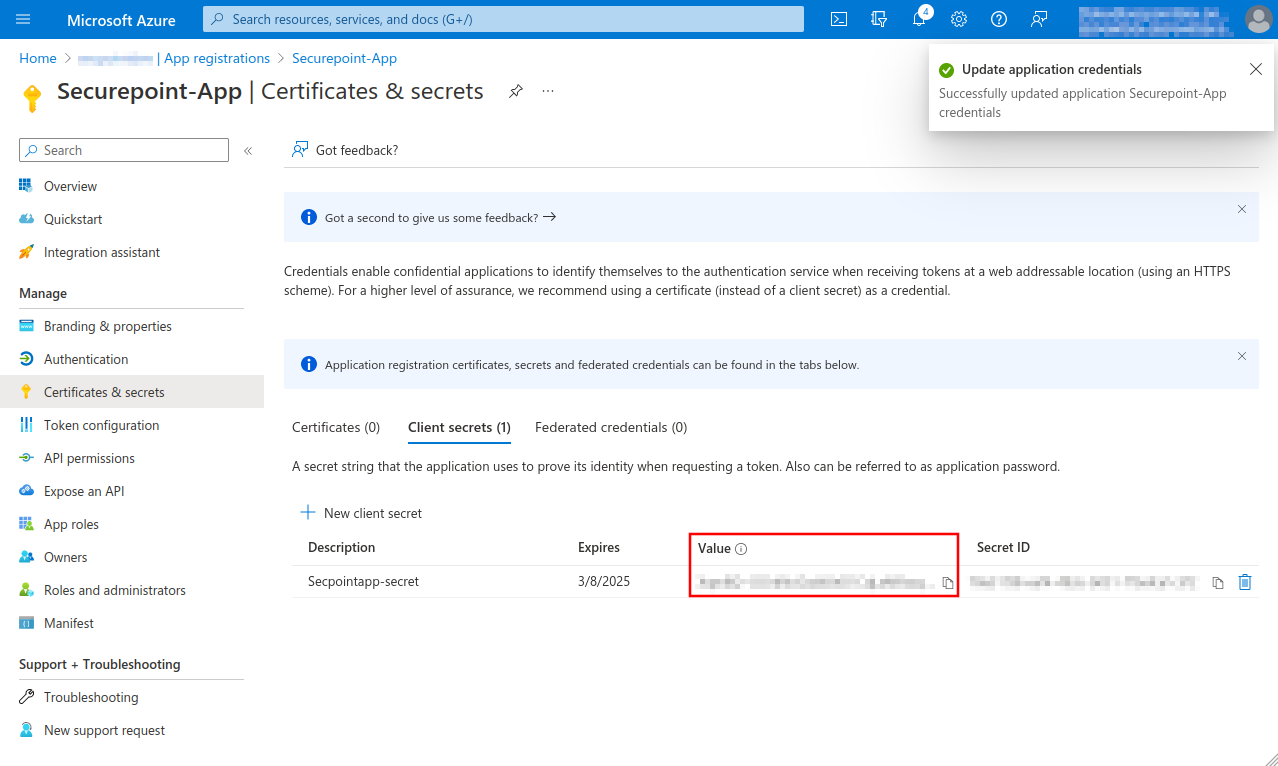
- Note down Value, is entered as Client secret for Remote e-mail accounts and Import single mailboxes
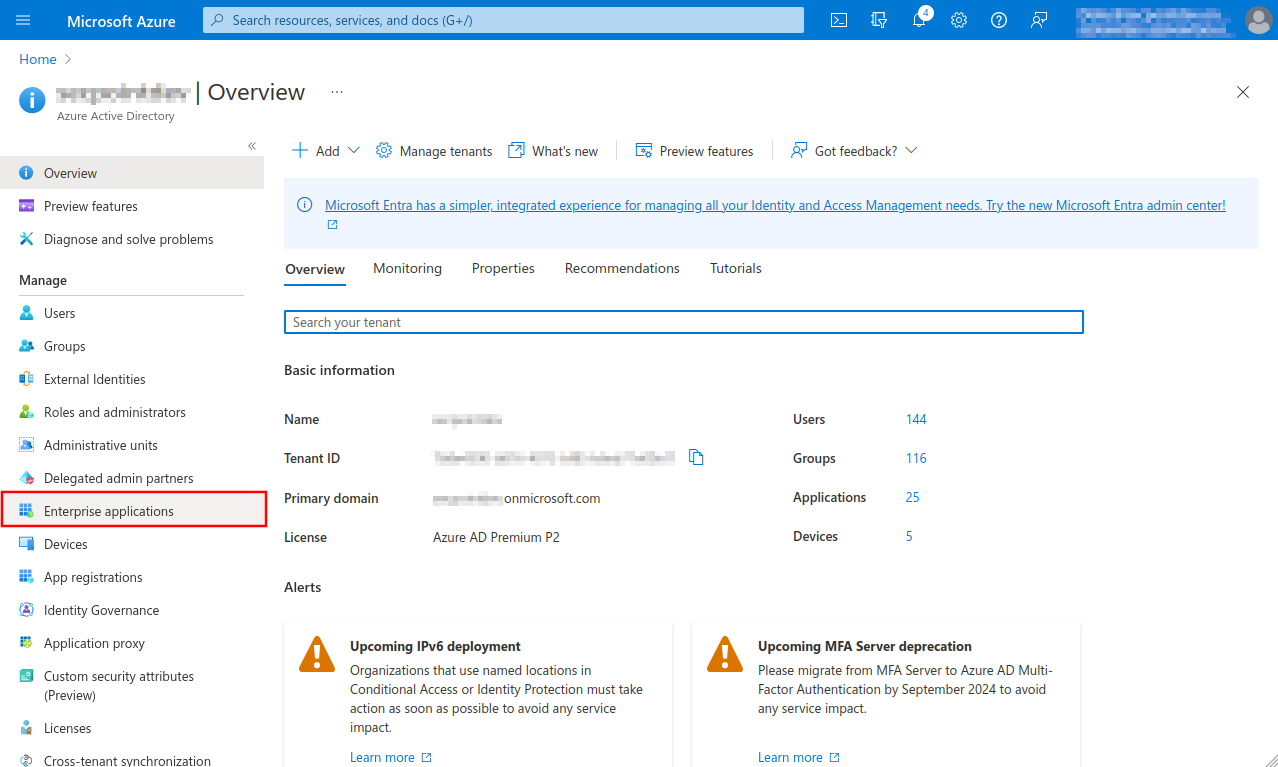
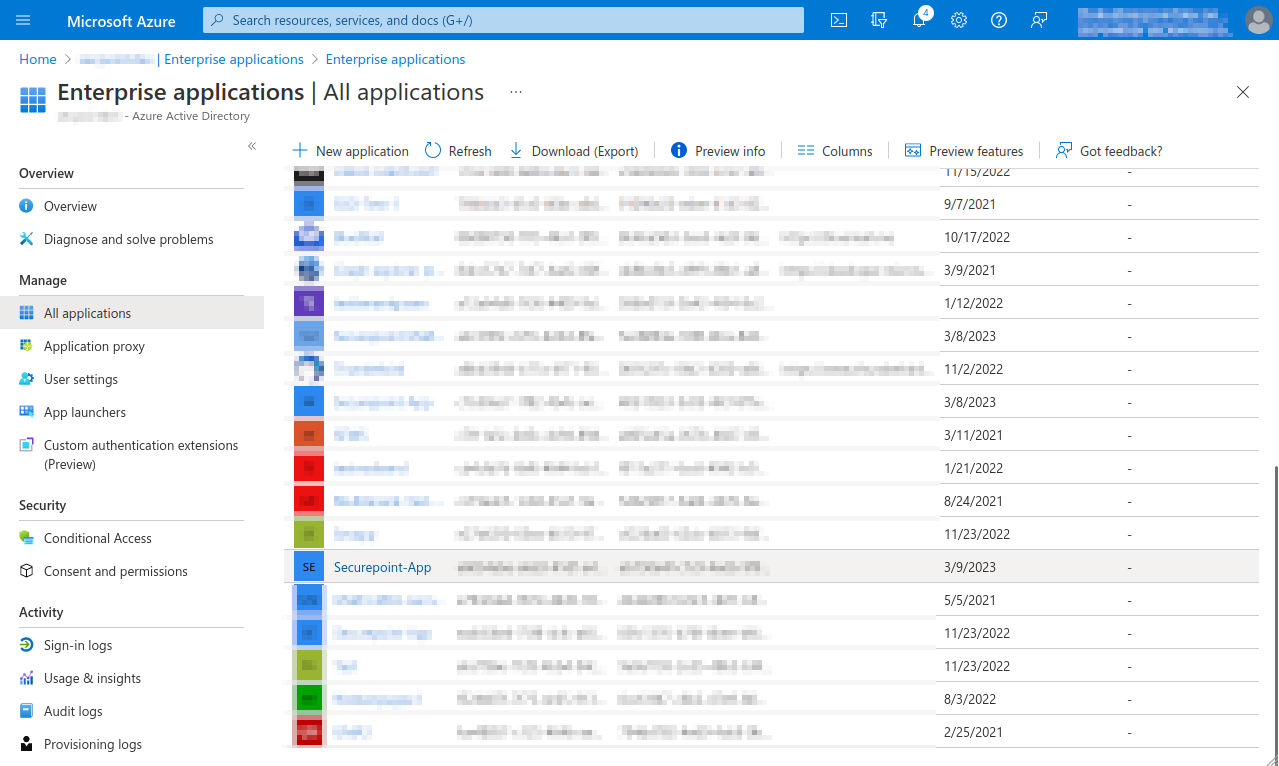
- Open menu Enterprise Applications and select app
- Note down from the app properties Application ID and Object ID.
- Open Powershell on Windows Client Administrator, import ExchangeOnlineManagement and connect to tenant
- Select the recipient mailbox in the Exchange admin center and choose Read and manage (Full Access) as delegation.
- Add member for Mailbox Delegation
- This completes the configuration in Microsoft Azure.
Further configuration is done in the UMA in the
System settings Tab Email accounts section Azure AD menu, in the setup wizard or when importing mailboxes. - The Microsoft servers may take up to 30 minutes before access works

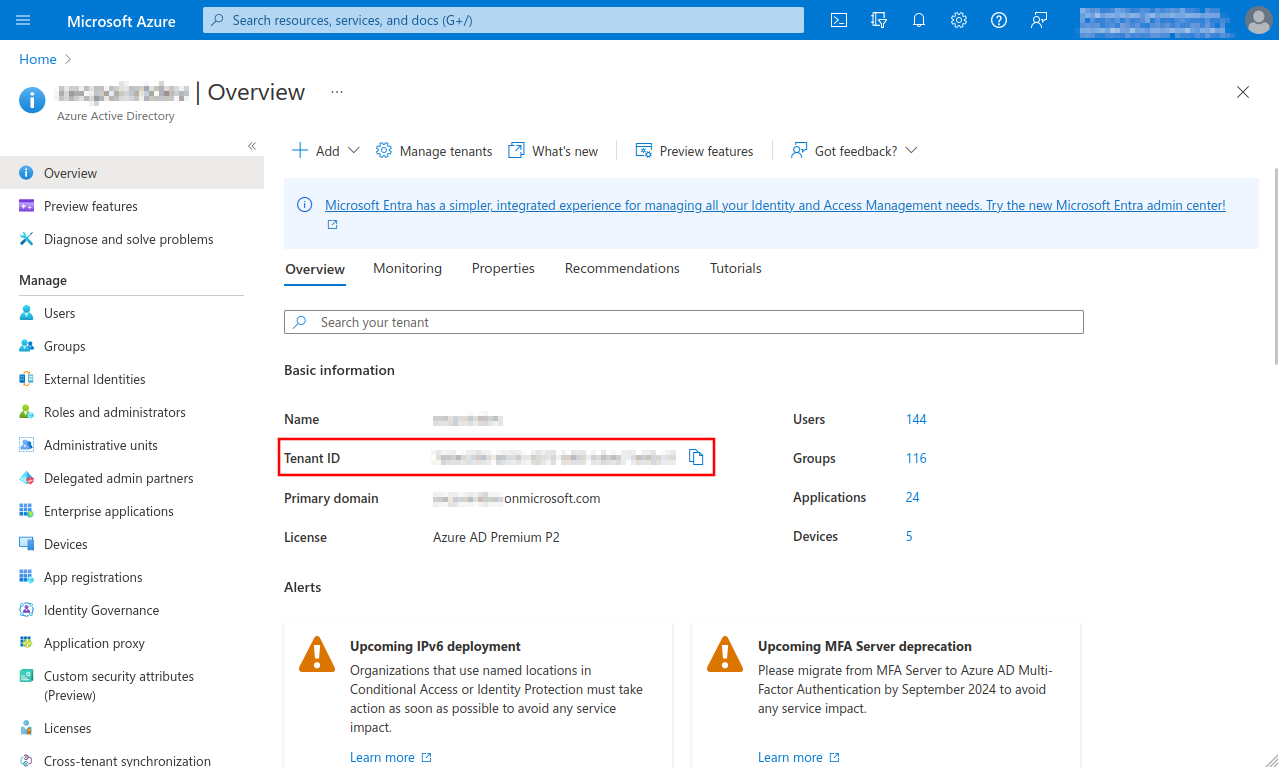
- Select Azure Active Directory menu
- Note down or copy Tenant ID, is entered for remote e-mail accounts and for importing single mailboxes
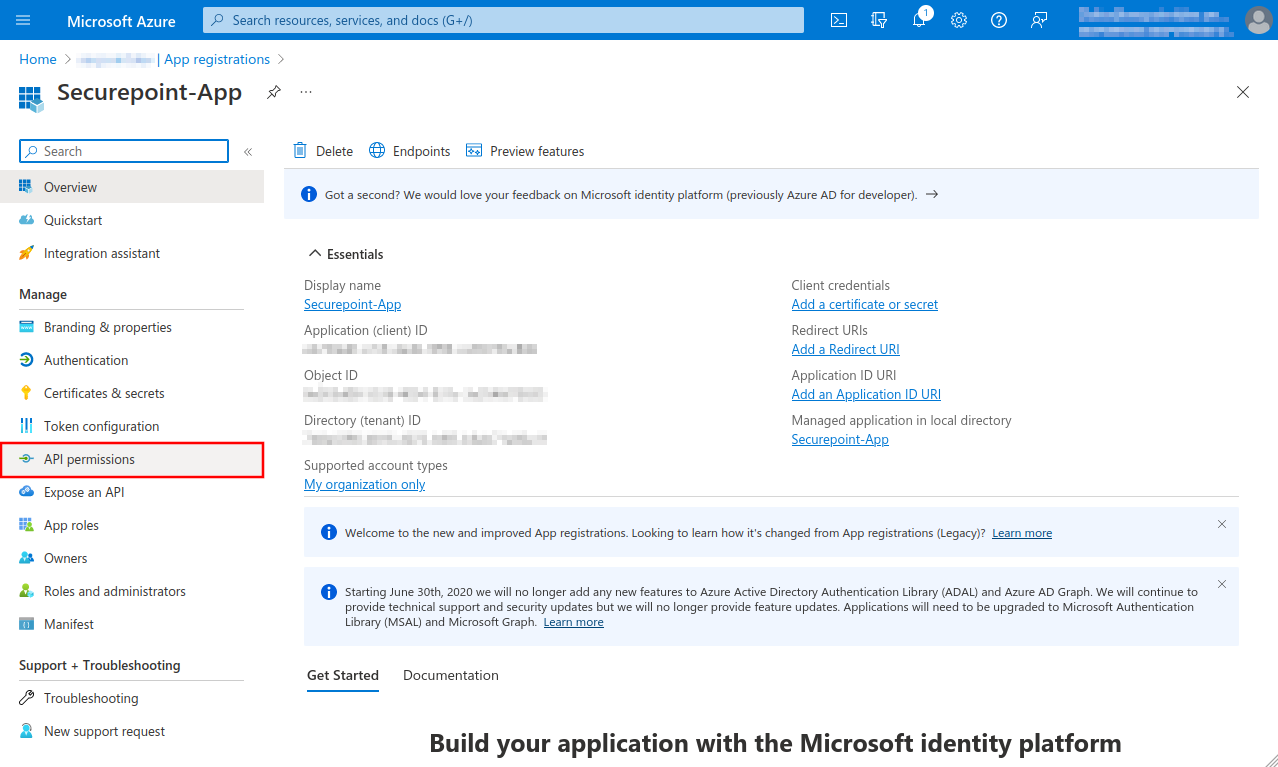
- The Object ID displayed here does not belong to the app and is not needed!
- Select API permissions menu
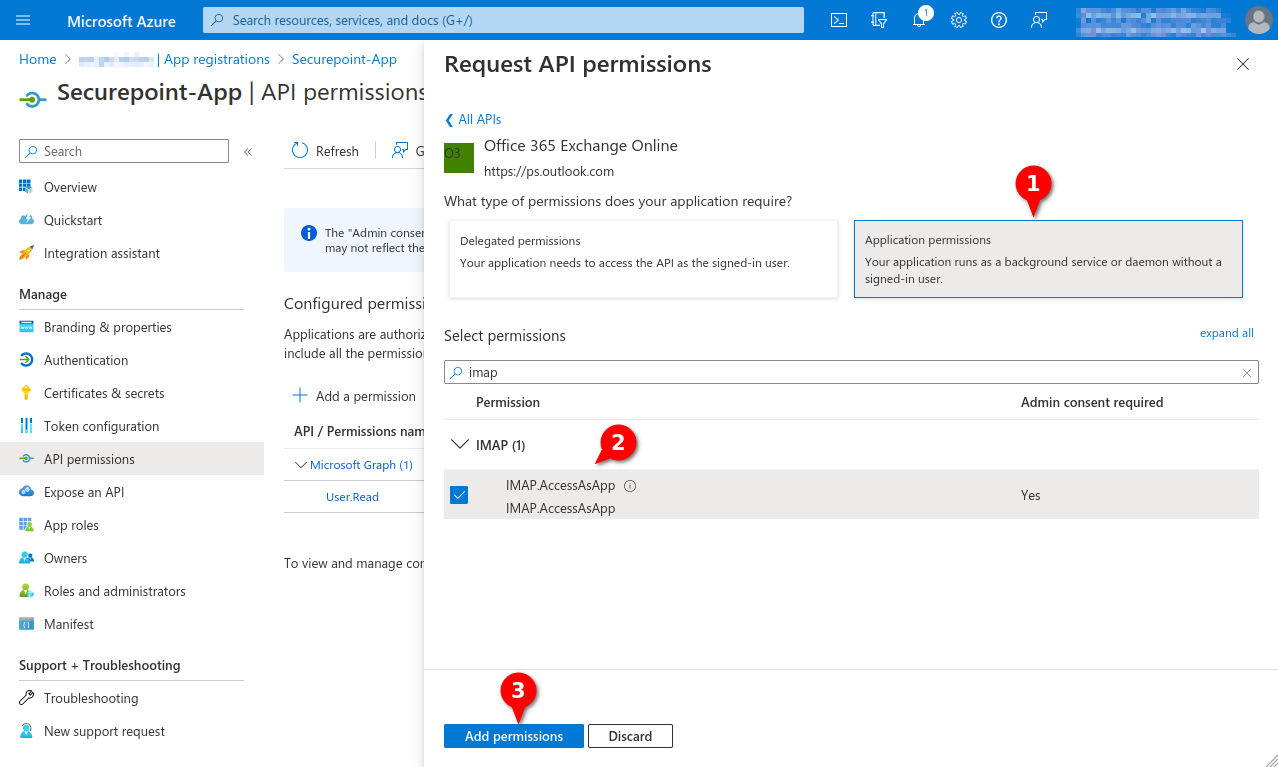
- Click Application permissions button
- Search for imap
- Checkmark IMAP.AccessAsApp
- Click the Add permissions button
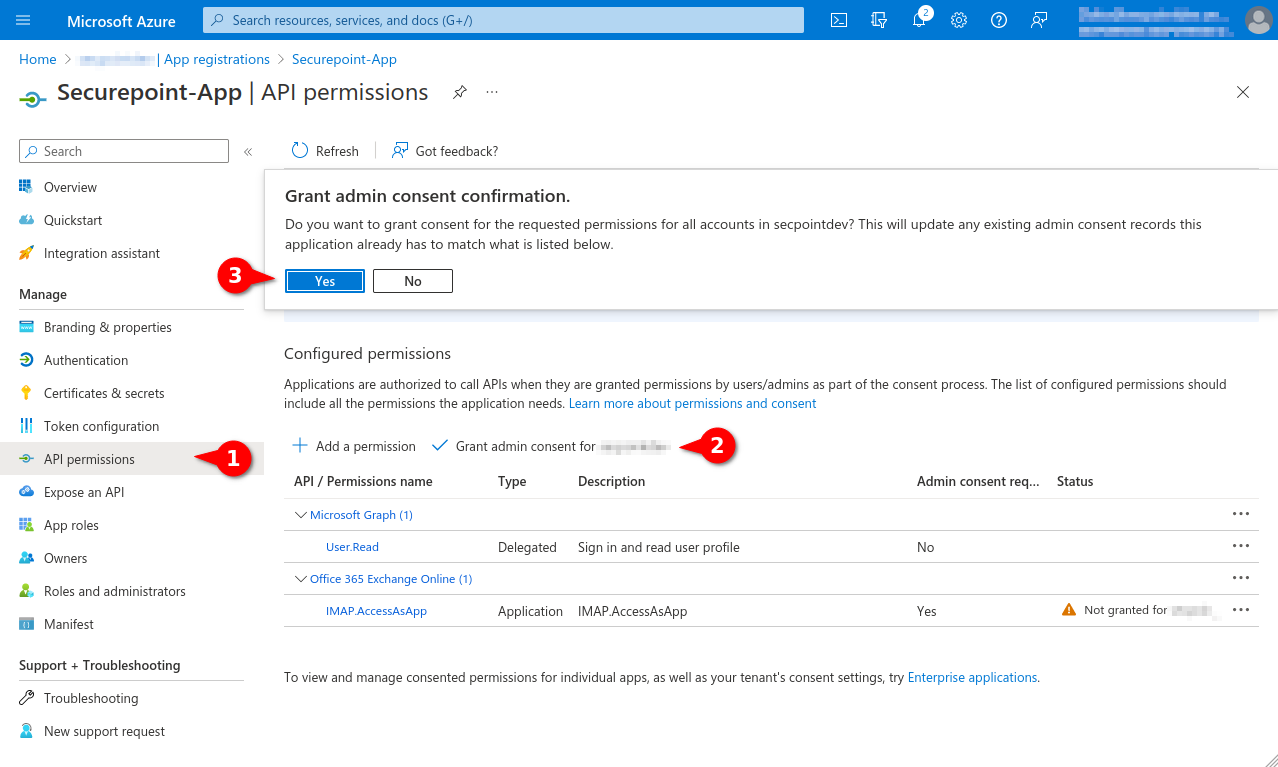
- Select menu API permissions again.
- Select entry Grant admin consent for [...]
- Click the Yes button
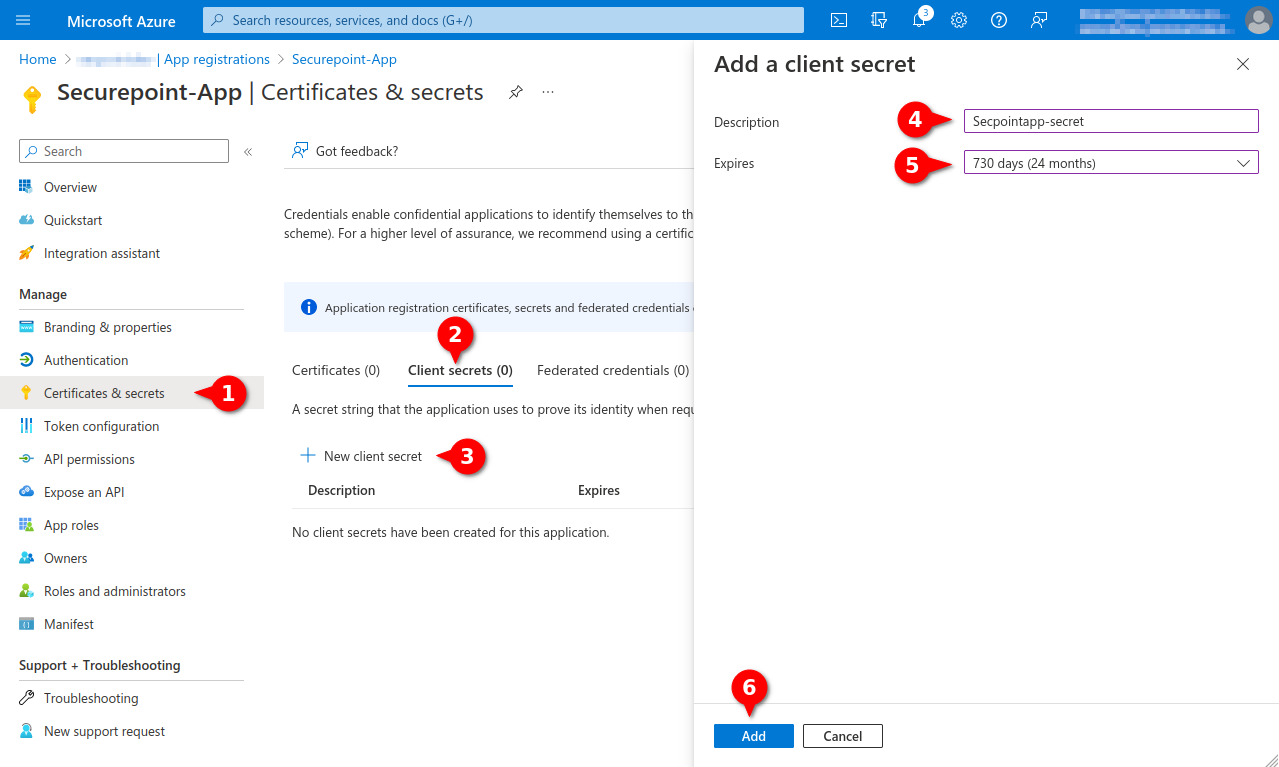
- Menu Certificates & secrets
- Tab Client secrets
- Entry New Client secret
- Enter unique description
- Select desired duration (max. 24 months)
- Click Add button
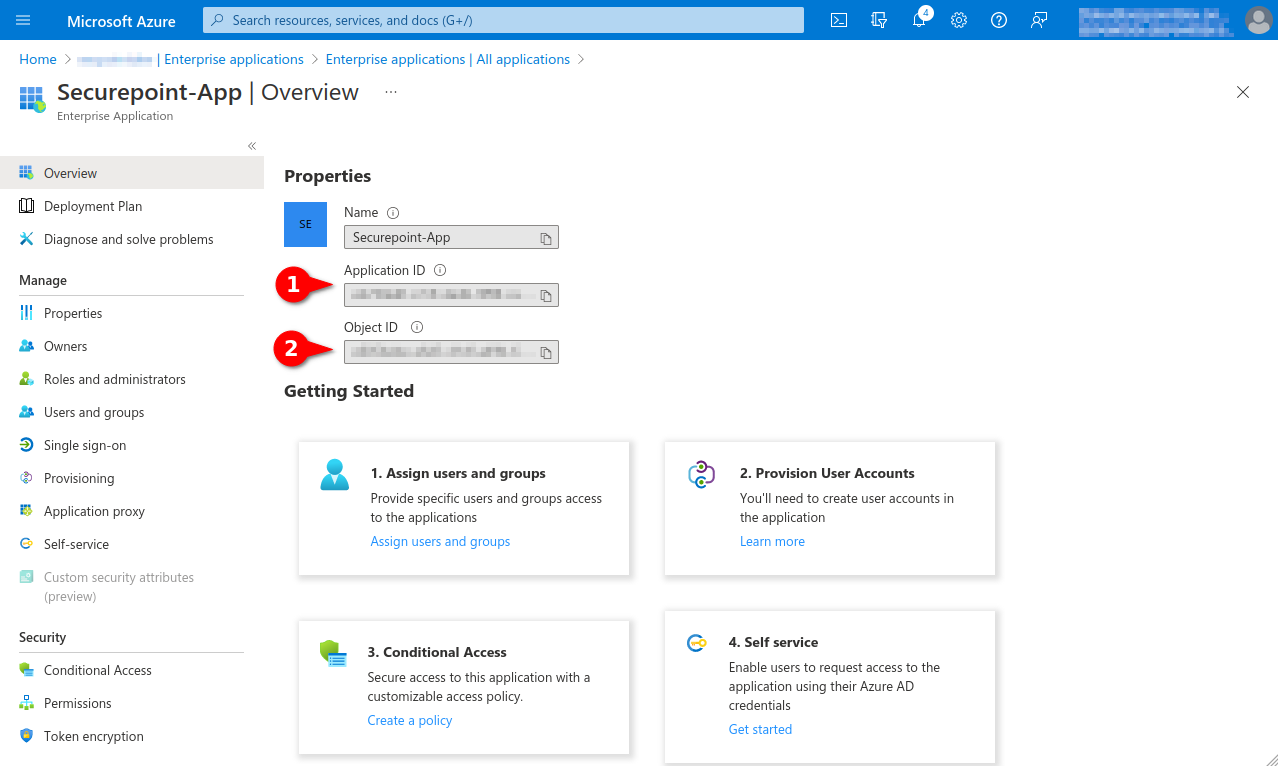
- Application ID, is entered as Application (Client) ID for Remote E-mail Accounts and Import Individual Mailboxes
- Object ID, is required for the granting of the authorisation via Powershell

- Open Powershell on a Windows client administrator
- Install ExchangeOnlineManagement module If there are problems installing the module or connecting, you may need to configure Powershell to TLS 1.2:
>[Net.ServicePointManager]::SecurityProtocol = [Net.SecurityProtocolType]::Tls12- > Install-Module -Name ExchangeOnlineManagement -allowprerelease
- Import ExchangeOnlineManagement and connect to Tenant:
- > Import-module ExchangeOnlineManagement
- > Connect-ExchangeOnline -Organization Tenant ID (See Fig.1)
- Create a new service principal and assign a unique name:
- > New-ServicePrincipal -DisplayName SecurepointServicePrincipal -AppId Enterprise-oApp-ooID-oooo-oooooooo -ServiceId Enterprise-oObj-ooID-oooo-oooooooo
- For Enterprise-oApp-ooID-oooo-oooooooo enter the Application ID and for Enterprise-oObj-ooID-oooo-oooooooo enter the Object ID (see Fig. 14)
- Then assign mailbox permissions:
- > Add-MailboxPermission -Identity alice@anyideas.onmicrosoft.com -User SecurepointServicePrincipal -AccessRights FullAccess
Import individual mailbox
In order to import a single mailbox, go to the Import Mailbox tab under {Kasten
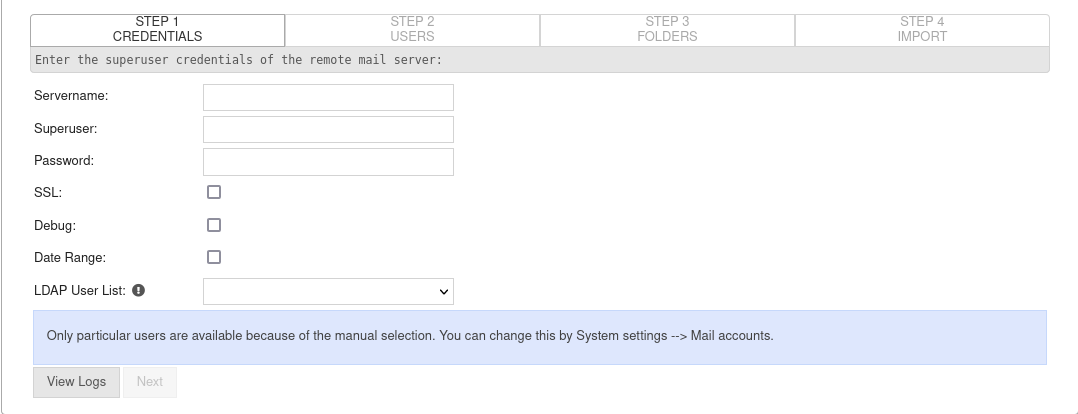
Step 1 - Login credentials for IMAP and POP3Step 1 - Login credentials for IMAP and POP3
| |||
| Caption | Value | Description |  |
|---|---|---|---|
| Protocol: | The protocol of the email server is selected. | ||
| Server name: | The name of the server is entered | ||
| Username: | The username of the server account | ||
| Password: | The password of the server account | ||
| SSL: | Enable SSL if the provider supports SSL encryption of the login. | ||
| Debug: | Enable debug in case of problems, bugs. | ||
| Time period: | If the time period is enabled, the time frame of the emails to be imported can be limited | ||
Step 1 - Login credentials for OAuth 2Step 1 - Login credentials for OAuth 2
| |||
| Protocol: | The protocol of the email server is selected. An existing OAuth 2 connection is required to use the OAuth 2 protocol. For more information, see Requirements |
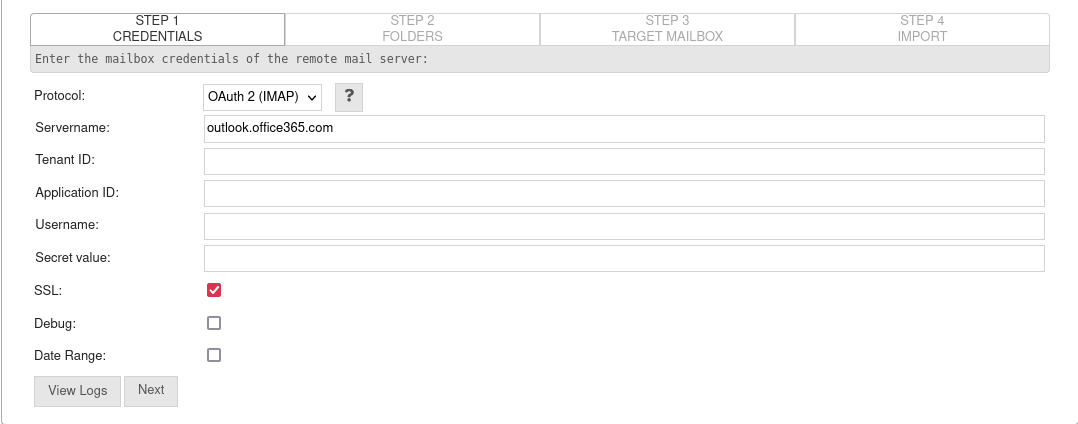 | |
| Server name: | outlook.office365.com | The name of the server is entered automatically | |
| Tenant ID: | aaaabbbb-1111-2222-3333-… | Enter the Tenant ID of the Azure App In Microsoft Azure in the menu Azure Active Directory | Overview under Tenant ID | |
| Application ID: | 11111111-aaaa-bbbb-2222-… | Enter the Application ID of the Azure App In Microsoft Azure under Enterprise Applications / All Applications / Select App / Overview / Properties under Application ID | |
| Username: | The username of the server account | ||
| Secret Value: | 33334444-dddd-eeee-ffff-… | Enter the secret value (client secret) of the Azure app In Microsoft Azure in the menu Certificates & secrets in the tab Client secrets under Value | |
| SSL: | Enable SSL if the provider supports SSL encryption of the login. | ||
| Debug: | Enable debug in case of problems, bugs. | ||
| Time period: | If the time period is enabled, the time frame of the emails to be imported can be limited | ||
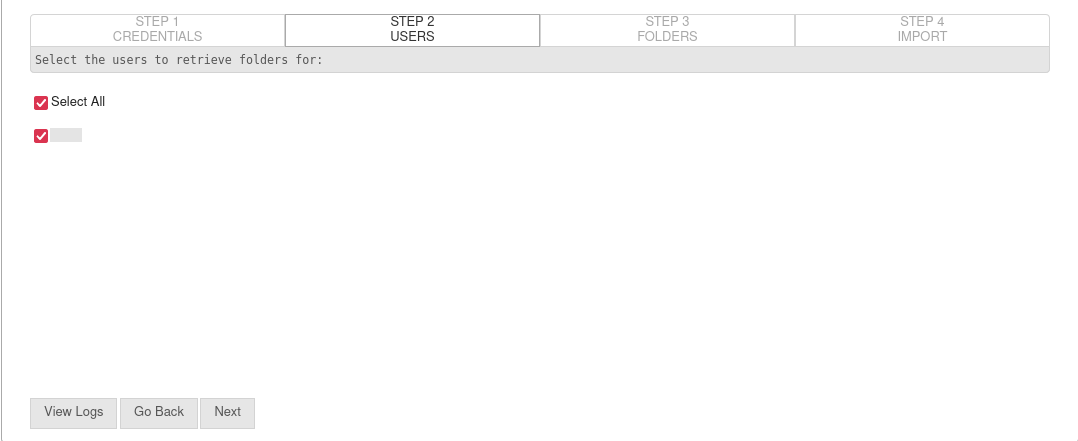
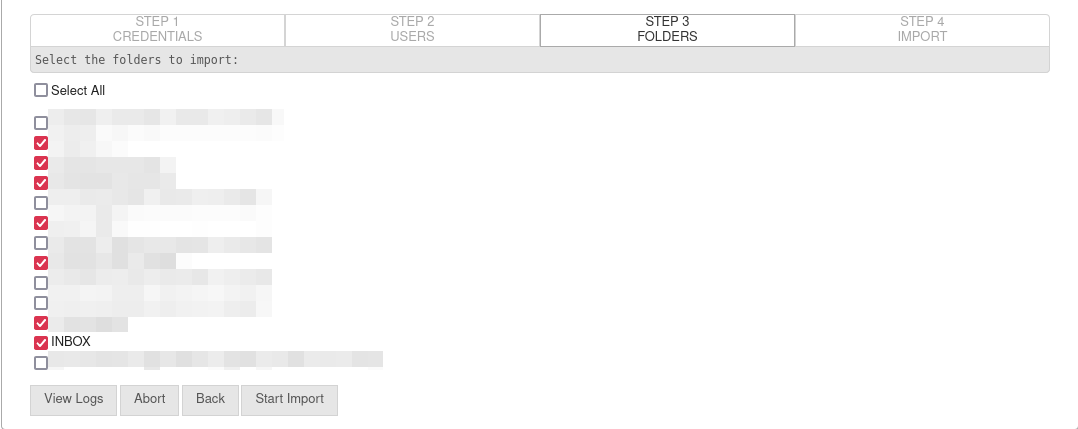
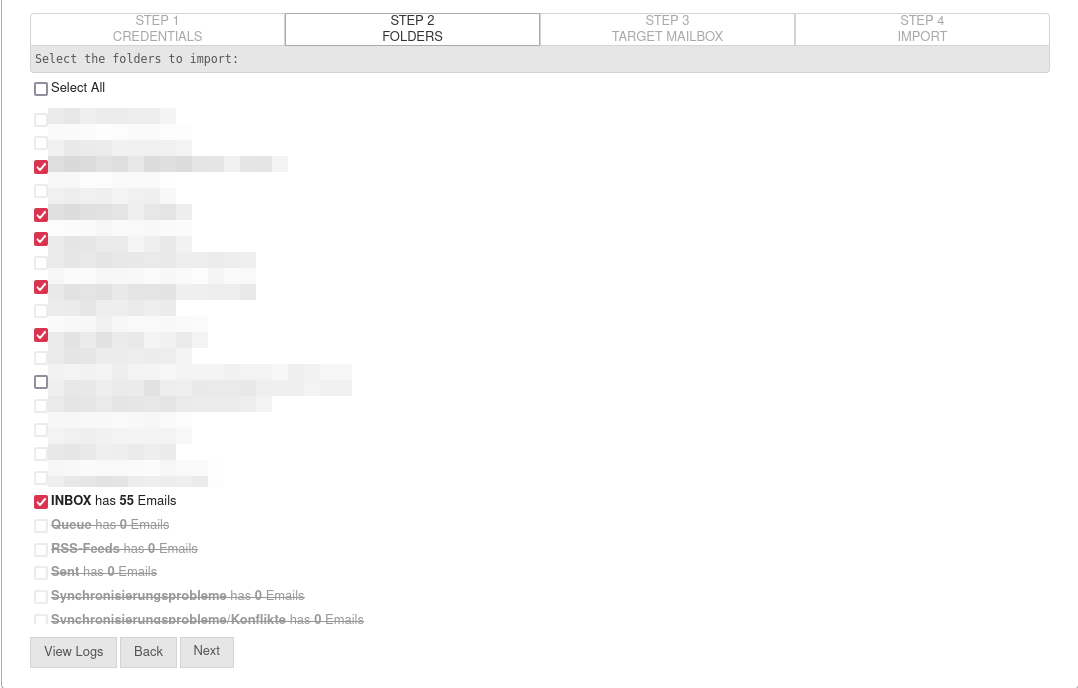
Step 2 - FolderStep 2 - Folder
| |||
| The folders to be imported are selected. If you want to select all of them, click Select all.
|
 | ||
Step 3 - Target mailboxStep 3 - Target mailbox
| |||
| User: | The user of the target mailbox is selected If no user is selectable in the list, the reason could be that under System Settings Tab Email Accounts at Select individual accounts (archive only individual accounts) the item Enable manual selection is disabled and no account is selected in Private user accounts. |
 | |
| Click the button to start the import process. | |||
Step 4 - ImportStep 4 - Import
| |||
| Depending on the size and number of emails to be imported, this process may take some time. After successful completion, a report about the import process appears with the number of imported emails, emails with an error and emails that cannot be archived. |  | ||
| Click the button to finish the process. | |||
Bulk import
Requirements
Under Import Tab Import Mailbox , Bulk Import will not
appear until System Settings Tab Email Accounts section User Repository the option is selected.
Preconfiguration
If multiple mail accounts are to be imported at the same time, a user must be designated in the mail server. This user must have the permissions to access the mailboxes to be imported.
Under Exchange, in this example version 2013, this is done via the Exchange Management Shell. The command to grant the user superuser in the domain securepointdemo.local the permission for full access to the mailbox User1 is:
Add-MailboxPermission User1 -User 'Securepointdemo\superuser' -AccessRights 'FullAccess'
The superuser must NOT be the administrator!
The superuser MUST have a mailbox!
"-InheritanceType All" must be added to the permission assignment:
Add-MailboxPermission User1 -User 'Securepointdemo\superuser' -AccessRights 'FullAccess' -InheritanceType All
Bulk import setup steps
After this preconfiguration, the following setup steps for a bulk import are performed in the UMA.
SEWS Import
To import emails from a Microsoft Exchange mail system into the Securepoint UMA, the Securepoint EWS tool (SEWS tool) is used.
This is done in the SEWS tab under SEWS Import Allow import via SEWS import tool is confirmed.
For more information, see the Wiki article Securepoint EWS tool for UMA.
PST Import
The PST import tool is used to import Microsoft Outlook databases into the UMA. To use the PST import tool, it is necessary to enter the login data of the UMA user.
In order to use it, go to the PST tab under PST Import Enable PST Import is confirmed.
For more information, see the Wiki article PST-Import UMA.
For UMA administrators
For UMA administrators there is the possibility to select the desired recipient. The login for the administrators must be explicitly enabled.
To do this, Enable login for UMA administrators via PST import tool is enabled.
If PST Import is enabled, the UMA checks daily for updates to the PST Import tool and automatically downloads the latest version.
