- Advanced TLS Settings
- Added necessary port filter rule (02.2023)
Intended use
With a reverse proxy, one can control access to the "internal" web servers from the Internet. In contrast to a port forwarding, dedicated filter rules can be created via the reverse proxy. In addition, with only one public IP address, several internal web servers can be addressed based on the domain.
Another highlight is offered by the load balancing. Servers can be combined into groups, to which the requests are then distributed using the selected algorithm (e.g. Round-Robin).
Requirements
The following values are assumed for the example configuration:
- Web server with the private IP: 10.1.0.150
- Domain: www.ttt-point.de
Preparations
- Attention:
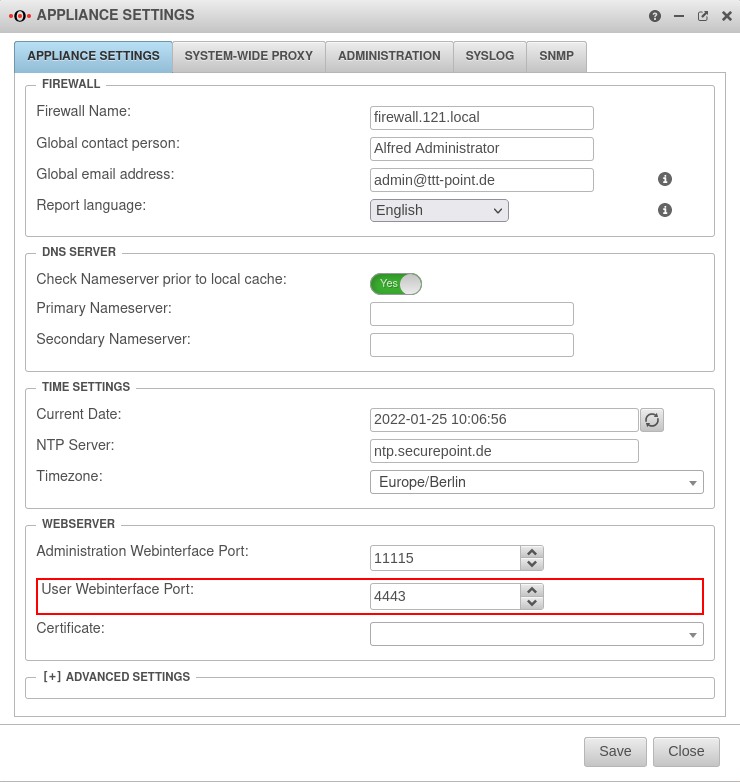
If the web server is also to be accessed via https, the port of the Userinterface must be changed first.
In the factory setting, port 443 for https is already occupied by the user web interface of the UTM. This must then be changed to another port.
The settings for this are in the menu Tab Appliance Settings in the section
- For https, the reverse proxy needs a certificate to accept the encrypted connection.
- For this, a certificate is used from
In this example, a wildcard certificate *.ttt-point.de is used.
Portfilter rule
Configuration
Wizard
Step 1 - Internal
Tab Server groups Button
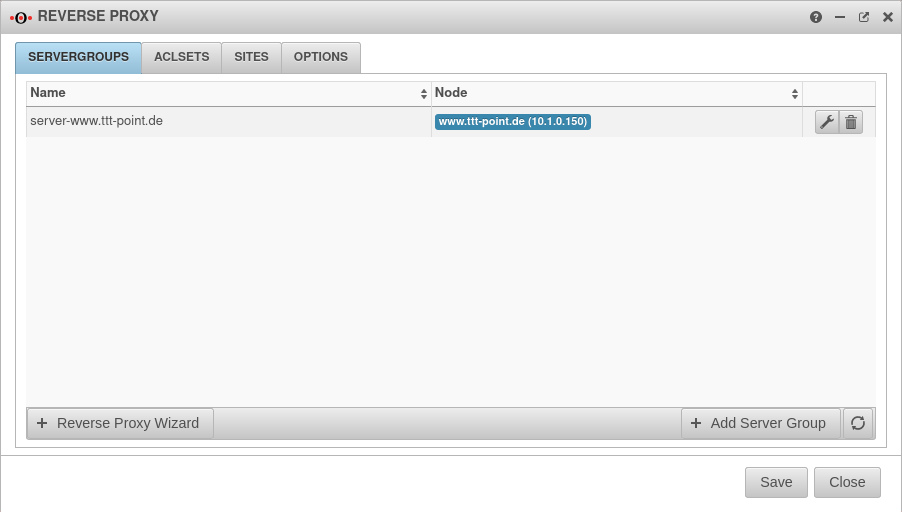
The settings for the reverse proxy are located in the menu
Clicking on the button opens the wizard.
| Caption | Value | Description | 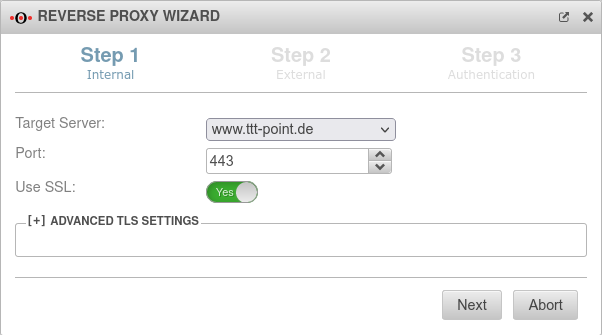 |
|---|---|---|---|
| Target Server: | If the host has already been created as a network object, it can be selected directly in the drop-down menu. | ||
| Port: | 443 | The web server should be accessed via an encrypted connection. | |
| Use SSL: | On | SSL should definitely be activated | |
| Target Server: | If the Exchange Server does not yet exist as a network object, it can be created via the selection point in the wizard. | 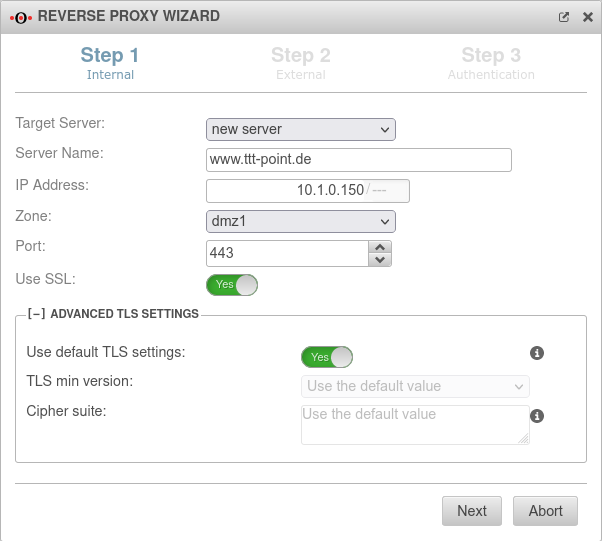 | |
| Server name: | www.ttt-point.de | Name of the network object. The server name of the network object can be freely selected when creating a new object, but must not already be in use with other objects. A meaningful name conventions should be considered and kept. Since here for the Web server with the homepage the connection is configured and the goal is to be attainable later also as "www.ttt-pint.de", this designation is used also for the network object. | |
| IP address: | 10.1.0.150/--- | IP address of the webserver | |
| Zone: | Zone of the network object. The zone is entered automatically if the IP range of the UTM is known. | ||
| Port: | 443 | The web server should be accessed via an encrypted connection. | |
| Use SSL: | Yes (Default: off) | SSL should definitely be activated | |
Advanced settings notemptyNew configuration options as of v12.3.6 notempty These TLS settings apply to the connection between this appliance and the (local) server.
For TLS settings between the clients and this appliance, the settings in the Tab Reverse-Proxy dialog apply. | |||
| Use default TLS settings: | Yes | Allows connections with TLS 1.2 or 1.3 only | |
| Minimal TLS version: | The outdated TLS versions 1.1 and 1.0 can be selected. | ||
| Cipher-Suite: | Standardwert verwenden | Note that to directly use a OpenSSL security level, the notation @SECLEVEL=N can be used in the cipher string, where N represents the selected level from 0 to 5.
| |
Step 2 - ExternalDefine incoming connection | |||
| External domain name: | www.ttt-point.de | Here you enter how the server behind the UTM is addressed |
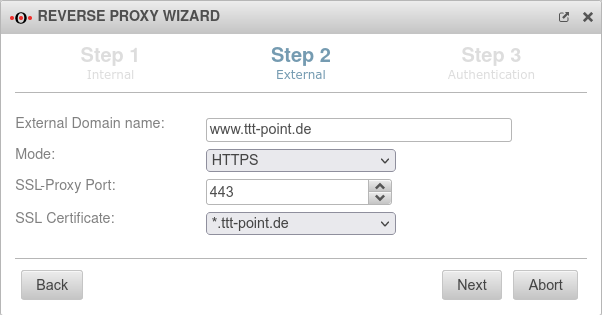 |
| Mode | Access shall be exclusively encrypted via https. | ||
| SSL-Proxy Port: | 443 | Proxy port is 443 as well | |
| SSL certificate: | The certificate that was selected in the step Preparations is selected here. | ||
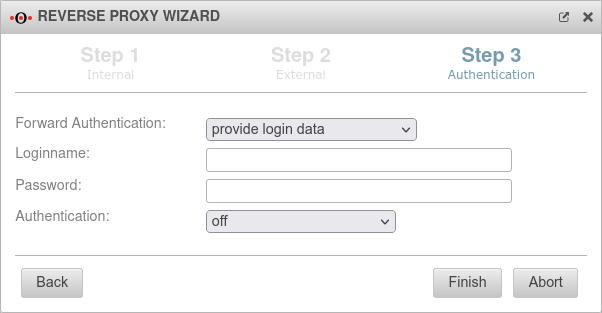
Step 3 - Authentication | |||
| Forward authentication: | The proxy should not perform authentication The string can include URL escapes (i.e. %20 for spaces). This also means % must be written as %%. |
 | |
| Leitet die Authentifizierungs-Header des Clients an die Gegenstelle weiter. Von der UTM empfangene Anmeldedaten werden an den Reverse Proxy gesendet. Dadurch wird das Proxy-Passwort des Benutzers für die Gegenstelle sichtbar. Eine Authentifizierung ist bei dieser Option nicht erforderlich. | |||
| Proxy- und Authentifizierung-Header werden unverändert weitergeleitet Sendet die vom Client empfangenen Anmeldedaten an den Reverse Proxy. Sowohl Proxy- als auch WWW-Authorization-Header werden ohne Änderung an die Gegenstelle weitergegeben. | |||
| Login name | Blank | ||
| Password | Blank | ||
| Authentication: | Authentication is not useful for a web server that maintains the public home page. | ||
Server groups Server groups
| |||
|
 | ||
| The button can be used to expand the server group. | 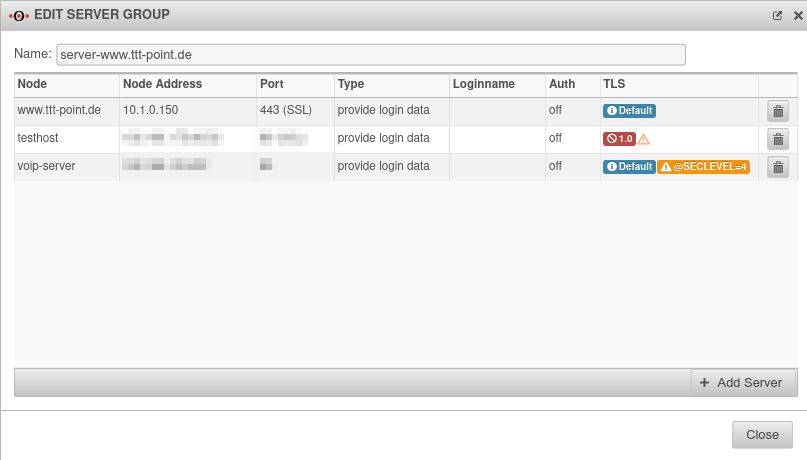 | ||
ACL Sets ACL Sets
| |||
| ACLs - Access rights Access rights can be assigned via ACLs. |
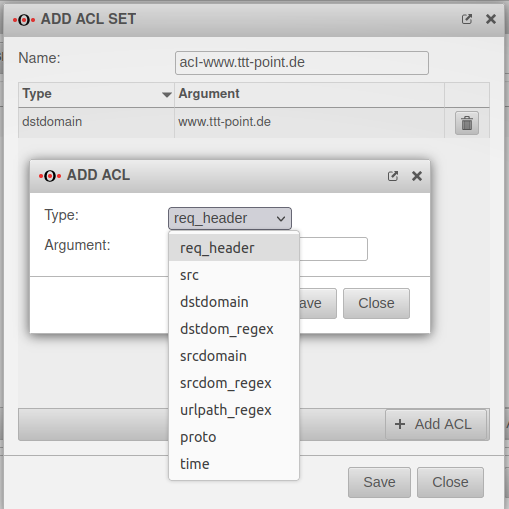 | ||
| Filter on the header of the client (It could be determined, for example, the browser). | |||
| Specifies the source IP of the client (87.139.55.127/255.255.255.255) | |||
| Specifies the domain/IP of the destination server (www.ttt-point.de or IP address). | |||
| Regex to the target domain (.*\ttt-point\.(en|com)) | |||
| Specifies the domain of the sender (anyideas.com) | |||
| Regex to the domain (anyideas) | |||
| Regex for paths | |||
| protoProtocol (http, https) | |||
| Time specification (M T W H F 9:00-17:00) S - Sunday
M - Monday | |||
Sites Sites
| |||
| Now the assignments of the ACLs, the action "Allow/Deny", the order, the distribution algorithm, as well as the bandwidth for the server can be made. The ACLs are processed in order, you can either allow them "Allow" or deny them "Deny". |
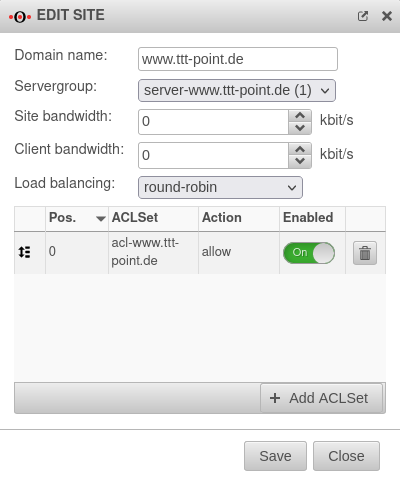 | ||
Options Options
| |||
| Here you can specify whether HTTP/HTTPS or both should be used, the ports and the certificate for the corresponding server. | 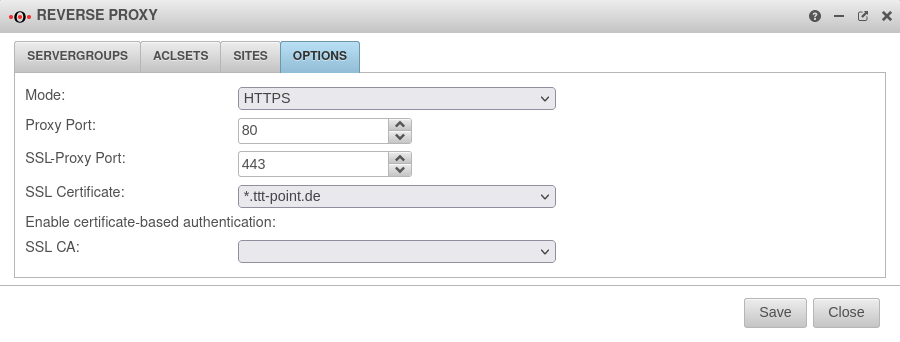 | ||
