Jump to:navigation, search
Wiki


notempty
Dieser Artikel bezieht sich auf eine nicht mehr aktuelle Version!

notempty
Der Artikel für die neueste Version steht hier

notempty
Zu diesem Artikel gibt es bereits eine neuere Version, die sich allerdings auf eine Reseller-Preview bezieht


{{var | Anpassen des Mailfilters--desc

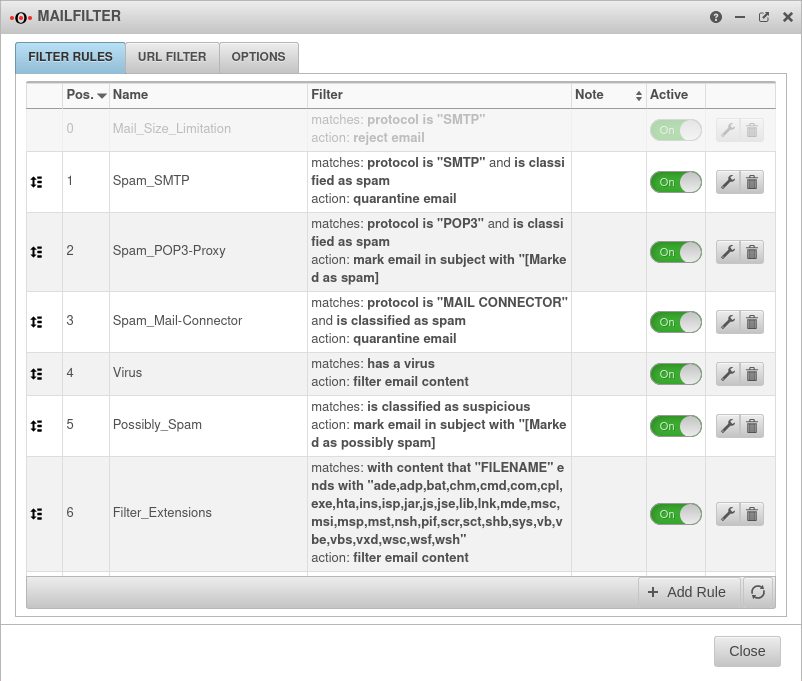
| In → Anwendungen →Mailfilter wird im Reiter Filterregeln überprüft, ob die Regeln Spam_SMTP und Spam_POP3-Proxy aktiviert Ein sind
Das bewirkt, dass eine E-Mail die von der Firewall als Spam deklariert wird, eine vordefinierte Nachricht im Betreff erhält (in diesem Fall "[SPAM]" bzw. "[PROBABLY_SPAM]") und an den internen Mailserver weitergeleitet wird. Der Mailserver filtert seinerseits nun die ankommenden E-Mails im Betreff nach dieser Nachricht und schiebt diese dann in einen Junk-Ordner. So können die Benutzer intern selber entscheiden, ob die E-Mails für sie von Belang sind oder nicht.
   | In → Applications →Mailfilter, the
Filter rules{{{2}}}
tab checks if the rules Spam_SMTP and Spam_POP3-Proxy are enabled Vorlage:ButtonOn
This causes an email declared as spam by the firewall to receive a predefined message in the subject (in this case "[SPAM]" or "[PROBABLY_SPAM]".) and forwarded to the internal mail server. The mail server, for its part, now filters the incoming emails for this message in the subject and then pushes them into a junk folder. This allows users to decide for themselves within the company whether the emails are relevant to them or not.


De.png
En.png
Fr.png


Adaptation of the firewall to the UMA
Last adaptation to the version: 3.3
New:
notempty
This article refers to a Resellerpreview

2.5.6

Access: UTM-IP:Port or UTM-URL:Port
Port as configured at Network / Appliance Settings / Webserver
Default-Port: 11115
i.e.: https://utm.ttt-point.de:11115
Default: https://192.168.175.1:11115
→ Firewall →Portfilter


Introduction

Introduction

In order to implement the UMA, the firewall must be adapted. The firewall must be configured to receive email, check spam, filter for viruses, and forward to the internal mail server.
Im Beispiel wird von einem Exchange-Server ausgegangen.
Details on the administration of the firewall can be found in corresponding Wiki articles. The setup on a UTM is described here.


Creating the network objects and firewall rules for SMTP

Creating the network objects and firewall rules for SMTP

In the UTM under → Firewall →Portfilter
Network objects{{{2}}}
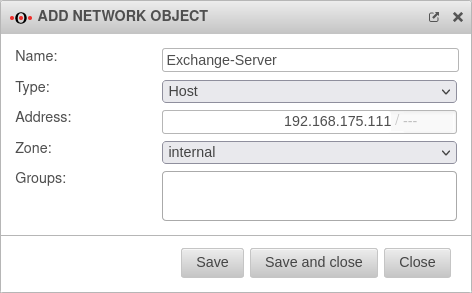
tab a network object is created for the Exchange server. To do this, click on the Add object button.
Caption Value Description UMA3.3 Firewall Portfilter Netzwerkobjekt hinzufügen-en.png
Name: Exchange-Server The name of the network object
Type: Host Select as type host
Adresse: 192.168.175.111 Enter the address of the Exchange server
Zone: internal Select as zone where the server is located
Groups:     A group can be added
The network objects for the external and internal interface, the Internet and for the SMTP service with port 25, NTP with port 123 and HTTPS with port 443 are normally already preconfigured. If this is not the case, the missing objects and services must still be created.
In → Firewall →Portfilter Portfilter tab, the Add rule button adds a port filter rule. Two port filter rules are added.
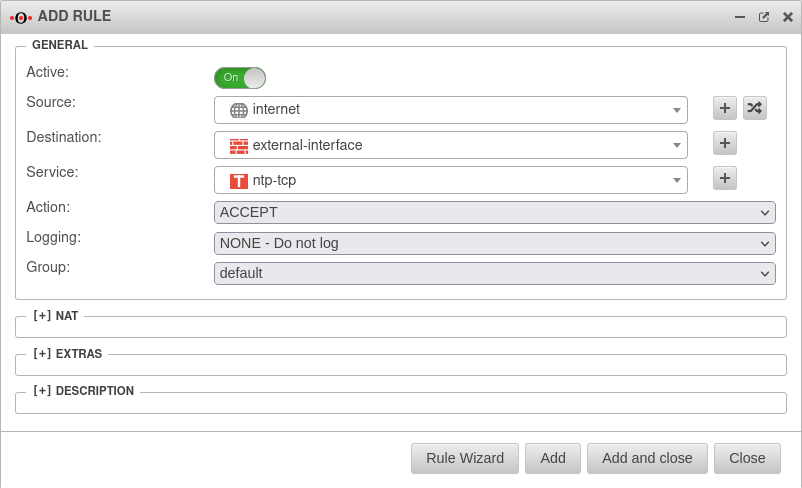
The following rule allows the firewall to accept e-mails on the external interface via the set port from the Internet. The following rule allows the firewall to accept emails on the external interface via the set port from the Internet.
Caption Value Description UMA3.3 Firewall Portfilter-Regel-hinzufügen-en.png
Active: On Activate rule
Source: World.svg internet
Target: Interface.svg external-interface
Service: Tcp.svg ntp-tcp Select the service you need
Task: Accept
Logging: None - do not log
Group: default The rule can be assigned to an existing group
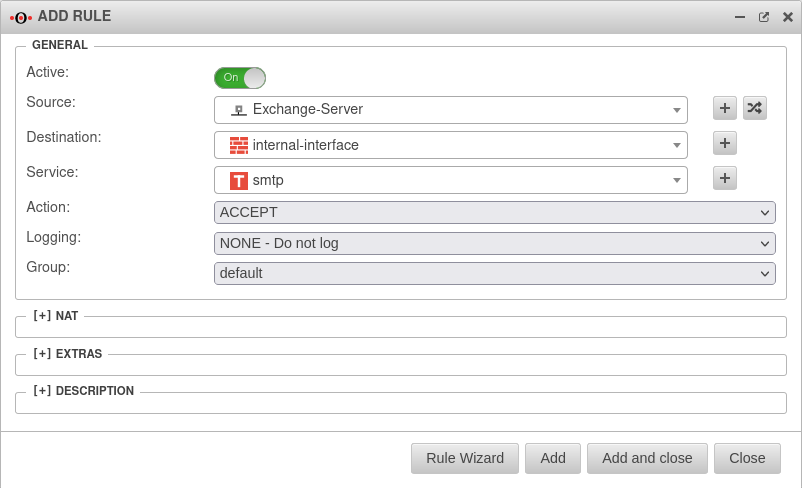
This rule allows accepting emails on the internal interface from the mail server via the respective port, which is necessary for checking outgoing emails for viruses.
Caption Value Description UMA3.3 Firewall Portfilter-Regel-hinzufügen2-en.png
Active: On Activate rule
Source: Host.svg Exchange-Server The previously created network object
Target: Interface.svg internal-interface The interface of the zone where the network object is located
Service: Tcp.svg smtp Select the service you need
Task: Accept
Logging: None - do not log
Group: default The rule can be assigned to an existing group
The following rules are also created.
Active: On Activate rule
Source: Host.svg Exchange-Server The previously created network object
Target: Interface.svg internal-interface The interface of the zone where the network object is located
Service: Tcp.svg ntp-tcp Select the service you need
Task: Accept
Logging: None - do not log
Group: default The rule can be assigned to an existing group
Active: On Activate rule
Source: Host.svg Exchange-Server The previously created network object
Target: Interface.svg internal-interface The interface of the zone where the network object is located
Service: Udp.svg ntp-udp Select the service you need
Task: Accept
Logging: None - do not log
Group: default The rule can be assigned to an existing group

Timestamp

Timestamp
The following rule is for the signature of the timestamp. For this, there must be a corresponding network object for this timestamp.
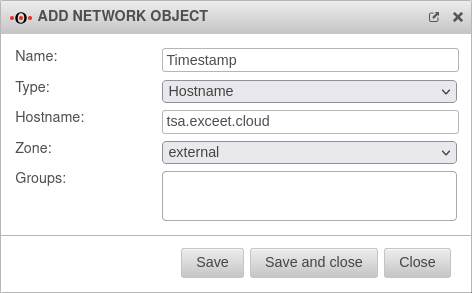
In → Firewall →PortfilterTab Network objects click Add object to create the network object.
Caption Value Description UMA3.3 Firewall Portfilter Netzwerkobjekte Zeitstempel-en.png
Name: Timestamp The name of the network object
Type: Hostname Select hostname as type
Hostname: tsa.exceet.cloud Enter the host name tsa.exceet.cloud
Zone: external Select as zone where the server is located
Groups:     A group can be added
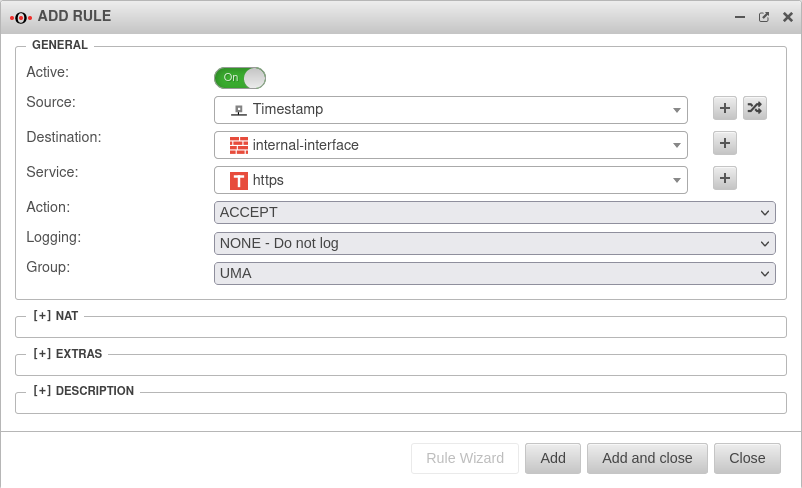
In → Firewall →PortfilterTab Portfilter, the Add rule button adds a corresponding rule.
Active: On Activate rule UMA3.3 Firewall Portfilter-Regel-hinzufügen Zeitstempel-en.png
Source: Host.svg Timestamp The previously created timestamp network object
Target: Interface.svg internal-interface The interface of the zone where the Exchange server is located
Service: Tcp.svg https Select the service you need
Task: Accept
Logging: None - do not log
Group: default The rule can be assigned to an existing group


Configure the mail relay

Configure the mail relay

→ Applications →Mailrelay.
In order for incoming mail to be properly scanned for viruses, filtered for spam, and then forwarded to the internal mail server, the next step is to configure the mail relay.
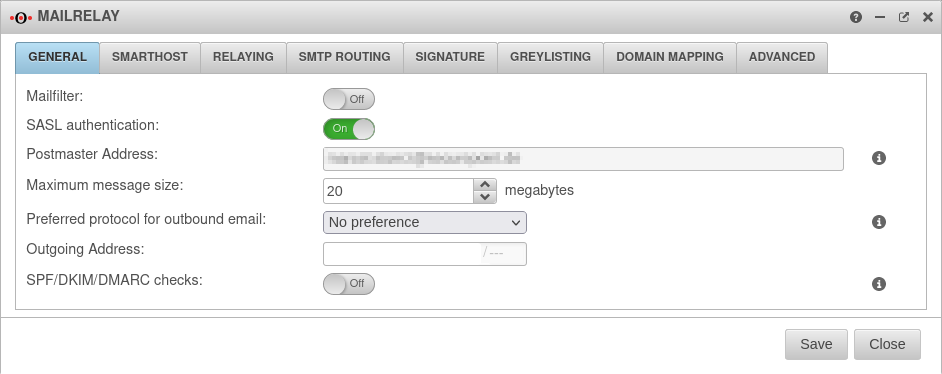
In the General tab, a postmaster email address is entered and the maximum email size for incoming emails and emails to be sent is specified. UMA3.3 Anwendungen Mailrelay Allgemein-en.png

Relaying

Relaying
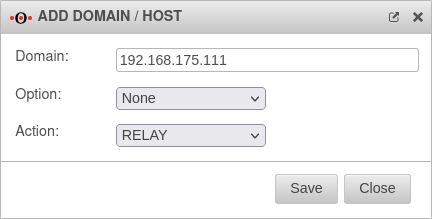
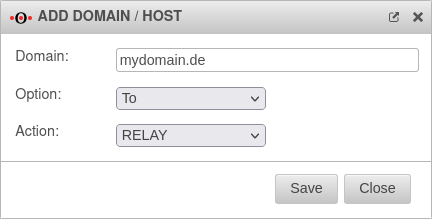
In the Relaying tab, the Add domain/host button adds two domains.
Caption Value Description UMA3.3 Anwendungen Mailrelay Relaying1-en.png
Domain: 192.168.175.111 The IP address of the mail server
Option: None No option is selected
Task: Relay Select this action
For accepting emails with the IP of the mail server.
  
Domain: mydomain.de The domain of the mail server UMA3.3 Anwendungen Mailrelay Relaying2-en.png
Option: To Select this option
The entry of the domain with the To option allows accepting all emails of the entered domain in the recipient.
  
Task: Relay Select this action

SMTP Routen

SMTP Routen
In the SMTP Routes tab, the Add SMTP Routing button creates a new SMTP route.
Caption Value Description Datei:UMA3.3 Anwendungen Mailrelay SMTP-Routene-en.png
Domain: mydomain.de Enter the selected domain
Mailserver: 192.168.175.111 Enter the IP address of the mail server
This route specifies that all incoming emails are forwarded to the internal server.
  
Under
Settings
Check email address: SMTP can be selected.
As a result, emails to unknown recipients who are not stored on the mail server are rejected.
This effectively prevents attempts to deliver spam to "invented" recipients on the one hand, and on the other, actually legitimate senders receive feedback that their email could not be delivered, for example because they made a mistake with the recipient address.
UMA3.3 Anwendungen Mailrelay SMTP-Routen E-Mail.png
In the Advanced tab, under
Greeting Pause
the Status: is activated On.
UMA3.3 Anwendungen Mailrelay Erweitert Greeting-en.png
Similar to graylisting, Greeting Pause takes advantage of the fact that in spambots spread by viruses and Trojans, the SMTP protocol is not fully implemented to distinguish them from regular mail servers.
The greeting is a line of text that is transmitted from the mail relay to the sending mail server. e.g:
220 firewall.foo.local ESMTP Sendmail 8.14.4/8.14.4; Tue, 8 Mar 2011 14:29:30 +2000
With the SMTP protocol fully implemented, a mail server will wait for and evaluate this greeting line before sending SMTP commands to initiate mail delivery.
A spambot will start sending commands immediately after the TCP handshake is complete, since this aspect of the SMTP protocol is most likely not implemented due to space limitations, nor is a repeated delivery attempt. In this case, the mail relay will no longer accept commands.


Customize the mail filter

Customize the mail filter
UMA3.3 Anwendungen Mailfilter Filterregeln-en.png