Konfiguration of the Captive-Portals
Last adaptation to the version: 11.8.7
- New:
- Article updated
- English translation
- Added rule for HTTPS with SLL interception
Previous versions: -
Server settings
Menü Reiter Server settings
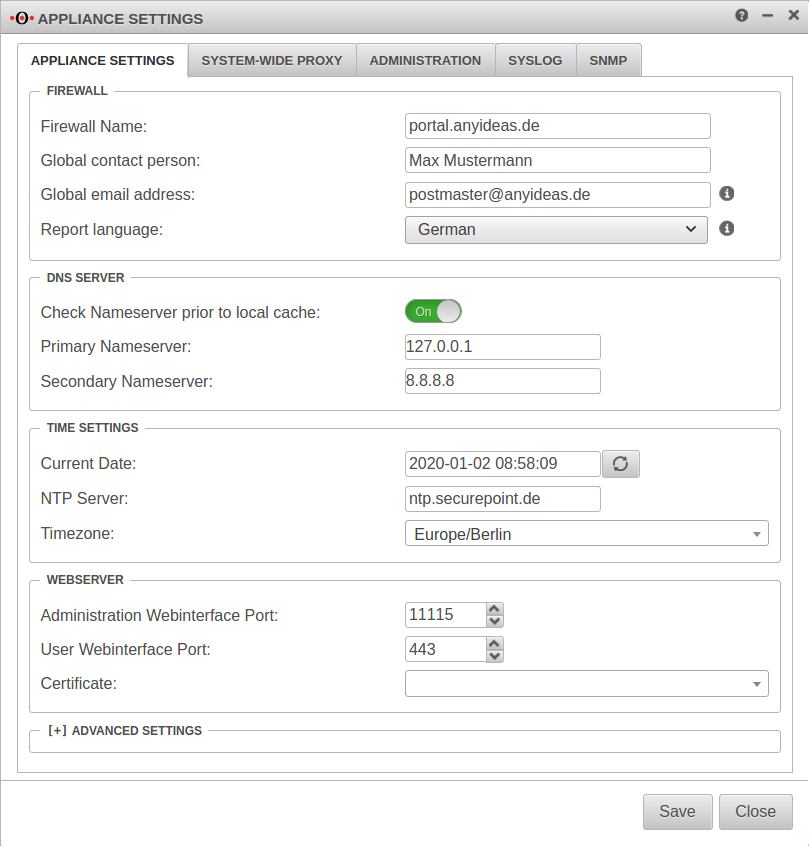
Customize Firewall Name
The firewall name should be defined as FQDN. (In the example portal.anyideas.de)
This is necessary so that later the resolution of the landing page of the captive portal is compatible with the certificate.
Firewall
| ||
| Firewallname | portal.anyideas.de | FQDN compliant firewall name |
Entering the DNS serverThe localhost (here 127.0.0.1) is entered as the primary name server. In the past, 'google-public-dns-a.google.com' has proven itself as a secondary name server with its fast response time and high availability. DNS server | ||
| Primary name server | 127.0.0.1 | Localhost |
| Secondary name server | 8.8.8.8 | Possible name server: google-public-dns-a.google.com |
Importing certificates
Since the landing page of the captive portal is a HTTPS website, the next step is to provide the required certificate. We strongly recommend to buy a certificate from an official CA (or to use an existing wildcard certificate) to avoid later irritations because of browser warnings.
Basically there are two options:
Grundsätzlich bestehen hier zwei Optionen:
- A Certificate for a FQDN
- in this case the common name of the certificate would be portal.anyideas.de
- A wildcard certificate
- in which case the common name of the certificate would be *.anyideas.de
In the first step, the CA provided together with the certificate must be imported into the UTM.
Menu Area CA ButtonIn the first step, the CA provided together with the certificate must be imported into the UTM.
Menu Area CA Button
Import format
Certificates and CAs to be imported into a UTM must be in the format .pem or .p12 (pkcs12).
Certificates can be converted with the tool openssl - available for all common platforms (part of Linux, call via console) - and the following commands:
| Certificate | Command |
|---|---|
| X509 to PEM | openssl x509 -in certificatename.cer -outform PEM -out certificatename.pem |
| DER to PEM | openssl x509 -inform der -in certificate.cer -out certificate.pem |
| P7B to PEM | openssl pkcs7 -print_certs -in certificate.p7b -out certificate.pem |
Error message during import
During import, the error message "The certificate format is not supported..." may appear.
Password protected certificates in pkcs12 format (.p12 , .pfx , .pkcs12) in conjunction with older ciphers can trigger this error.
Options for importing certificates:
- Convert certificate to *.pem
Certificates can be converted with the tool openssl - available for all common platforms (part of Linux, call via console) - and the following commands:
openssl pkcs12 -in Zertifikat.pfx -out Zertifikat.pem -nodes
Alternatively with the help of an online service - CLI commands to allow certificate import with obsolete ciphers in the UTM
extc global set variable GLOB_ENABLE_SSL_LEGACY value 1
appmgmt config application "securepoint_firewall"
appmgmt config application "fwserver"
system reboot
notemptyRequires a This will interrupt all connections (incl. VPN connections) to the UTM!
cli> extc global get variable GLOB_ENABLE_SSL_LEGACY
variable              |value
----------------------+-----
GLOB_ENABLE_SSL_LEGACY|0

cli> extc global set variable GLOB_ENABLE_SSL_LEGACY value 1
OK

cli> extc global get variable GLOB_ENABLE_SSL_LEGACY
variable              |value
----------------------+-----
GLOB_ENABLE_SSL_LEGACY|1

cli> appmgmt config application "securepoint_firewall"
cli> appmgmt config application "fwserver"
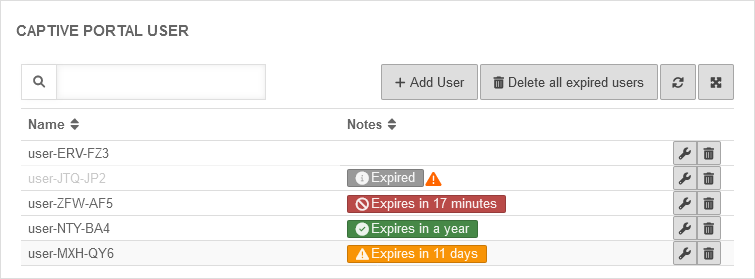
Captive Portal User
Add user
Captive Portal users can be managed by:
- Administrators
- Users who are members of a group with the permission Userinterface Administrator .
They reach the user administration via the user interface.


