notempty
- Changed default behaviour: Access to the HTTP proxy now only from known networks
- Access to internal destinations via the HTTP proxy can now be deactivated
- The SNI validation can be deactivated
Introduction
The proxy serves as an intermediary between the internet and the network to be protected.
The clients send their request to the proxy and the proxy passes it on to the corresponding servers.
The actual address of the client remains hidden from the server.
In this way, it is possible to check the data traffic for viruses and unwanted content.
General
notempty
| Caption | Value | Description | 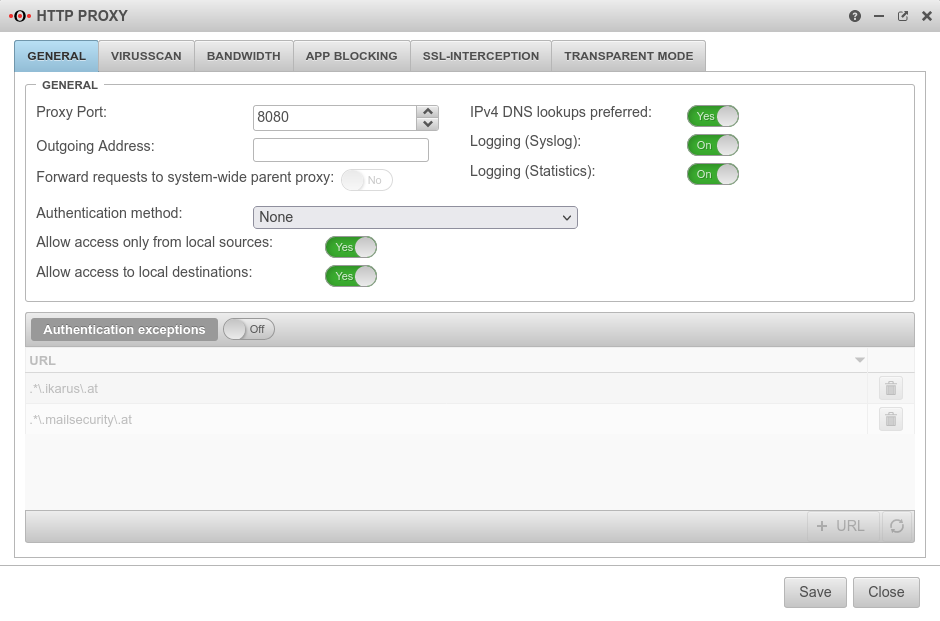 | ||
|---|---|---|---|---|---|
General
| |||||
| Proxy Port | 8080 | specifies on which port the proxy is to be addressed | |||
| Outgoing Address | The Outgoing Address is used for two scenarios:
In this example, the proxy is bound to the faster DSL line:
Connection to a web server in the VPN network:
| ||||
| Forward requests to system-wide parent proxy: | No | If another proxy is used before the HTTP proxy, this function must be activated. The configuration takes place under | |||
| IPv4 DNS lookups preferred | Yes | Here you can specify whether the name resolution should preferably be done with IPv4 addresses | |||
| Logging (Syslog) | On | Writes a general Syslog for the HTTP proxy (Open: Tab Log | |||
| Logging (Statistics) | On | Writes a statistical Log call: Tab HTTP proxy statistics | |||
| Authentication method | The proxy offers various possibilities for authentication. The possibilities are: | ||||
| The HTTP proxy processes all requests without authentication | |||||
| With basic authentication, the users are queried against the stored users under Tab User on the firewall | |||||
| Here the firewall must be made known to the server. This can be set up in the web interface under | |||||
| Here the firewall must be made known to the server. This can be set up in the web interface under | |||||
| Allow access only from local sources: since v12.2 | Yes default |
Changed default behaviour from v12.2 Access to the HTTP proxy is now only possible from internal sources. These are:
| |||
| Allow access to local destinations: since v12.2 | Yes default |
All internal networks can also be reached via the HTTP proxy (the port filter has already been passed through to reach the HTTP proxy). Disabling No prevents this and access to other internal networks must be explicitly allowed via the port filter without an HTTP proxy. | |||
| Authentication exceptions | Off | URLs listed here are accessed without prior authentication. The default URLs are pages that are used for Securepoint Antivirus Pro. Further information can be found in the article HTTP proxy authentication exceptions |
 | ||
Virusscan Virusscan settings
| |||||
| Virusscan: | On | Activates or deactivates the virus scanner function of the UTM (In default: active) |
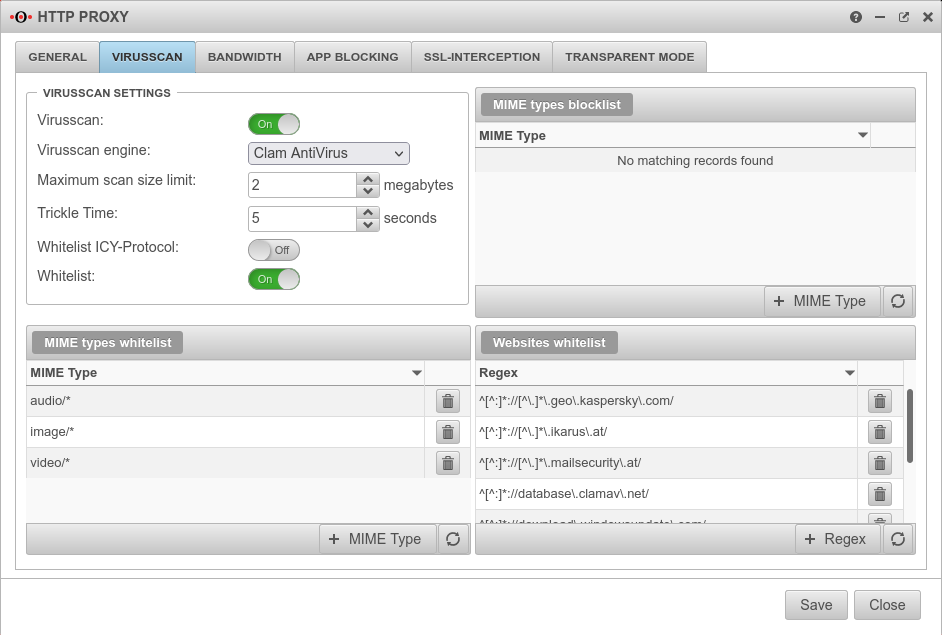 | ||
| Virusscan engine: | You can choose between: and | ||||
| Maximum scan size limit: | 2 Megabytes | Sets the size of the files to be scanned by the virus scanner | |||
| Trickle Time: | 5seconds | Interval at which data is transferred from the proxy to the browser so that the browser does not stop loading during the virus check | |||
| Allowlist ICY-Protocol | A web radio protocol that can be excluded from testing | ||||
| Allowlist | On | This enables or disables the following Allowlist entries. The blocklist is always activated! | |||
| Mime types blocklist | |||||
| application/x-shockwave-flash Example |
Mime types listed here are blocked in any case. The button opens a dialogue in which a mime type can be selected from a dop-down menu or an individual type can be entered. | ||||
| Mime type Allowlist | |||||
| application/pkcs10 Example |
Mime types listed here are not scanned. Standard defaults:
| ||||
| Websites Allowlist | |||||
| ^[^:]*://[^\.]*\.ikarus\.at/ | Here it is possible to create your own filters based on Regular Expressions (Regex). Viruses from these pages are not detected ! Some update servers that cause problems when using a virus scanner are already preconfigured. Hint: Further exceptions are necessary so that iTunes can communicate correctly with the internet. | ||||
Bandwidth Bandwidth settings
| |||||
| Bandwidth limiting policy | The bandwidth is not limited | 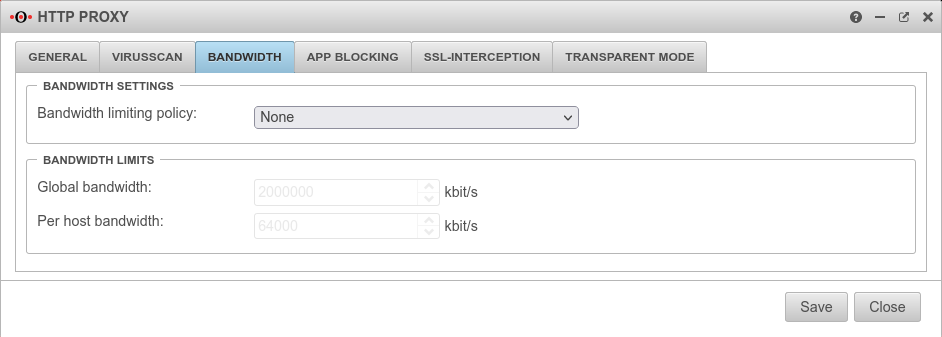 | |||
| In this case, the proxy only uses the specified maximum bandwidth and leaves the rest of the bandwidth untouched by your internet connection. (This bandwidth is shared by all hosts connected to the proxy.) | |||||
| Bandwidth for each host. The limited bandwidth for hosts cannot exceed the global bandwidth. | |||||
Bandwidth limits
| |||||
| Global bandwidth | 2.000.000 kbit/s | Default value, if activated | |||
| Per host bandwidth | 64.000 kbit/s | Default value, if activated | |||
App BlockingAllow Applications | |||||
Application allowed Application blocked |
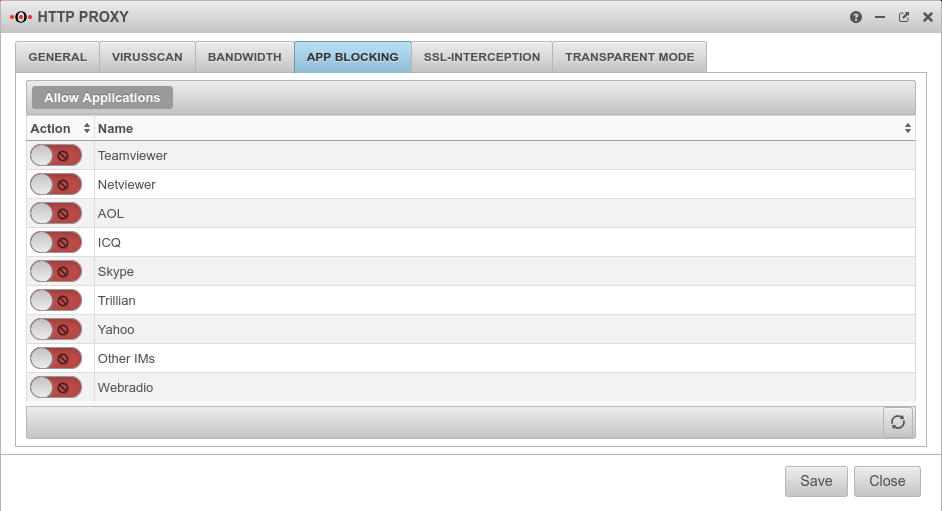
Here you have the option of blocking specific applications. This is done simply by activating the desired application. Further, even more extensive blocking options are available under
|
 | |||
SSL-InterceptionWith the SSL Interception feature it is possible to detect malicious code in SSL-encrypted data streams already at the gateway. It interrupts the encrypted connections and makes the data packages visible to the virus scanner. The data transmission to the client is then encrypted again. | |||||
| SSL-Interception: | On | Activates the SSL interception | 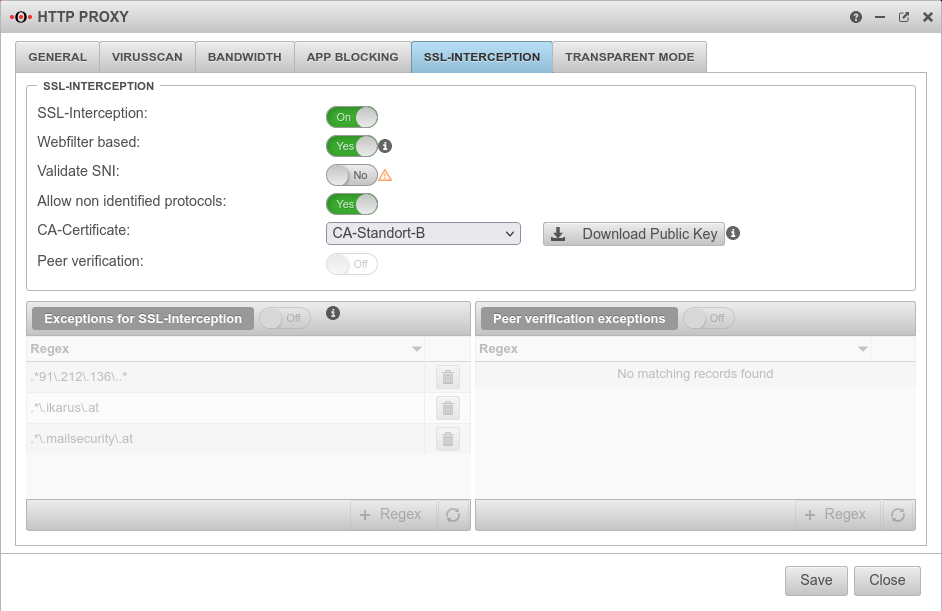 | ||
| Webfilter based: | No | When enabled, only connections blocked by the web filter are intercepted. This avoids the problem that there are sites that do not tolerate an interruption of the encryption (e.g. banking software) without having to define an exception for it. | |||
| Validate SNI Only available when "Webfilter-based" is active. |
On | Without Server Name Indication validation, clients can manipulate SNI arbitrarily to bypass the web filter. | |||
| Allow non identified protocols: | On | If this switch is deactivated, unrecognized protocols are blocked | |||
| CA-Certificate: | Here, a CA must be selected that can re-encrypt the connection after decryption (and scanning). The public key of the CA must be installed on all client computers that are to use SSL Interception. Download can be done here directly with ⬇Download public key . | ||||
| The public key should be installed on the clients that are going to use SSL interception to avoid certificate errors. | |||||
| Peer verification: | Off | This should definitely be enabled With this, the HTTP proxy checks whether the certificate of the called page is trustworthy. Since the browser only sees the local certificate, a check by the browser is no longer possible. | |||
| Exceptions for SSL-Interception | On | It is possible to define exceptions in the format of Regular Expressions. However, since only https can arrive here, it is not filtered for protocols, unlike the virus scanner. With new exceptions are added. So an exception for www.securepoint.de would be:
.*\.securepoint\.de" | |||
| Peer verification exceptions | Aus | Here exceptions for certificate verification in regex format can be added. | |||
Transparent Mode | |||||
| Transparent Mode | Aus | Due to the transparent mode, the proxy is not visible to the clients, the client sees its internet connection (HTTP) as if no proxy was connected in front of it. Nevertheless, the entire HTTP stream goes through the proxy, which means that no settings have to be made on the client. However, there are the same possibilities to analyse / block / filter / manipulate the data stream as if a fixed proxy were used. Each network object or group of network objects that are to use the transparent proxy must be stored here. |
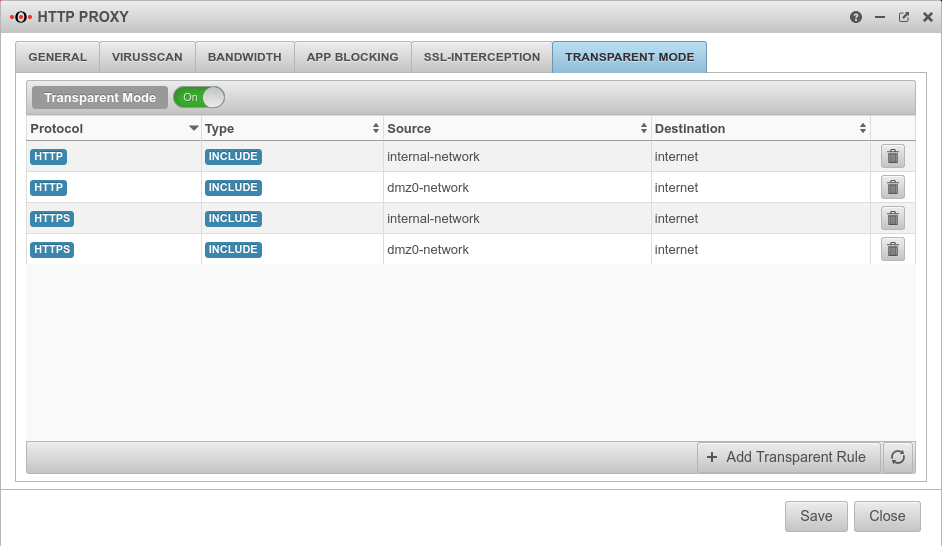 | ||
| Protocol | oder | Protocol that is used | 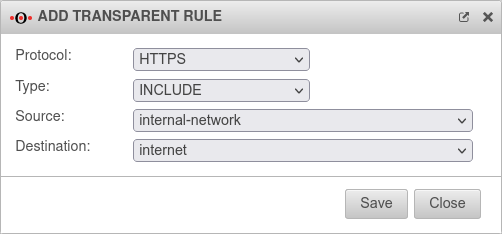 | ||
| Type | The transparent mode is applied | ||||
| Transparent mode is not applied | |||||
| Source | Source network object created under Tab Network objects | ||||
| Destination | Destination network object | ||||
Captive Portal
The Captive Portal is configured since v12.1 in its own menu under . There is a separate Wiki-article for this.