Jump to:navigation, search
Wiki


notempty
Dieser Artikel bezieht sich auf eine nicht mehr aktuelle Version!

notempty
Der Artikel für die neueste Version steht hier

notempty
Zu diesem Artikel gibt es bereits eine neuere Version, die sich allerdings auf eine Reseller-Preview bezieht


De.png
En.png
Fr.png


Configuration of a name server with DNS forwarding
Last adaption: 12.4
New:
  • Terms corrected: Instead of Domain Forwarding, the term DNS Forwarding is used.
  • Special case configuration: Safe Search with external DHCP server (02.2023)
notempty
This article refers to a Resellerpreview

12.2.3 11.7 11.6.11

Access: UTM-IP:Port or UTM-URL:Port
Port as configured at Network / Appliance Settings / Webserver
Default-Port: 11115
i.e.: https://utm.ttt-point.de:11115
Default: https://192.168.175.1:11115
→ Applications →NameserverTab DNS Forwarding

Introduction

A name server is a server that provides name resolution.
Name resolution is the procedure that allows names of computers or services to be resolved into an address (IP) (e.g.: support.securepoint.de in 85.209.185.22). The UTM can forward a name resolution to another name server or find a specific name for an IP address (reverse lookup).
Additionally there is the function DNS forwarding, which allows to forward all DNS requests to a specific name server.

The network tools article provides an overview of the data that is managed in a name server.

DNS Forwarding

A DNS forwarding is used to forward all DNS requests made to the firewall's name server to another IP.

Add DNS Forwarding

Menu → Applications →NameserverTab DNS Forwarding Button Add DNS Forwarding

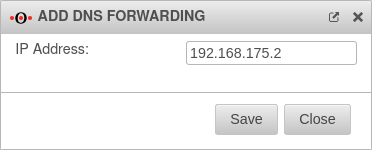
Caption Value Description UTMv12.4 Nameserver DNS-Forwarding-hinzufügen-en.png
Creating a DNS Forwarding
IP address 192.168.175.2 The IP address of a DNS server to which the DNS requests should be forwarded.
Save The entry is saved with this button

The changes in DNS forwarding must also be saved with the Save button.


Domain forwarding through a VPN tunnel

Sometimes it is necessary to forward internal domain requests to a remote name server located in a VPN.

It should be noted here that, by default, all direct requests addressed to external name servers are sent from the firewall with the external IP. However, a public IP is not routed into a VPN tunnel.

Set the name server of the firewall

Menu → Network →Server SettingsTab Server Settings section
DNS-Server
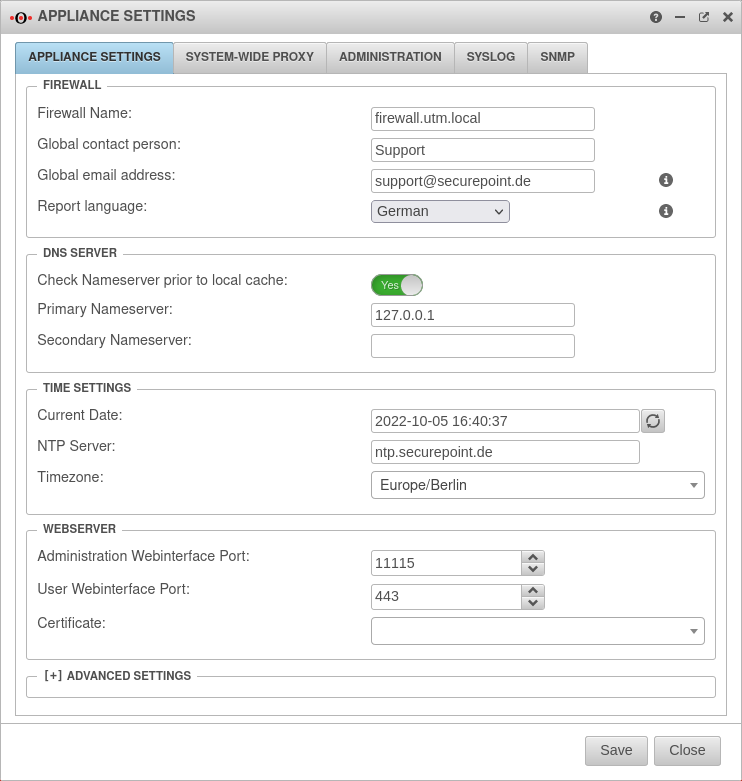
Caption Value Description UTM-v12.2.3- Servereinstellungen-en.png
Name server IP
Check name server before local cache: Yes Should be enabled
Primary name server: 127.0.0.1 The IP of the UTM itself (localhost=127.0.0.1)
Secondary name server:     Should remain empty or designate another DNS in the VPN
Save The entry is saved with this button


Create relay

For this example, an IPSec connection was used. For SSL-VPN, the setup is done in the same way.

Menü → Applications →Name server Button Relay-Zone

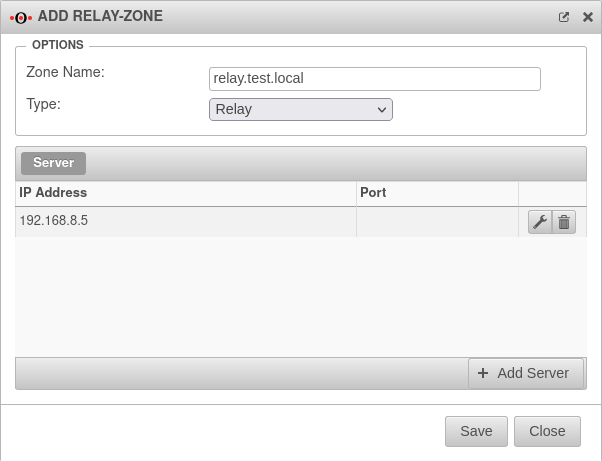
Caption Value Description UTM-v12.2.3-Nameserver-DNS-Forward-Relay-en.png
Creating the relay zone
Zone name: relay.test.local The zone name of the desired domain
Type: Relay Select this type
IP address 192.168.8.5 Click on Add server and in the IP address field the address of the remote name server is entered


Edit the entry
trash Delete the entry

Save The entry is saved with this button

The changes in the zone must also be saved by clicking the Save button.


Create network object

From the → Firewall →PortfilterTab Network Objects navigation bar, the network object is created under Add Object. A network object must be created for the IPSec network.

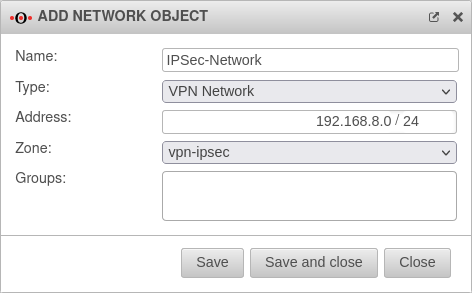
Caption Value Description UTM-v12.2.3-nameserver-DNS-Forward-Netzwerkobjekt-en.png
Network object
Name: IPSec network A name for the network object
Type: VPN network Select this type
Address: 192.168.8.0/24 The IP address corresponds to that of the IPSec network
Zone: vpn-ipsec This zone must be selected
Save The entry is saved with this button


Create rule

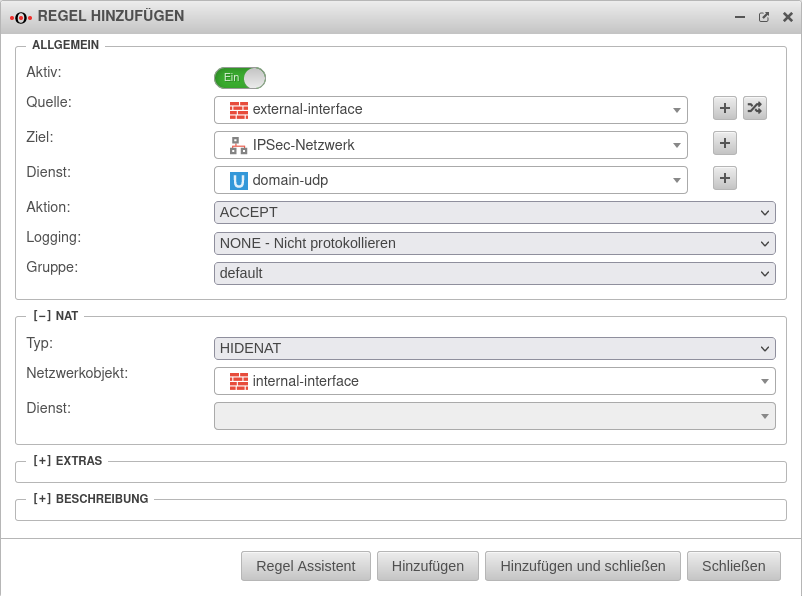
In the last step, a firewall rule with a Hide NAT must be created. This causes the DNS forwarding to also go into the tunnel, and not directly into the Internet. From the → Firewall →Portfilter navigation bar, the application is selected and a rule can be added under Add Rule.

Caption Value UTM-v12.2.3-nameserver-DNS-Forward-Firewallregel-en.png
Create the rule
Aktive: On
Source: Interface.svg external-interface
Destination: Vpn-network.svg IPSec-Netzwerk
Service: Udp.svg domain-udp

[-] NAT
Type: HIDENAT
Network object: Interface.svg internal-interface
Service: The Service parameter is not used here and is disabled

The entry can be saved by clicking the Add and close button.
The port filter must be updated via the Update rules button.
With this rule, all domain UDP requests made through the firewall to the remote name server are now nated over the IP of the internal interface and can thus be routed into the IPSec tunnel.


Safe Search with external DHCP server

If an external DHCP server is used, the active web filter Safe Search often does not work for search engines, especially Google, when searching for images.

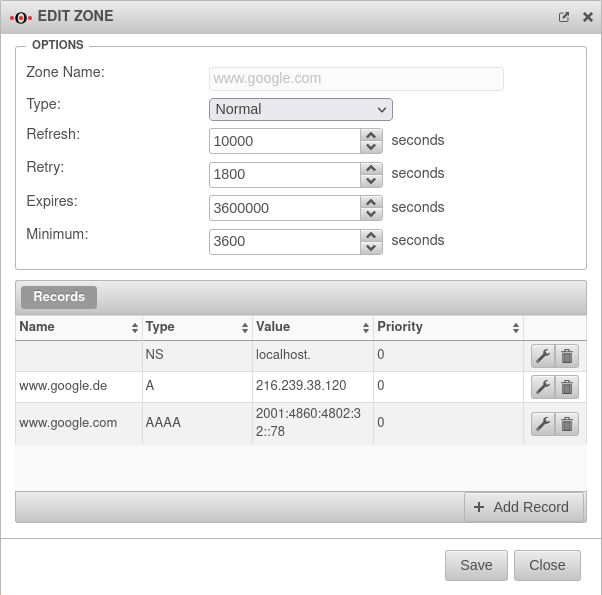
In order for this web filter to take effect there as well, the following forward zones must be set up for all ccTLDs (see https://www.google.com/supported_domains : www.google.de, www.google.ch, ...). From the → Applications →Nameserver navigation bar, use Add Forward Zone to add a forward zone:
Caption Value UTM-v12.2.3-Forward-Zone-Safe-Search-en.png
The established forward zone for www.google.com
Zone name: www.google.com
Name server hostname: localhost
Name server IP address: <leave blank>
In the Name server window, click in the www.google.de zone.
In the Edit Zone window click Add entry.
Name: www.google.com
Type: A
Value: 216.239.38.120
Save and click again on Add entry.
Name: www.google.com
Type: AAAA
Value: 2001:4860:4802:32::78
Save