notempty Dieser Artikel bezieht sich auf eine nicht mehr aktuelle Version!
notempty Der Artikel für die neueste Version steht hier
notempty Zu diesem Artikel gibt es bereits eine neuere Version, die sich allerdings auf eine Reseller-Preview bezieht
Set up Generic Routing Encapsulation
Last adaptation to the version: 12.2.3
New:
- Article and layout adjustments
notemptyThis article refers to a Resellerpreview
11.7
Introduction
The GRE (=Generic Routing Encapsulation) protocol can be used to encapsulate other protocols and transport them via tunnels. It should be noted that the packets are not encrypted.
Possible use of the GRE protocol:
Create GRE tunnel
In this example, the firewall "Headquarters" has the IP address 198.51.100.75/24 on eth0 and the remote site "Site-01" has the IP address 198.51.100.1/24 on eth0.
The local subnets are 10.0.0.0/24 for "Central" and 10.1.0.0/24 for "Site-01".
To establish this connection, a transfer network is still required, which in this example is 10.250.0.0/24.
Create GRE interface
|
|
|
|
|
Name and local IP addresses
|
| Name: |
gretun0 |
Here you can enter the desired name for the GRE tunnel
|
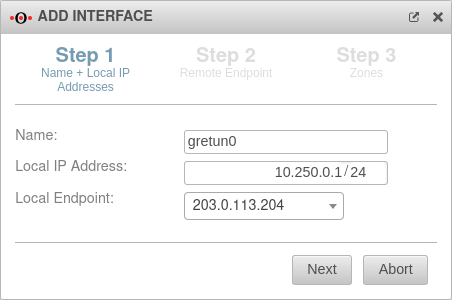 Name and local IP addresses
|
| Local IP Address: |
10.250.0.1/24 |
Local IP of the transfer network, which is specified with this
|
| Local tunnel endpoint: |
203.0.113.204 |
The respective public IP
|
|
|
Remote endpoint
|
| Remote endpoint: |
203.0.113.203/--- |
The remote endpoint has the IP 203.0.113.203
|
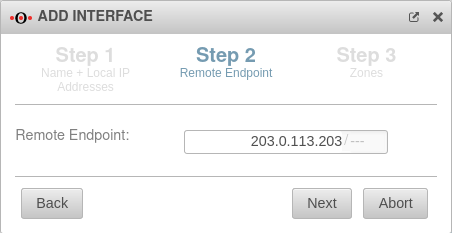 Remote endpoint
|
|
|
Zones
|
| Zones: |
× external × firewall-external
× firewall-internal × dmz1 |
Here you can select the desired zones
|
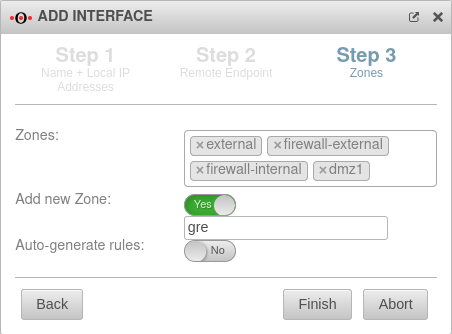 Zones
|
| Add new zone: |
Yes
gre |
If necessary, a new zone can be created here
|
| Auto-generate rules: |
No |
Auto-generated rules that may need to be replaced
|
| Back |
By clicking on the button previous steps can be edited again
|
| Finish |
Clicking the button saves the entries and adds the interface
|
| Abort |
Clicking the button cancels the process, deletes the entries and closes the dialog
|
|
|
Routing
|
- Select Tab Routing from the menu.
- Add a new route
|
| Source Network: |
/24 |
The field is optional
|
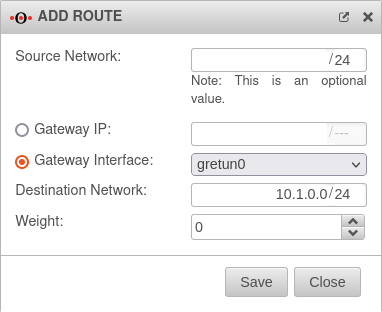 Add Route
|
| Gateway Interface: |
gretun0 |
The interface that has just been created must be selected
|
| Destination Network: |
10.1.0.0/24 |
Destination network is the remote network of the remote station
|
| Weight |
0 |
A higher weighting can be entered here
|
| Save |
Clicking the button saves the entries and adds the route
|
| Close |
Clicking the button cancels the process, deletes the entries and closes the dialog
|
Port filter
Create firewall rule
The simple option to connect the networks with each other is using the network objects of the entire networks and the "any" service.
However, security and control are always obtained only when working dedicatedly.
- In the menu.
- Add a new rule
- Source is the internal-network
- Destination is remote network gre-network
- Select default-internet as the service in the test scenario.
- Click Add
- Add another rule
- Source is the remote network gre-network
- Destination is the internal-network
- Select default-internet as the service in the test scenario.
- Click Add and close
Create dedicated firewall rule
Of course, it is also advisable to work in a dedicated manner, i.e. to create individual network objects for each required connection and to enable only the required services in the port filter rule.
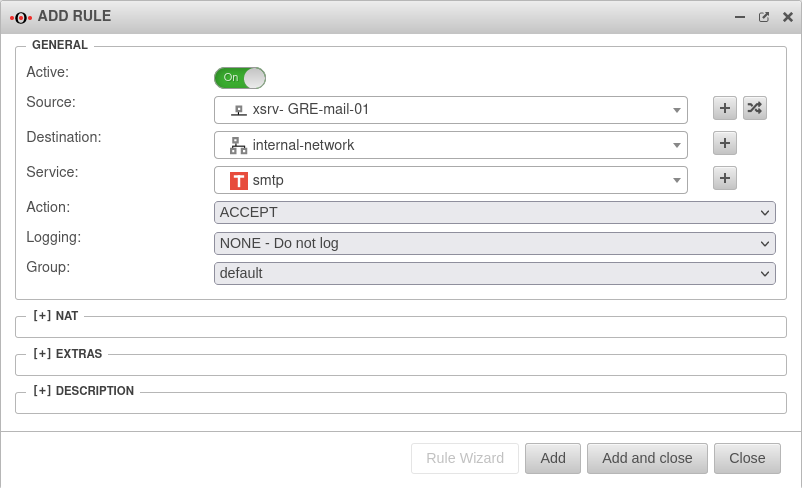
In this example, the mail server in "Site-01" is to be reached from the "Headquarters" network via "smtp". In addition, clients from the network of "Site-01" are to access the terminal server of the "Headquarters" via RDP.
- Open Tab Network Objects
- Add a new object:
| Name: |
xsrv-GRE-mail-01 |
Here the respective desired name for the network object can be chosen.
|
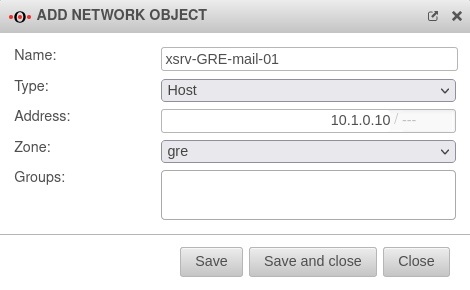 Add network object
|
| Type: |
Host |
Select the relevant type
|
| Address: |
10.1.0.10/--- |
The IP address is entered here
|
| Zone: |
gre |
Here the previously created zone "gre" was selected
|
| Groups: |
|
Additional groups can be selected
|
| Save |
Here the entries are saved and the network object is added.
|
| Save and close |
Here the entries are saved, the network object is created and the editing dialog is closed.
|
| Close |
Here the process is canceled, the entries are deleted and the dialog is closed.
|
|
|
- In the menu.
- Add a new rule
- Source is internal-network
- Destination is remote network xsrv-GRE-mail-01
- Select smtp as the service when accessing the mail server
- Click Add
|
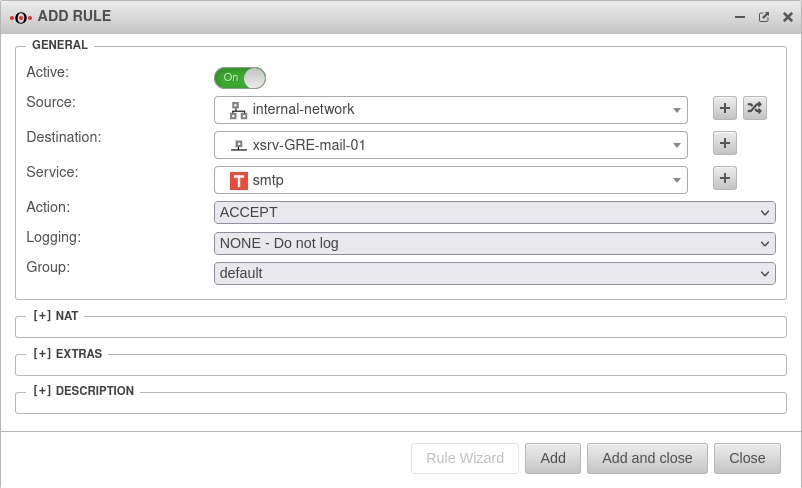 Zugriff vom internen Netz zum Mailserver der Gegenstelle erlauben
|
|
|
- Eine weitere Regel hinzufügen
- Quelle ist das entfernte Netz gre-network
- Ziel ist srv-lg-rdp-01
- Als Dienst beim Zugriff auf den Terminalserver ms-rdp wählen
- Hinzufügen und schließen klicken
- (Siehe oben)
|
|
|
| The ruleset
|
 The rule group with the port filter rules
|
|
|
Configuration of the remote terminal
|
|
| On the remote UTM, the settings must be made in reverse.
|
|
|
| Name: |
gretun0 |
Here you can enter the desired name for the GRE tunnel
|
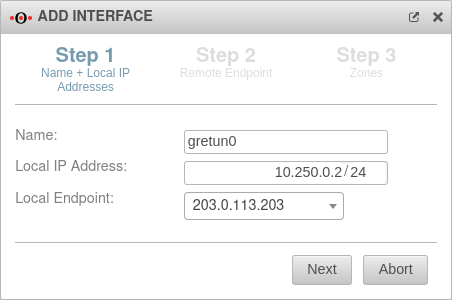 Name and local IP addresses
|
| Local IP Address: |
10.250.0.2/24 |
Local IP of the transfer network, which is specified with this
|
| Local tunnel endpoint: |
203.0.113.203 |
The respective public IP
|
|
|
| Remote endpoint: |
203.0.113.204/--- |
What is local in "Headquarters" is remote in "Site-01".
|
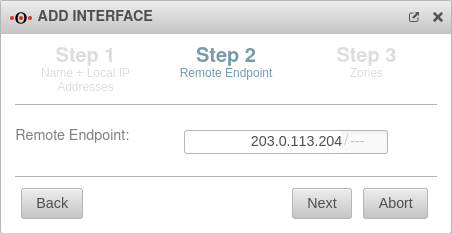 Remote endpoint
|
|
|
| Zones: |
× external × firewall-external
× firewall-internal × dmz1 |
Here you can select the desired zones
|
 Zones
|
| Add new zone: |
Yes
gre |
If necessary, a new zone can be created here
|
| Auto-generate rules: |
No |
Auto-generated rules that may need to be replaced
|
| Back |
By clicking on the button previous steps can be edited again
|
| Finish |
Clicking the button saves the entries and adds the interface
|
| Abort |
Clicking the button cancels the process, deletes the entries and closes the dialog
|
|
| Add rule
|
For incoming and outgoing port filter rules, corresponding services must be created.
Rules designed outgoing in "Headquarters" must be created incoming at "Site-01".
|
 Configuration of the remote terminal - Add rule
|
|
|


