notempty Dieser Artikel bezieht sich auf eine nicht mehr aktuelle Version!
notempty Der Artikel für die neueste Version steht hier
notempty Zu diesem Artikel gibt es bereits eine neuere Version, die sich allerdings auf eine Reseller-Preview bezieht
This HowTo describes how to place an IPv6 prefix as a /64 network on a specific interface.
Last adaptation to the version: 12.2.5
New:
- Updated to Redesign of the webinterface
notemptyThis article refers to a Resellerpreview
11.8
Introduction
It is possible by prefix delegation to split an IPv6 network (assigned by the provider) (e.g.:2001:0db8:aaaa:bb::/56) into /64 networks (e.g.:2001:0db8:aaaa:bb00::/64, 2001:0db8:aaaa:bb01::/64 etc.) and assign them to individual interfaces. All devices in this network segment can then receive an IPv6 address from their interface identifier and the prefix if router advertisement is activated. The respective interface of the UTM receives the first address, in the example 2001:0db8:aaaa:bb00::1/64.
IPv6 prefix delegation is enabled on the interface that is connected to the WAN.
notemptyThe UTM can request an IPv6 prefix from the provider via the PPPoE connection and divide it into smaller /64 subnets and automatically place them on the interfaces.
Activating the prefix delegation
|
In the menu Area Network interfaces Button the interface (e.g. wan0 ) that is assigned to a larger IPv6 network via PPPoE must be configured.
In the bottom section of the General tab:
|
| Caption |
Value |
Description
|
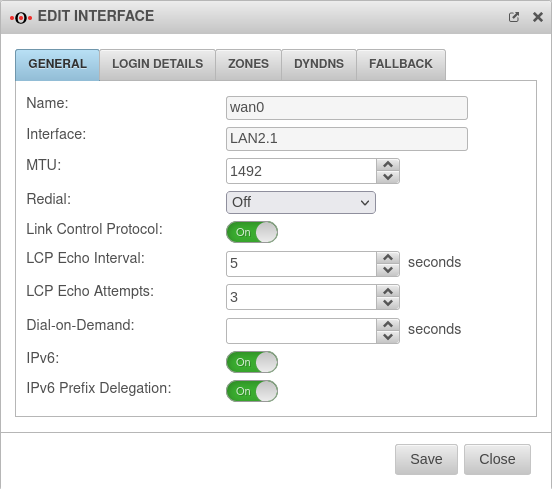 Edit interface
|
| IPv6: |
On |
Enable for IPv6 to be used at all
|
| IPv6 Prefix Delegation: |
On |
Activates the prefix delegation
|
| Only IPv6 networks from a delegated prefix are placed on an interface if they have the Router Advertisement feature and do not have a fixed configured IPv6 address. Click Save to apply the changes.
|
|
|
Transfer to interface by router Advertisement
|
| In the menu Network interfaces the interface to which the smaller /64 subnet is to be assigned (e.g.: LAN2) must be configured:
|
| Caption |
Value |
Description
|
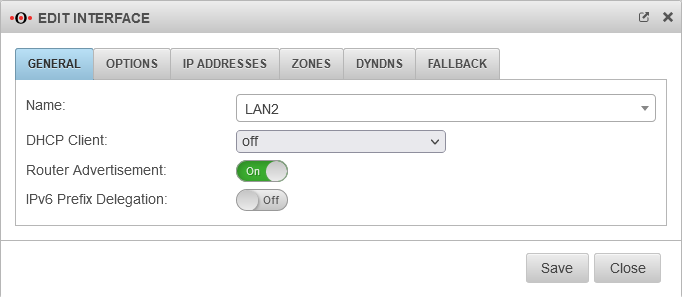 Edit interface Router Advertisement
|
| Name: |
LAN2 |
Display of the selected interface
|
| DHCP Client: |
off |
|
| Router Advertisement: |
On |
With this function, the allocation of a prefix is taken over by the router (here: the UTM firewall)
|
| IPv6 Prefix Delegation: |
off |
Prefix Delegation ist nur für externe Schnittstellen zulässig.
|
| Only IPv6 networks from a delegated prefix are placed on an interface if they have the Router Advertisement feature and do not have a fixed configured IPv6 address. Click Save to apply the changes.
|
|
|
|
|
 Display in the network configuration
|
Add default route
|
| In order to route the IPv6 addresses, a default route must be added under Tab Routing with Add default route.
|
| Caption |
Value |
Description
|
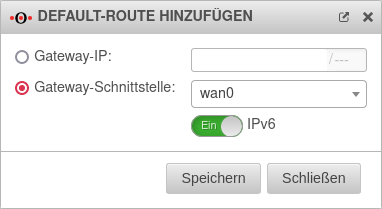 Default route
|
| Gateway interface: |
wan0 |
The selected interface
|
| IPv6: |
On |
|
|
|
Überprüfung
|
| Under Tab Ping, a ping is performed on an address that reliably uses (and also answers) IPv6. This verifies that the routing is working properly.
|
| Caption |
Value |
Description
|
Settings
|
| Source: |
2001:db08:aaaa:bbb00::1 |
Selection of the IPv6 address to be pinged with
|
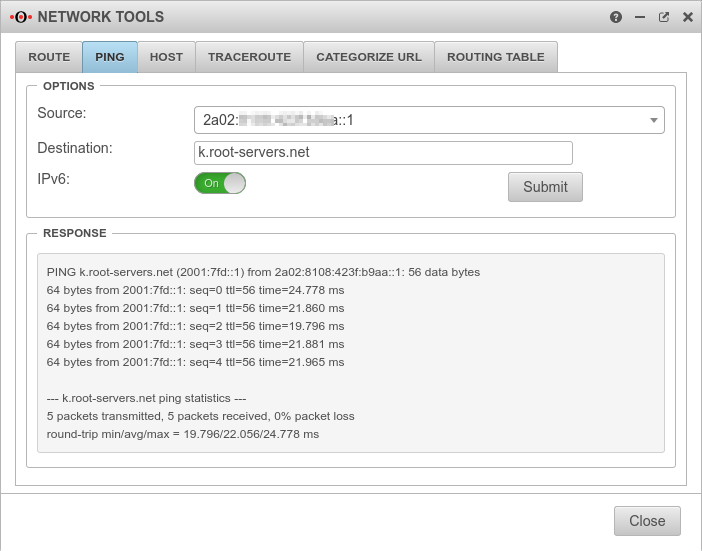 IPv6 Ping-Test
|
| Destination: |
k.root-servers.net |
Destination name or IP addresss
|
| IPv6 |
On |
Enable for IPv6 to be used at all
|
| Send |
|
Start Ping-Test
|
Response |
|
The root server k.root-servers.net of the Ripe NCC should respond with the IP 2001:7fd::1 as shown in the picture
|
|
|
|
|
Adjust port filter rules
| notempty When using IPv6, all port filter rules must additionally be created for IPv6.
|
Create IPv6 network objects
|
External zone
|
| Create the Internet zone for IPv6 under Tab Network objects with + Add object.
|
| Caption |
Value |
Description
|
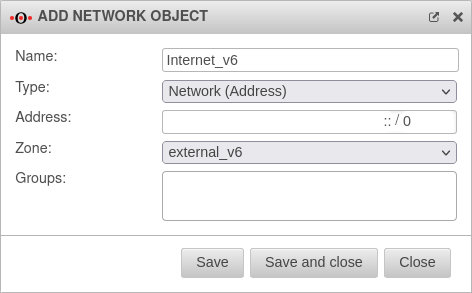 Network object Internet_v6
|
| Name: |
Internet_v6 |
Unique designation
|
| Type: |
Network (address) |
|
| Address: |
::/0 |
The entire Internet
|
| Zone: |
external_v6 |
notempty g
|
| Group: |
|
should remain blank, but can be assigned to a group if necessary
|
| Click Save to apply the changes.
|
|
|
Interne Zone
|
| Configuration of the internal network object:
|
| Caption |
Value |
Description
|
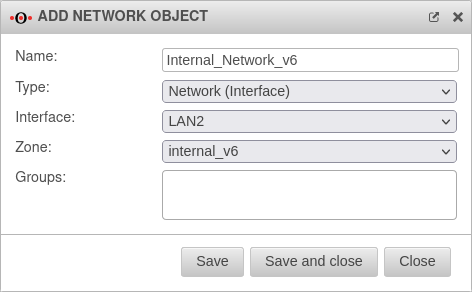 Internal IPv6 network object
|
| Name: |
Internal_Network_v6 |
Unique designation
|
| Type: |
Network (interface) |
Selection according to your own requirements. For this example network (interface)
|
| Interface: |
LAN2 |
Selection of the internal interface to be supplied with IPv6
|
| Zone: |
internal_v6 |
|
| Group: |
|
if necessary, selection of a group to which this network object is to be assigned
|
| Click Save to apply the changes.
|
|
|
Add port filter rule
|
| notempty The existing ruleset only applies to IPv4. A completely new set of rules, including the network objects, must be created for IPv6.
|
| Now a rule can be created under + Add rule:
|
| Caption |
Value |
Description
|
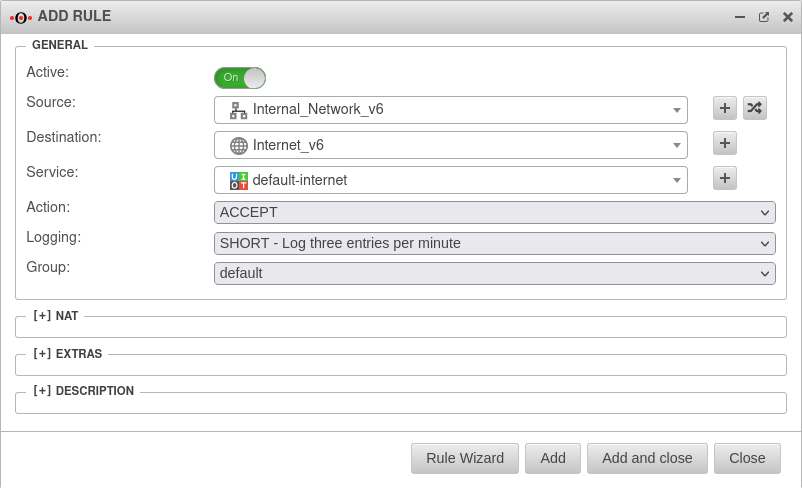 Port filter rule for IPv6
|
| Active: |
On |
|
| Source: |
 Internal_Network_v6 Internal_Network_v6 |
Source network
|
| Destination: |
 Internet_v6 Internet_v6 |
Destination network
|
| Service: |
 default-internet default-internet |
Select desired service or service group
|
| Action: |
Accept |
Accept packet
|
| Logging: |
Short - Log three entries per minute |
Select desired logging level
|
| Group: |
IPv6 rules |
Add to desired group
|
| notempty Unlike IPv4, no NAT is required here!
|
| Click Add, or Add and close to save the port filter rule.
|
| Click Update rules to have the port filter rules updated.
|
|
|


