Jump to:navigation, search
Wiki


notempty
Dieser Artikel bezieht sich auf eine nicht mehr aktuelle Version!

notempty
Der Artikel für die neueste Version steht hier

notempty
Zu diesem Artikel gibt es bereits eine neuere Version, die sich allerdings auf eine Reseller-Preview bezieht


De.png
En.png
Fr.png


Forwarding DNS requests for the domain to the DNS server through the VPN tunnel
Last adaptation to the version: 12.3.6
New:
Last updated: 
02.2024
notempty
This article refers to a Resellerpreview

11.7

Access: UTM-IP:Port or UTM-URL:Port
Port as configured at Network / Appliance Settings / Webserver
Default-Port: 11115
i.e.: https://utm.ttt-point.de:11115
Default: https://192.168.175.1:11115
→ Applications →Nameserver


Introduction

In this scenario, the UTM and clients of a remote site are to be connected to the domain at the main site.

  • All DNS requests for the domain to the DNS server, through the VPN tunnel, are forwarded to the main site.
  • The UTM shall provide DNS for the clients in the remote site.
  • Requests for the domain network shall be forwarded in the VPN tunnel to the DNS server in the main site.


Creating the DNS Relay Zone

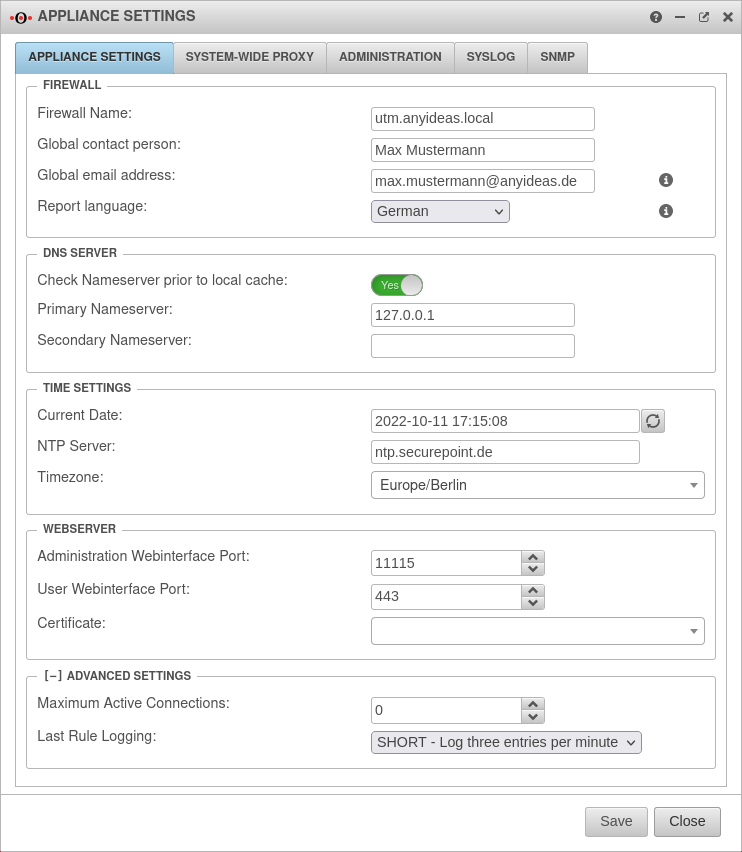
Set the nameserver of the firewall

Set the nameserver of the firewall
→ Network →Server settingsTab Server settings Section
DNS Server

The first step is to set the nameserver of the firewall.

In the Primary nameserver field, enter 127.0.0.1 as the IP (localhost). Click on the Save button.


Create DNS Relay

→ Applications →NameserverTab Zones
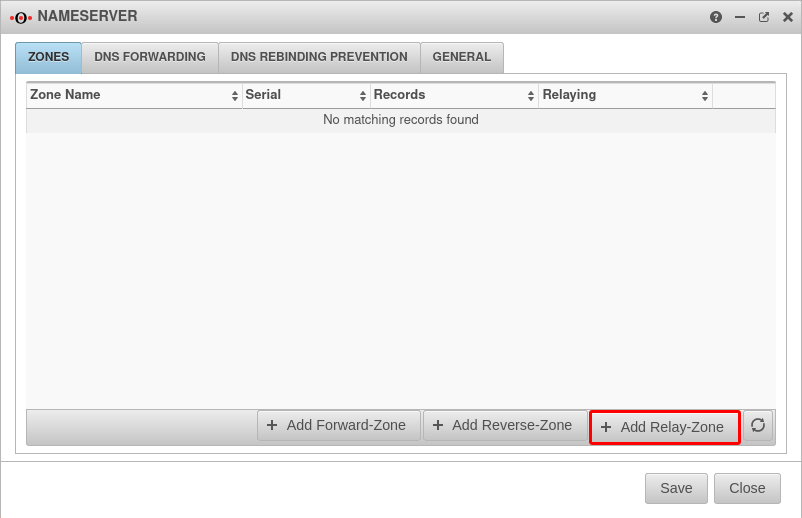
The next step is to create a relay zone.
UTM v12.2.3 DNS Relay Nameserver Relay-Zone anlegen-en.png
Step 1
  • Open the Zones tab in the Nameserver window.
  • Click on the Add Relay Zone button to create a new relay zone
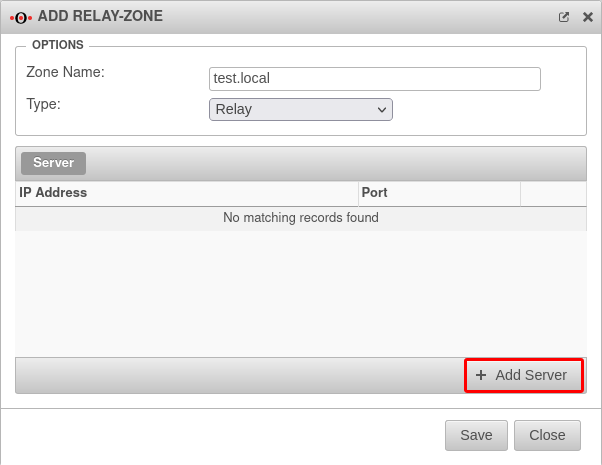
UTM v12.2.3 DNS Relay Zone anlegen DNS Relay IP-Adresse-en.png
Step 2
  • Under Zone name: enter the desired domain name
  • Select as Type: Relay
  • Click on the Add Server button to enter the IP address of the nameserver
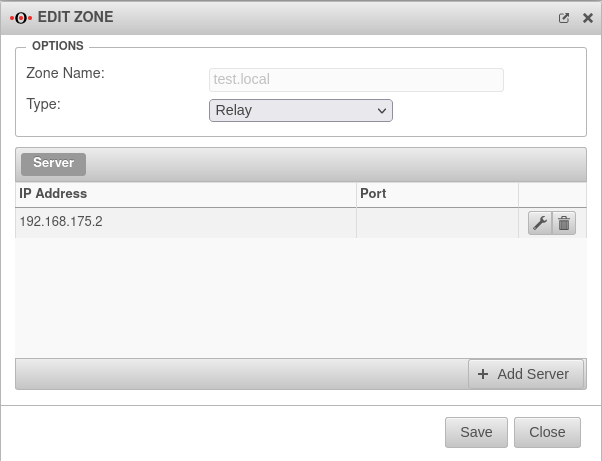
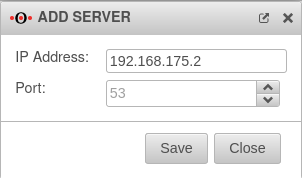
UTM v12.2.3 DNS Relay Zone anlegen DNS Relay IP Adresse Nameserver-en.png
Step 3
  • Under IP address: the IP address of the remote nameserver is entered
UTM v12.2.3 DNS Relay Zone anlegen DNS Relay-en.png
Step 4
View of the finished relay zone.
In order to use this, Save the dialog Add Relay Zone and the dialog Nameserver.


After creating the relay zone, the firewall forwards all requests to the DNS server at the main site on the domain network.


DNS Relay for an IPSec Site-to-Site Tunnel

In order to forward internal domain requests to a remote nameserver that is on an IPSec network, note that by default, all direct requests addressed to external nameservers are sent from the firewall with the external IP. However, a public IP is not routed into an IPSec tunnel.

Create network object

→ Firewall →PortfilterTab Network objects
The port filter rules in the Implied rules are automatically activated. This means that no network object is yet available for the IPSec network.

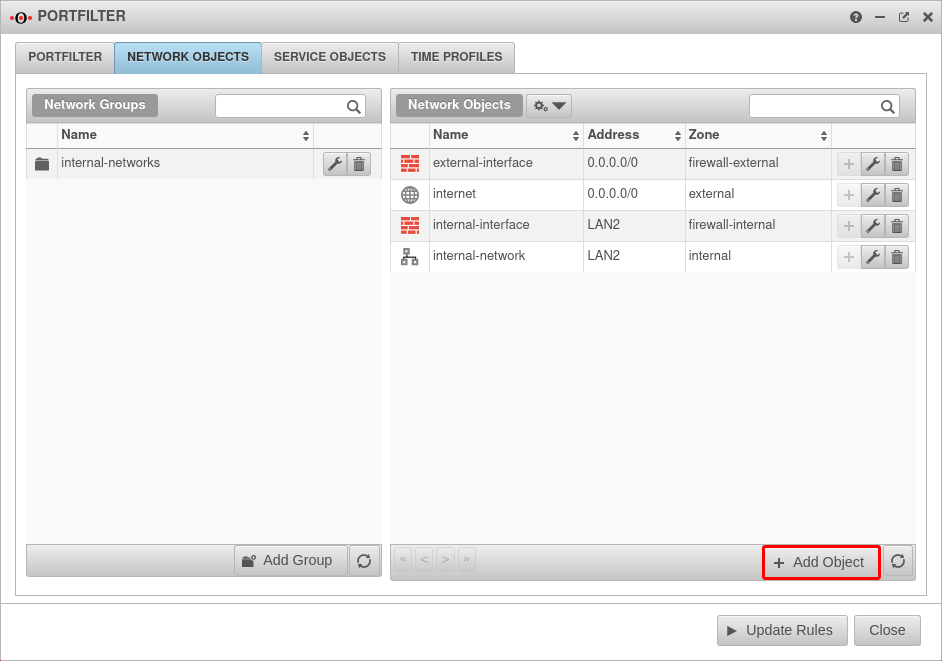
The following objects are preconfigured at delivery: Network object associated interface object UTM v12.2.3 DNS Relay IPSec Netzwerkobjekt Uebersicht-en.png
Overview of network objects
World.svg Internet Interface.svg external-interface
Network.svg internal-network Interface.svg internal-interface
only with min. 3 existing interfaces Network.svg dmz1-network Interface.svg dmz1-interface
In order to create the appropriate network object, click on the Network objects button under the Add object tab.
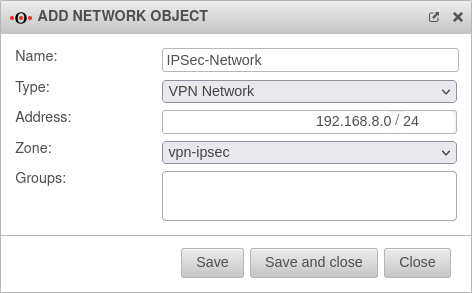
Caption Value Description UTM v12.2.3 DNS Relay IPSec Netzwerkobjekt hinzufuegen-en.png
Name: IPSec-Network Name for the IPSec network
Type: VPN-Network Choose VPN network
Address: 192.168.8.0/24 IP address of the IPSec network
Zone: vpn-ipsec Select the corresponding VPN IPSec zone
Groups:     a corresponding group can be entered

Click Save, or Save and Close to save this network object.
After the network object is created, Update rule is clicked.


Create a rule

→ Firewall →PortfilterTab Add rule Button +
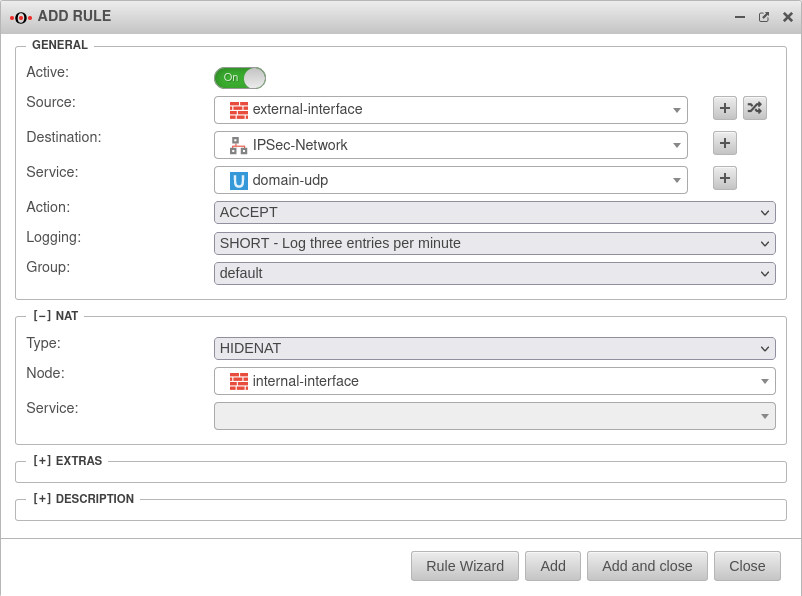
The last step is to create a firewall rule with a Hide NAT.
This causes DNS forwarding to also go to the tunnel and not directly to the Internet.

Labeling Value UTM v12.2.3 DNS Relay IPSec Portfilterregel erstellen-en.png
Creating the rule
Active: On
Source: Interface.svg external-interface
Destination: Vpn-network.svg IPSec-Network
Service: Udp.svg domain-udp
Action: ACCEPT
[-] NAT
Type: HIDENAT
Network object: Interface.svg internal-interface

Click Add or Add and Close to save this rule.
With this rule, all domain UDP requests made through the firewall to the remote nameserver are natted over the IP of the internal interface and can thus be routed into the IPSec tunnel.

Wenn Multipath Routing konfiguriert ist, muss für jedes externe Interface eine solche Regel angelegt werden.


DNS Relay for an OpenVPN Site-to-Site Tunnel

In order to forward internal domain requests to a remote nameserver located in an OpenVPN network, note that by default all direct requests directed to external nameservers are send from the firewall with the external IP. However, a public IP is not routed into an OpenVPN tunnel.

Create zone

→ Network →Zone settings
In order to route the DNS requests into the OpenVPN tunnel, a new interface zone must be created on the UTM.
A new zone is created with the Add zone button.

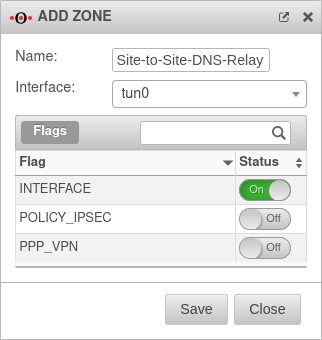
Caption Value Description UTM v12.2.5 DNS Relay OpenVPN Zone-en.png
Dialog Add zone with flag Interface
Name: Site-to-Site-DNS-Relay Name for the interface zone
Interface: tun0 Select the corresponding interface tunX
Interface: On Enable FLAG Interface for this zone

Create Open-VPN network objects

→ Firewall →PortfilterTab Network objects
The port filter rules in the Implied rules are automatically activated. This means that no network object is yet available for the Open-VPN network.

The following objects are preconfigured at delivery: Network object associated interface object UTM v12.2.3 DNS Relay IPSec Netzwerkobjekt Uebersicht-en.png
Overview of network objects
World.svg Internet Interface.svg external-interface
Network.svg internal-network Interface.svg internal-interface
only with min. 3 existing interfaces Network.svg dmz1-network Interface.svg dmz1-interface
In order to create the appropriate network object, click on the Network objects button under the Add object tab.
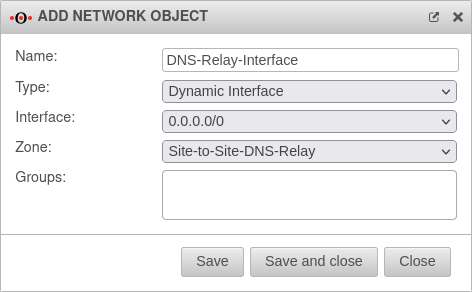
Caption Value Description UTM v12.2.3 DNS Relay OpenVPN S2S Netzwerkobjekt hinzufuegen OpenVPN Interface-en.png
Name: DNS-Relay-Interface Name for the Open VPN network
Type: Dynamic interface Select dynamic interface
Interface: 0.0.0.0/0 select this interface
Zone: Site-to-Site-DNS-Relay Select the corresponding Open VPN zone
Groups:     a corresponding group can be entered

Click Save, or Save and Close to save this network object.
After the network object is created, Update rule is clicked.


Create rule

→ Firewall →PortfilterTab Add rule Button +
The last step is to create a firewall rule with a Hide NAT.
This causes DNS forwarding to also go to the tunnel and not directly to the Internet.

Labeling Value Datei:UTM v12.3.6 Firewall Portfilterregel DNS Relay -en.png
Creating the rule
Active: On
Source: Interface.svg DNS-Relay-Interface
Destination: Host.svg Remote-DNS-Server
Service: Service-group.svg dns
Action: ACCEPT
[-] NAT
Type: HIDENAT
Optional if domain controller does not want to respond to requests from the transfer network
Network object: Interface.svg internal-interface

Click Add or Add and Close to save this rule.


DNS Relay for a WireGuard Site-to-Site Tunnel

The internal domain requests can also be forwarded to a remote nameserver located in a WireGuard network. The configuration of such a scenario requires an existing WireGuard site-to-site VPN (S2S) connection.

Create zone

→ Network →Zone settings Button Add zone
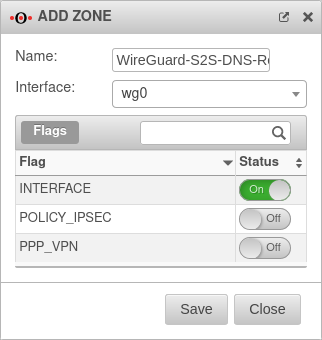
In order to route the DNS requests into the WireGuard tunnel, a new interface zone must be created on the UTM.

Caption Value Description UTM v12.2.5 DNS Relay WireGuard Zone-en.png
Dialog Add zone with flag Interface
Name: WireGuard-S2S-DNS-Relay Name for the interface zone
Interface: wg0 Select the corresponding WireGuard interface wg0
Interface: On Enable FLAG Interface for this zone

Create WireGuard network objects

→ Firewall →PortfilterTab Network objects
The port filter rules in the Implied rules are automatically activated. This means that no network object is yet available for the WireGuard network.

The following objects are preconfigured at delivery: Network object associated interface object UTM v12.2.3 DNS Relay IPSec Netzwerkobjekt Uebersicht-en.png
Overview of network objects
World.svg Internet Interface.svg external-interface
Network.svg internal-network Interface.svg internal-interface
only with min. 3 existing interfaces Network.svg dmz1-network Interface.svg dmz1-interface
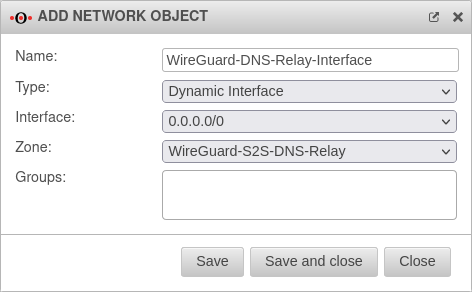
In order to create the appropriate network object, click on the Network objects button under the Add object tab.
Caption Value Description UTM v12.2.5 DNS Relay WireGuard S2S Netzwerkobjekt hinzufuegen WireGuard Interface-en.png
Name: WireGuard-DNS-Relay-Interface Name for the WireGuard network
Type: Dynamic interface Select dynamic interface
Interface: 0.0.0.0/0 select this interface
Zone: WireGuard-S2S-DNS-Relay Select the corresponding WireGuard zone
Groups:     a corresponding group can be entered

Click Save, or Save and Close to save this network object.
After the network object is created, Update rule is clicked.


Create rule

→ Firewall →PortfilterTab Add rule Button +
The last step is to create a firewall rule with a Hide NAT.
This causes DNS forwarding to also go to the tunnel and not directly to the Internet.

Labeling Value Datei:UTM v12.5 DNS Relay WireGuard S2S portfilterregel erstellen-en.png
Creating the rule
Active: On
Source: Interface.svg WireGuard-DNS-Relay-Interface
Destination: Host.svg Remote-DNS-Server
Service: Udp.svg domain-udp
Action: ACCEPT
[-] NAT
Type: HIDENAT
Optional if domain controller does not want to respond to requests from the transfer network
Network object: Interface.svg internal-interface

Click Add or Add and Close to save this rule.