Jump to:navigation, search
Wiki


notempty
Dieser Artikel bezieht sich auf eine nicht mehr aktuelle Version!

notempty
Der Artikel für die neueste Version steht hier

notempty
Zu diesem Artikel gibt es bereits eine neuere Version, die sich allerdings auf eine Reseller-Preview bezieht


.


De.png
En.png
Fr.png


Creating and using portfilter rules, network objects, services and time profiles
Last adaption: 12.4
New:
notempty
This article refers to a Resellerpreview

12.2 12.1 11.7

Access: UTM-IP:Port or UTM-URL:Port
Port as configured at Network / Appliance Settings / Webserver
Default-Port: 11115
i.e.: https://utm.ttt-point.de:11115
Default: https://192.168.175.1:11115
→ Firewall →Portfilter

Portfilter Description

The portfilter controls the data traffic that passes through the UTM.

  • All network packets that pass through the UTM are filtered and only forwarded based on portfilter rules.
  • Thereby it is irrelevant whether the destination address and source address of the packet are in the same network, in another, local network or in the Internet and a local network.
  • Based on the source IP, destination IP and service used, the rules are checked from top to bottom.
    The sequential number before a rule # indicates the order of rulecreation and is permanently retained. It does not indicate the order in which the rule is processed!
  • A rule that has been created can be subsequently moved in the order by holding down the mouse button on the icon Dragndrop.png.
  • If an exception is to be created for a rule, the (more specific) exception must first be defined and only then the more general rule.
    If the exception rule applies to a package, the specified action is carried out and the portfilter is terminated.
    If the exception rule does not apply, the more general rule is then checked.
    If this rule then applies, the action specified there is executed.
  • If no applicable rule exists for a data packet, the packet is discarded Default Drop
  • A portfilter rule contains several elements:


    Portfilter rule

    The basic structure of a rule is :
    Source → Target → Service → Action

    New as of v12.4
    With copy rulesrules can be copied. The Add Rule dialogue opens with a copy of the respective rule.


    Typical examples: # Source Destination Service NAT Action Active
    The Internet should be accessible from the internal network Dragndrop.png 7 Network.svg internal-network World.svg internet Service-group.svg default-internet HN Accept On
    The dmz1 network should be accessible for all services from the internal network. Dragndrop.png 8 Network.svg internal-network Network.svg dmz1-network Other.svg any Accept On
    A server in the internal network is to be accessible from outside via ssh Dragndrop.png 9 World.svg internet Network.svg internal-network Tcp.svg ssh DN ➞ Accept On
    The Internet should be accessible from the internal network, but no ftp should be enabled!
  • The portfilter is processed from top to bottom. If a rule applies, the check of the set of rules is terminated and the configured action is executed. Therefore, the prohibition of ftp must be before the general permission rule. A rule that has been created can be moved to the icon Dragndrop.png with drag and drop and placed specifically in the order.
  • Dragndrop.png 10 Network.svg internal-network World.svg internet Tcp.svg ftp Drop On
    Dragndrop.png 7 Network.svg internal-network World.svg internet Service-group.svg default-internet HN Accept On

    Autogenerated rules

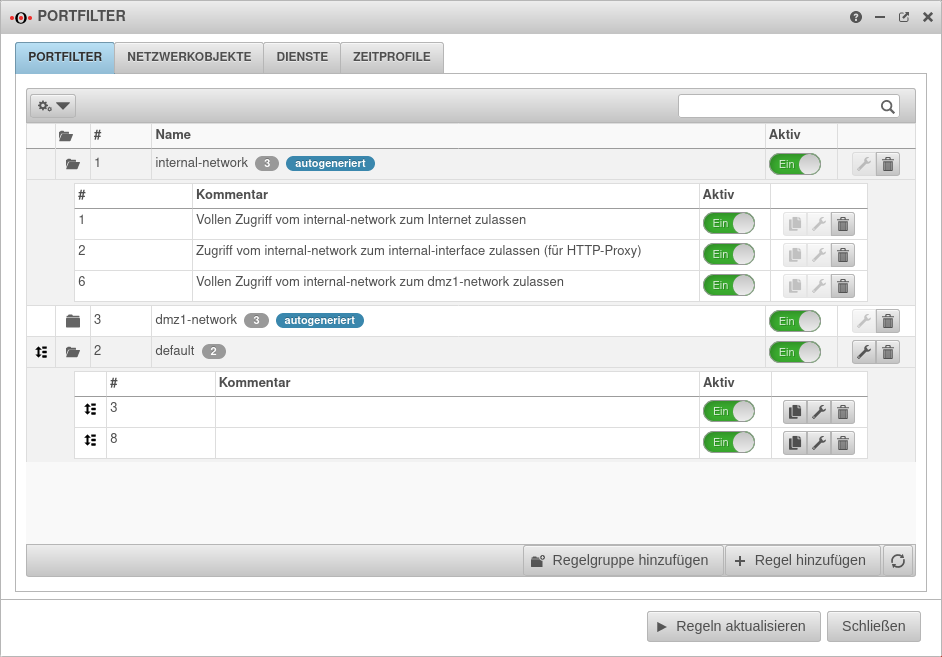
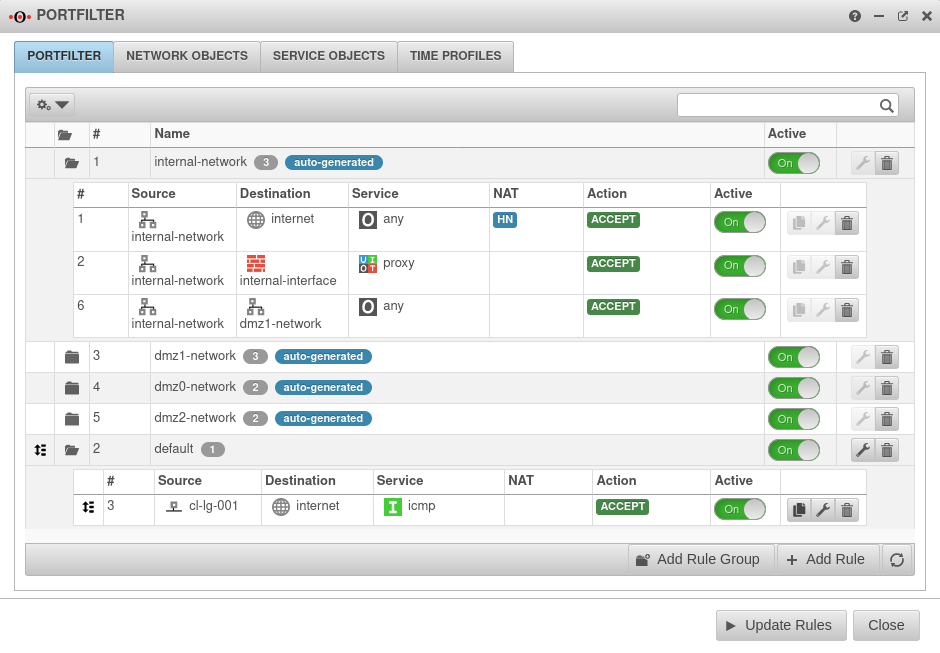
    autogenerated The UTM has autogenerated rules ex works.
    These rules initially allow all data traffic into the existing networks and also release the proxy and DNS services of the respective interface for internal networks

    These rules are used exclusively to enable the commissioning of the firewall
    They cannot be edited and must be replaced strictly by individualized rules and have to be deactivated or deleted afterwards!

    The visibility of the autogenerated rules can be controlled in the drop-down menu with this switch: On Show auto-generated rules Default

    Portfilter Rule Settings

    Portfilter rules settings
    After editing or adding a rule, the rulebook must be updated.
    Only after that will the rules be applied!
    / Add Rule Update Rules
    General
    Caption Value Description
    Active On Only when activated is this rule checked
    Source Network.svg internal-network Network object or user group that is permitted as the source of the data package.
    Destination World.svg internet Network object or user group that is permitted as the destination of the data packet.
    Service Service-group.svg  default-internet Desired service with stored port (see tab Services)
    Netzwerkobjekt add / Dienst add Adds a network object or service
    Switch network object
    as of 12.2.3
    Exchanges the network objects Source and Destination
    Action ACCEPT ACCEPT Forwards the package
    DROP DROP The package is dropped
    REJECT REJECT An ICMP packet is sent to the sender indicating that the port is not available. In the LAN, reject rules can prevent clients from having to wait for a timeout.
    QOS QOS Allows you to specify a Quality of Service profile that limits the bandwidth for data packets to which this rule applies.
    Configuration of the QoS profiles in the → Network →QoSTab Profile menu.
    STATELESS STATELESS Allows connections regardless of status
    Logging None No logging (default)
    Short Logs the first entries per minute
    Long Logs all entries
    Group default Portfilter rules must be assigned to a group. This facilitates clarity when adding to the set of rules. In addition, rule groups can be activated or deactivated with a switch.
    NAT
    NAT
    Network Address Translation is the conversion of IP addresses used in a network to another IP address from another network. Typically, all internally used private IP addresses are mapped to one or more public IP addresses.
    Type
    None
    None
    No NAT is performed
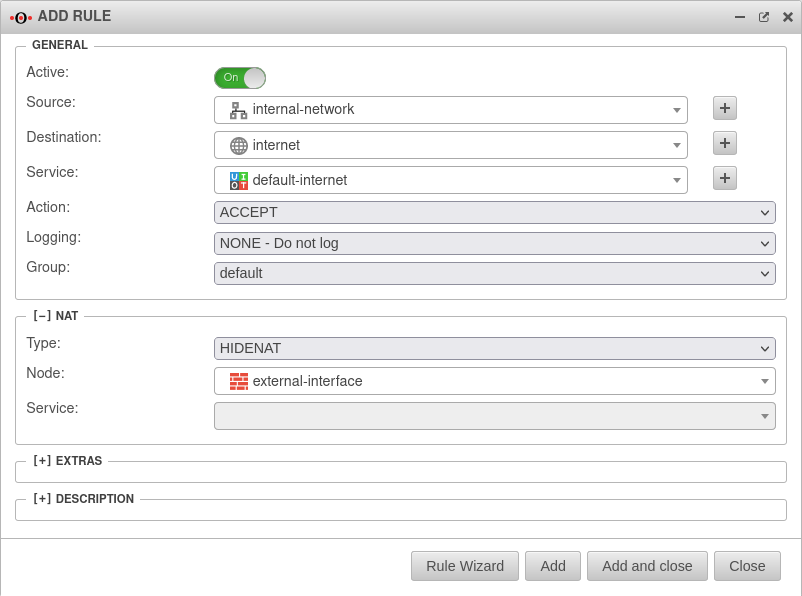
    Hide NAT
    Hide NAT
    Also called Source NAT. Hides the original IP address behind the IP address of the interface used.

    The standard case is data traffic from an internal network with private IP addresses to the Internet.
    The IP from the local network is masked with the IP of the interface that establishes access to the Internet.

    UTM v12.2 Portfilter Hidenat-Regel-en.png
    HideNat Rule
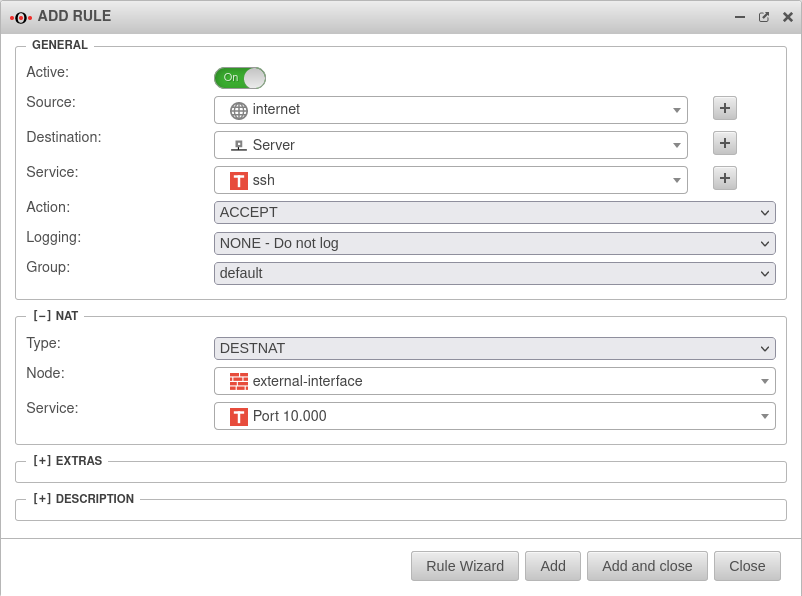
    Dest. NAT
    Dest. NAT
    Destination NAT is usually used to offer several services on different servers under one public IP address.


    For example, if you want to access the SSH service (port 22) of the server (198.51.100.1/32) from the Internet via the public IP address of the eth0 interface with port 10000, the rule would have to be created as shown opposite.
    The associated network objects and the service on port 10000 must be created for this.

    UTM v12.2 Portfilter Destnat-Regel-en.png
    Destination NAT Rule
    HideNAT Exclude
    HideNAT Exclude
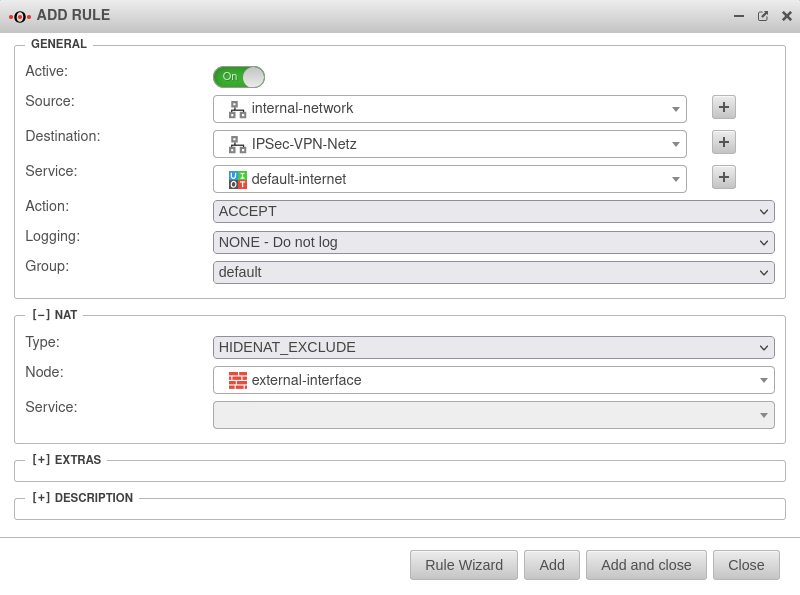
    HideNAT Exclude is usually used in connection with IPSec VPN connections.
    This ensures that data packets for the VPN remote terminal are routed through the VPN tunnel with the private IP address. Otherwise, these would be masked with the public WAN IP address like all other packets in the direction of the Internet and, since they are sent with a private destination address, would be discarded at the next Internet router.
    See also the Wiki article HideNAT Exclude.
  • The HideNAT-Exclude rule must come before the HideNAT rule for the exception to apply.
  • UTM v12.1 Portfilter Hidenat Exclude-Regelübersicht-en.png
    UTM v12.2 Portfilter Hidenat Exclude-Regel-en.png
    HidNAT Exclude Rule
    NetMap
    NetMap
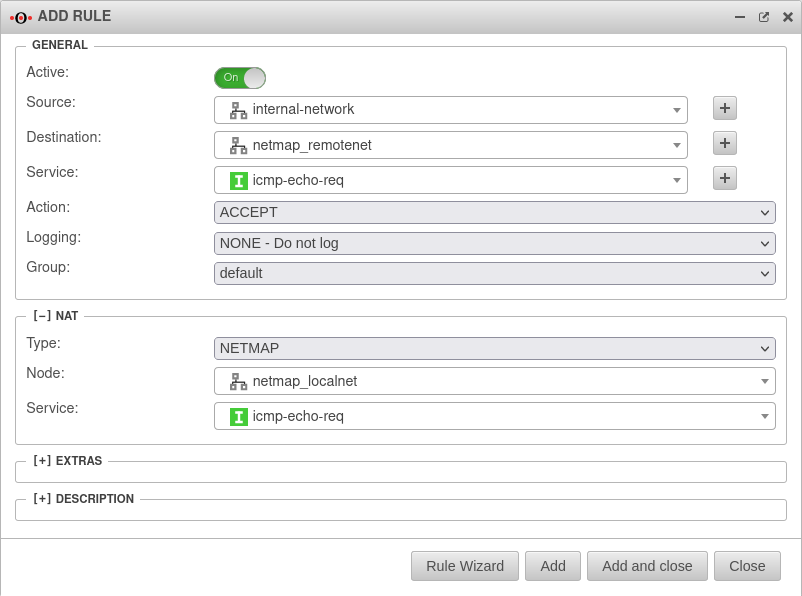
    NetMap is used to connect two identical subnets with each other.

    Using auxiliary networks (mapnet), which are not set up on either of the remote sites to be connected, these connections can be created collision-free without completely changing the subnet on either side. Instructions for connecting two networks can be found in a dedicated Wiki article NetMap

    UTM v12.2 Portfilter NetMap-Regel-en.png
    NetMap Rule
    Full Cone NAT
    Full Cone NAT
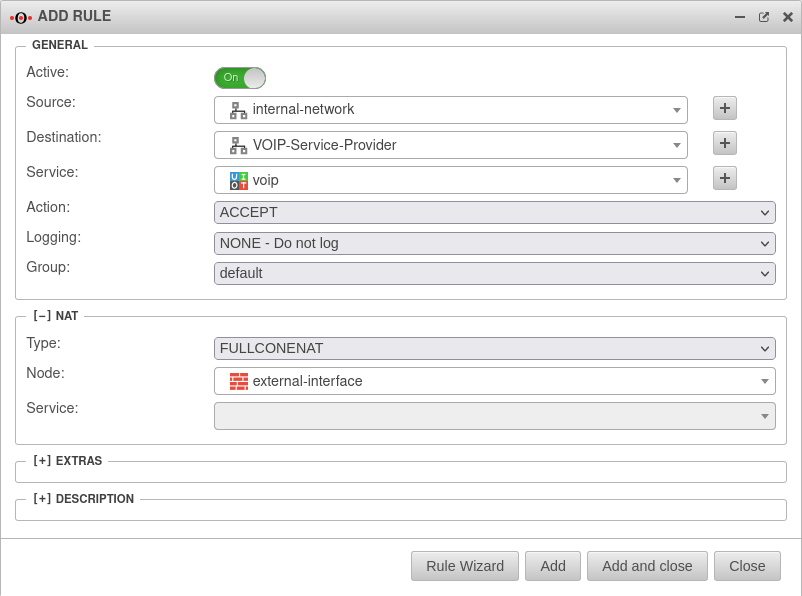
    With Full Cone NAT, the same port is set for the sender as for the recipient. However, IPs other than the originally addressed IP are also permitted as senders. This can be helpful with VOIP. UTM v12.2 Portfilter FullconeNat-Regel-en.png
    Full Cone NAT Rule
    Network object Interface.svg external-interface The IP address of this network object is then used as the sender IP of the data packets in the target network.
    As a rule, this should be the interface whose IP address is known to the target network so that reply packets can also be correctly delivered.
    Service Tcp.svg ssh Uses the selected service in the local destination network. This value is often (but by no means always) identical with the service above it in the data source package for which the rule is checked.
  • Only available when
    Type
    is selected as DESTNAT or NETMAP.
  • Extras
    Rule Routing
    Rule Routing
    wan0 In the
    [-] Extras
    section, the
    Rule Routing
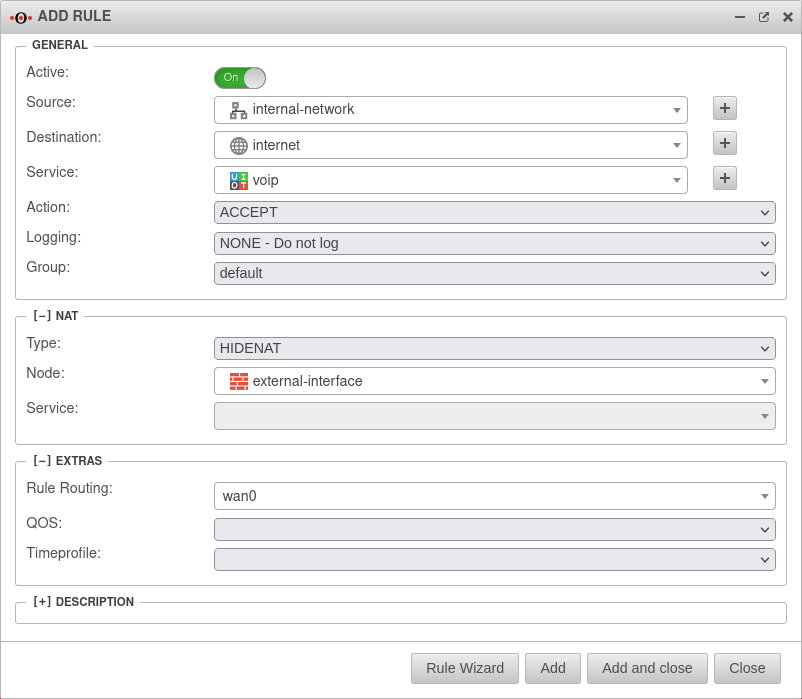
    field is used to specify, based on rules, which route IP packets should take.
    In the example opposite, all VOIP packets are routed via the wan0 interface.
  • The drop-down field only provides wan interfaces for selection.
    If access to the Internet is via a router connected to an ethernet interface, this can be entered manually.
  • UTM v12.2 Portfilter Rule Routing-en.png
    Portfilter rule with rule routing
    QOS
    QOS
    QOS Allows you to specify a Quality of Service profile that limits the bandwidth for data packets to which this rule applies.
    Configuration of the QoS profiles in the → Network →QoSTab Profile menu.
  • Only available when QOS is selected as
    Action
    .
  • Time profile
    Time profile
    Time profile Restricts the validity of the rule to a previously defined time profile.
    See section Time Profiles.
    Description
    Description
    Rule description Alternative text that can be displayed instead of the rule details.
    The alternative texts are displayed with the button
    UTM v12.4 Portfilter Portfilter Regelbeschreibung.png


    After editing or adding a rule, the rulebook must be updated.
    Only after that will the rules be applied!
    / Add Rule Update Rules


    Network objects

    Network objects
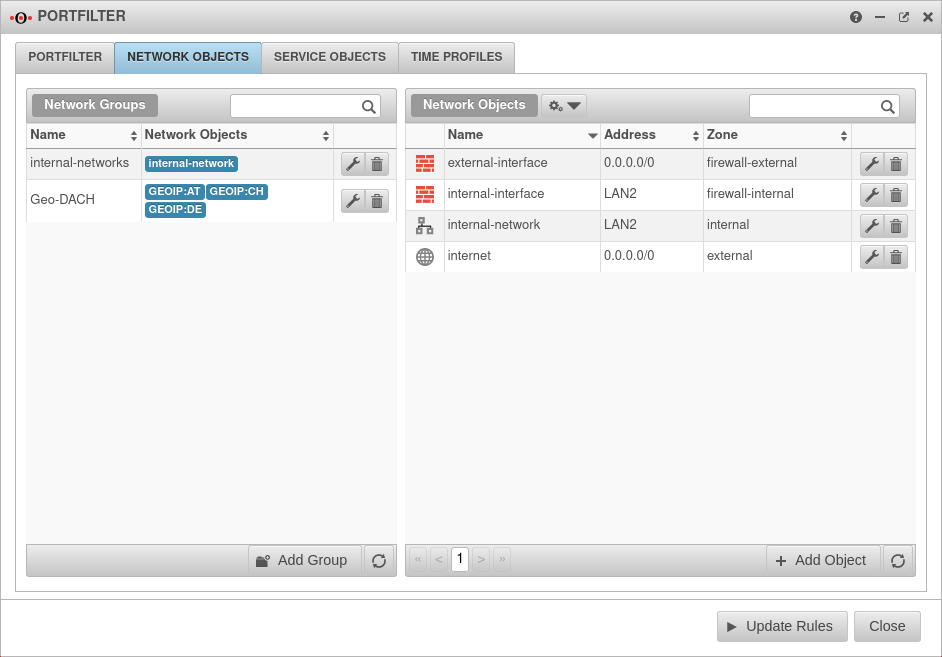
    Button Description UTM v12.4 Portfilter Netzwerkobjekte-en.png
    Tab Network Objects
    Edit Opens the network group or network object for editing
    Delete Deletes the network group or network object. The deletion must be confirmed once again
  • For GeoIP network objects, after confirmation, deletes all GeoIP network objects with the same prefix
  • Add group Creates a new network group to which network objects can be added immediately
    New as of 12.2.3
    Show GeoIP objects On
    When disabled Off: Hides GeoIP objects to improve readability.
    Network objects include :
    • a name
    • an address (IP or network), a hostname or an interface
    • and a zone.

    Network objects are mainly used to create portfilter rules, but they are also used in the HTTP proxy.

    New:
    The members of a network group are displayed as labels. Clicking on a label displays the details in the table Network objects.


    Edit / Add Network Groups

    Edit / Add Network Groups
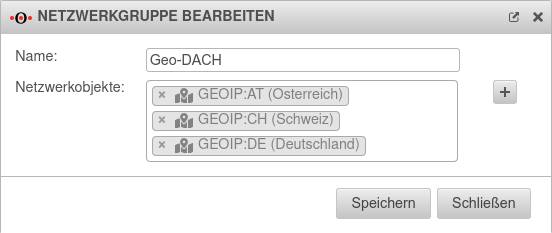
    Caption Value Description UTM v12.4 Netzwerkgruppe bearbeiten.png
    Edit / create network group dialog
    Name: Geo-DACH Freely selectable name for the network group
    Network objects: ×Map-marked-alt.svg GEOIP: DE (Germany) Existing network objects can be added in the click box
    Opens the dialog for adding another network object
    Removes a network object from the network group

    Create / Add network objects

    Edit / Add Network Objects

    → Firewall →PortfilterTab Network Objects Button Add Object

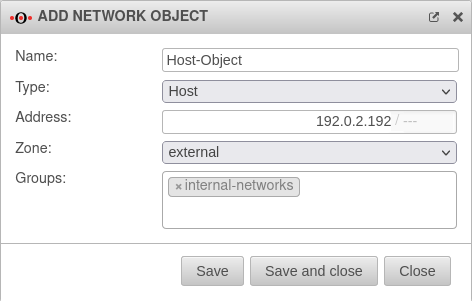
    Caption Value Description UTM v12.2 Netzwerkobjekt Host-en.png
    Create / Add network objects
    Name Hostname Freely selectable name for the network object.
    OK - not really free: Even if it should be technically possible, refrain from using cryptic special characters such as curly brackets, backslashes and similar. At the latest in an AD environment, such things may lead to problems.
      
    Type The type determines how the affiliation to this network object is determined.
    Host A single host with an IP address e.g. 192.0.2.192/32 → 192.0.2.192/--- 
    Network (address) A complete network, e.g. 192.0.2.0/24
    A 24 network is entered as default. However, this can be changed as desired.
    Network (address with custom mask)
    as of v12
    Network with any subnet mask. This is useful when the prefix may change. (Example: 192.0.2.0/0.255.255.0 oder 2001:DB8::1234/::FFFF:FFFF)
    Network(interface) A complete network behind an interface e.g. eth0
  • Attention: With HideNat, only the first IP lying on this interface is used.
    When using with HideNat, try to use a network address.
      
  • VPN-Host A single VPN host with an IP address, e.g. 192.0.2.192/32 → 192.0.2.192/--- 
  • Only zones that have a flag Policy_IPSEC or PPP_VPN in the zone management (→ Network →Zone Settings Button w) can be selected as zones for these network objects.
  • VPN network A complete VPN network, e.g. 192.0.2.0/24
    A 24 network is entered as default. However, this can be changed as desired.
    Static interface A configured IP address of an interface can be selected from a drop-down menu, e.g. 192.0.2.1/24
    Dynamic interface A dynamic assignment of the address of the interface based on the assigned zone. E.G.: 0.0.0.0/. oder eth0
    Hostname
    as of v12
    A host name, e.g.: my.host.local
    GeoIP
    as of v12.2.3
    Creates a network object in the specified zone for each country.
    IP addresses are assigned to a country via organizations and institutions to which the associated IP networks are assigned.
    The actual location of a host may differ from the assignment or may not be visible, e.g. due to a VPN tunnel!
      
  • Creates about 250 new network objects!
  • Address: 192.0.2.192 Depending on the type selected. See above.
    Interface
    For type only Network(interface) orDynamic interface
    LAN1 All hosts behind this interface belong to this network object
    IP address
    For type only Static interface
    192.168.175.1 All hosts behind the interface with this IP address belong to this network object
    Hostname
    For type only Hostname
    my.host.local Hostname of the network object
    Prefix
    For type only GeoIP
    ext2_ Prefix placed in front of the network objects (for better identification)
    Example_ Prefix ext2_  → Network object Map-marked-alt.svg ext2_GEOIP:DE
    Zone Zone Zone in which the network object is located.
    By linking an object in the set of rules with the interface via the zone, it is achieved that a portfilter rule only takes effect if not only the source, destination and service match the rule, but the connection is also made via the correct interfaces. This prevents all attacks that involve IP spoofing. The assignment of an object to an interface is done by binding the zone to the interface on the one hand and the assignment of the network object to a zone on the other.
      
  • Depending on the selected network type, a zone is already suggested or a restriction of the zone selection is made.
  • Groups »internal-networks Network objects can be grouped together to assign portfilter rules to multiple objects.
    Network objects can also belong to several groups.
    This can lead to contradictory rules for the same network object that are not immediately obvious.
    As with all rules, the rule that is executed first is the one whose network group contains the network object.
    Save Saves the network object, but leaves the dialogue open to be able to create further objects.
    Save and close Saves the network object and closes the dialogue

    Services

    Services
    UTM v12.4 Portfilter Dienste-en.png
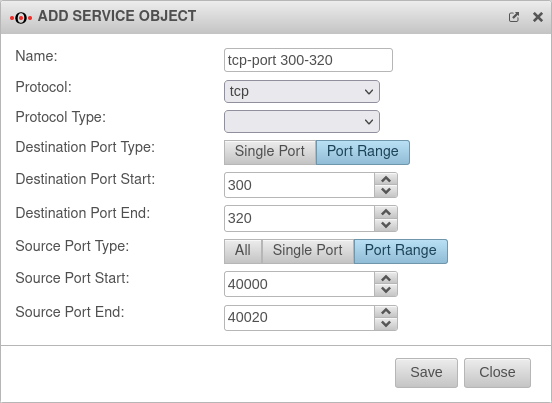
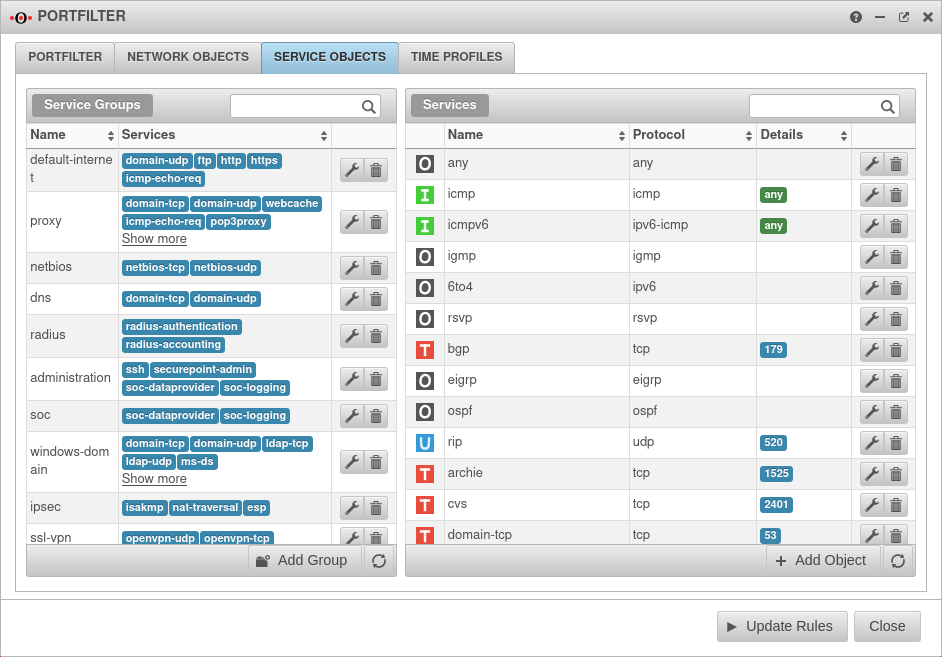
    Services define the protocol used and, if applicable, the protocol type, the port or port range or the ICMP message type of the data packets to be filtered. Many services are already preconfigured such as http, https, ftp, ssh, etc.

    New:
    The services of a service group are displayed as labels. Clicking on a label displays the details of the service in the service tab.


    Add / edit services

    Add / edit services

    If a service does not exist, it can be created with Add object.
    Depending on the protocol used, further settings can be made:

    • Ports (TCP and UDP)
    • Packet types (ICMP)
    • Protocol type (gre)
    UTM v12.2 Portfilter Dienst hinzufügen-en.png
    The name of the service and the protocol must be specified in each case.
    UTM v12.2 Portfilter Dienst tcp hinzufügen-en.png
    With the tcp and udp protocols, sharing can be restricted to a single destination port or port ranges. Source ports can be any (None), a single port or a port range.
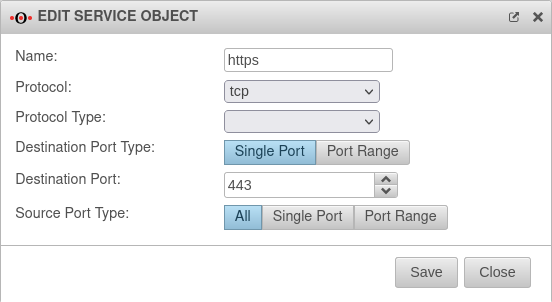
    UTM v12.2 Portfilter Dienst https-en.png
    If an existing service is to run on a different port, the service can be edited and the port changed.


    Service groups

    Service groups

    Services can be grouped together in service groups. Here, too, there are already predefined groups that can be added to and changed. Detailed display by clicking on the button .
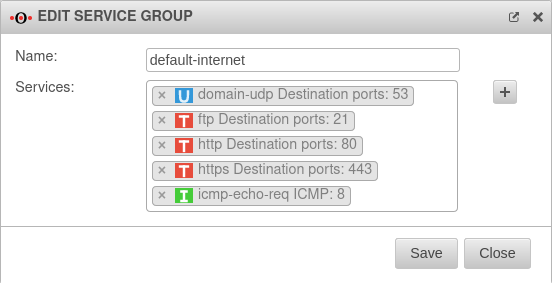
    Example: The group default-internet contains, for example, the services:

    Icon Name Protocol UTM v12.4 Portfilter Dienste Dienstgruppe default-internet-en.png
    Udp.svg domain-udp udp Port 53
    Tcp.svg ftp tcp (ftp) Port 21
    Tcp.svg http tcp Port 80
    Tcp.svg https tcp Port 443
    Icmp.svg icmp-echo-req icmp Pakettyp 8


    Add/remove service from a service group
    Add/remove service from a service group
    changed
    • Clicking in the click box selects the desired service and thereby adds it.
    • Clicking the button creates a new service and then adds it to the service group.
    • A service is removed from the service group by clicking on .

    Time profiles

    Time profiles

    Time profiles

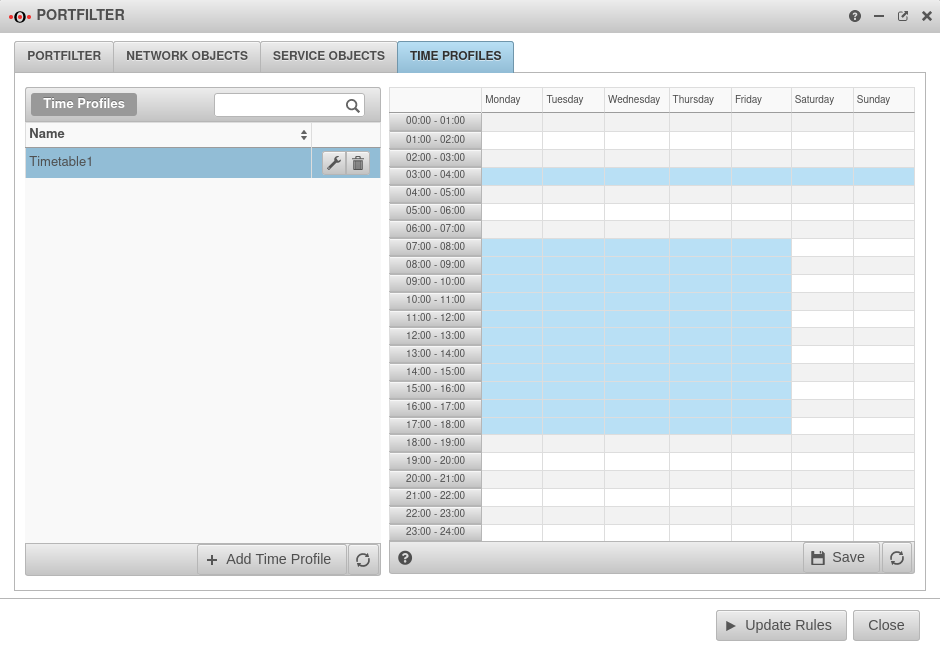
    Time profiles are used to activate portfilter rules only at specified times. In the example shown, the profile takes effect between 3:00 a.m. and 3:59:59 p.m. daily and from 7:00 a.m. to 5:59:59 p.m. on weekdays.

    Create time profiles

    • Create a time profile with the Add time profile button.
    • Select times
      • with the Ctrl key and mouse click for a single field or
      • with the Shift (Shift) key and mouse click for a time range.
    • Apply the time settings with the Save button.

    Use time profiles

    Time profiles are stored in the portfilter rules in section
    Extras
    .