notempty Dieser Artikel bezieht sich auf eine nicht mehr aktuelle Version!
notempty Der Artikel für die neueste Version steht hier
notempty Zu diesem Artikel gibt es bereits eine neuere Version, die sich allerdings auf eine Reseller-Preview bezieht
Best Practice: Configuration of port forwarding
Last adaption: 11.2022
New:
notemptyThis article refers to a Resellerpreview
11.8
Purpose of use
Objective: To make an internal server accessible from the Internet.
Port forwarding
Most companies do not have a subnet with external IPs available. All computers are in a private network and hide behind the IP of the router.
Port forwarding is used to redirect requests on certain ports directed to the public IP of the router to the internal server on another port, so that it can be reached from the Internet.
In this example, a web server with the internal IP 192.168.175.111 is to be accessible from the public network.
Public IP is 192.0.2.192/32
The creation of network objects and services must of course only take place if they do not yet exist on the firewall in the form described here!
Configuration of the appliance
Create network object
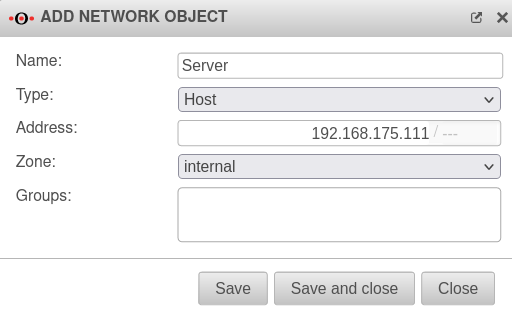
For port forwarding, the server must first be created as a network object.
- Menu Tab Network Objects Button + Add object
- The input mask "Add network object" appears.
| Caption |
Value |
Description
|
 Create network object
|
| Name: |
Server |
Name for the network object
|
| Type: |
Host |
The packages are nattened to the destination
|
| Address: |
192.168.175.111/--- |
The IP address to which the forwarding should be made (in our example: of the web server).
|
| Zone: |
internal |
Select "internal" as zone
|
| Group: |
|
Assign to a network group (can be left blank).
|
| Save and close |
Saves the network object and closes the dialog
|
|
|
Create service
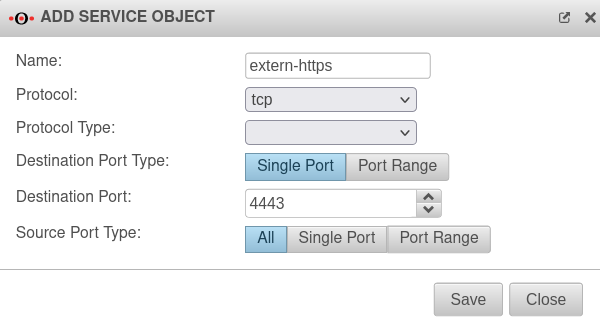
If the port used to access the external IP from the outside, and which is forwarded internally to the server on another port, has not yet been configured as a service, it must now be created.
- Menu Tab Services Button + Add object
The input mask "Add service" appears.
| Caption |
Value |
Description
|
 Create service
|
| Name: |
extern-https |
Enter a name for the service
|
| Protocol: |
tcp |
Choose protocol
|
| Protocol type: |
|
Not required for "tcp" protocol
|
| Target port type: |
Single port Port range |
Select single port or port range
|
| Target port: |
4443 |
Port or port range on the target computer
|
| Source port type: |
All Single port Port range |
Specifying the source port is only useful in cases where the source port can be predicted (e.g. ftp).
|
| Save |
Saves the service
|
|
|
Create firewall rules
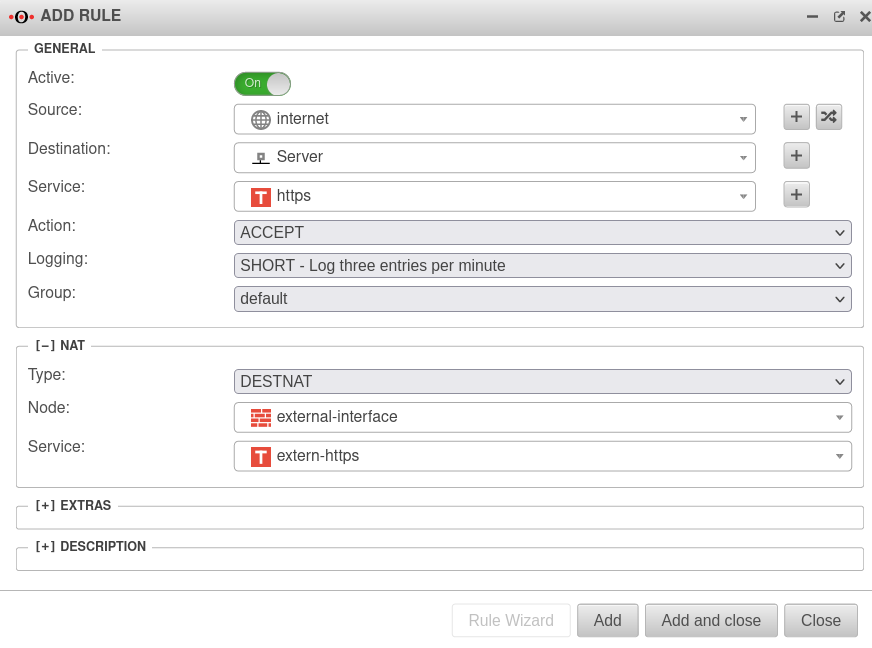
A firewall rule with "Destination NAT" must be created so that external users can now also access the server.
Rule can be created under Tab + Add rule.
Based on the example, the rule should look like this:
General
|
 Port forwarding
|
| Source |
 internet internet |
Access from the internet
|
| Target |
 Server Server |
Network object for the target server
|
| Service |
 https https |
Service with which the port is to be addressed on the target computer
|
| Action |
Accept |
Accept the data packages
|
[-] Nat
|
| Type |
Destnat |
The packages are nattened to the destination
|
| Network object |
 external-interface external-interface |
Network object for the interface that is to perform the NAT
|
| Service |
 extern-https extern-https |
Service with which the port is accessed from the Internet (externally)
|
| Add and close |
After new creation (like in this example)
|
| Save |
After change
|
| Update rules |
For the changes to take effect
|
|
|


