


Last adaptation to the version: 14.1.2 (02.2026)
- Authentifizierung für SSL-VPN über Entra-ID
- Renaming of Azure AD to Entra ID
- Added hint for empty groups (12.2024)
- 04.2026
- Hinweis auf zusätzlich erforderliche Berechtigungen im Entra ergänzt
- Note on implied rules for OIDC added 03.2026
- EntraID images corrected 03.2026
Introduction
AD/LDAP connectivity enables existing directory services such as Microsoft Active Directory® or other LDAProtocol-based systems to be used for authentication, group management, and attribute storage.
Centrally managed users from the directory can thus easily be used for authentication or use of services on the UTM.
This simplifies the administration of complex corporate networks and unifies user management.
Among other things, the Light Directory Access Protocol (LDAP) is used for the connection to the directory..
Using LDAP, information about users, groups and other objects can be read from the directory.
The standard protocol itself does not provide for encryption or authentication of the messages.
In ADV190023 (Microsoft Guidance for Enabling LDAP Channel Binding and LDAP Signing) it is pointed out and an adjustment of the security settings is given.
In the future, signing and encryption of LDAP traffic will be required (seal).
Alternatively, the entire connection can be secured with SSL.
Starting with version 11.8.10, not only the PDC, but all DCs are used for LDAP requests. Thus, authentication for users from the AD is available even if the PDC is not reachable.
Requirement
To use an AD / LDAP for authentication, users must be created there and organized in groups.
Create user groups in AD


The authorizations for the services contained in the UTM can be managed in groups. The users to be assigned to these groups must first be assigned to corresponding user groups in AD.
In this example, the users for Clientless VPN are to be authenticated via the Active Directory Service.
So first of all a group of the type Security Group must be added on the AD, which is given the name ClientlessVPN here.
Add user in AD


The users to be enabled for Clientless VPN are then added to this group.
DNS configuration
In order for the authentication process of the AD/LDAP connection to function smoothly, the name server of the UTM must be set up accordingly.
The following configurations must be made for this:
- Under Area DNS-Server Primary name server: must be 127.0.0.1
- notemptyThe entry for Secondary name server: must be empty!
- Under Area Zones a Forward Zone is created with an A and PTR entry
- The Firewall name of the UTM is used here
- With Area DNS Forwarding a DNS Forwarding is created with an external DNS such as 8.8.8.8
Integrate UTM into the domain
In the menu the authentication is configured.
Establishing an AD connection
If there is no AD/LDAP authentication yet, the AD/LDAP authentication wizard opens automatically.
Otherwise the wizard can be started with the button .
Step 1: Directory type | |||
| Caption | Value | Description | UTMuser@firewall.name.fqdn Authentication AD/LDAP Authentication  Step 1
|
|---|---|---|---|
| Directory type: | notempty
In any case, the directory type »AD« should be selected if it is an Active Directory environment. | ||
Step 2: Options | |||
| IP Address or Hostname: | »192.168.145.1 | (Example address!) |  Step 2
|
| Domain: | ttt-point.local | Domainname | |
| Workgroup: | ttt-point | The NETBIOS name of the AD If this should differ from the base domain, the correct NETBIOS name must be entered here. | |
| Appliance Account: | sp-utml | The name by which the UTM is entered in the AD in the group Computers. A unique name that must not be assigned twice! When operating the UTM in a cluster, the name in the master and spare must be different. The name is not synchronized!
| |
Step 3: Nameserver |
 Step 3: Nameserver
| ||
| If the AD server is not yet entered as the name server, this is done in this step: | |||
| IP address: | 192.168.145.1 | notempty Sample address! IP address of an AD server of the domain, if necessary additionally the port | |
| The AD server is thus added as a relay zone in the name server of the UTM. The entry can be found in the menu Area Zones. | |||
Step 4: Join | |||
| Administrator name: | Administrator | To join the domain, a user account with domain administrator permissions is required. |  |
| Password: | •••••••• | <div
class="mw-collapsible mw-collapsed dezent " data-expandtext=" Note for cluster operation " data-collapsetext=" hide " id="mw-customcollapsible-Inhalte" > Note for cluster operation
| |
Result of AD connection | |||
| Result in section Status :
| |||
| Enabled: | On | AD/LDAP authentication is enabled. | UTMuser@firewall.name.fqdn Authentication 
|
| Connection Status: | For confirmation the display changes from grey to green. Update with | ||
Extended | |||
| AD attributes can be given certain authorizations. This allows you to configure who can view them. For example, they cannot be read by an LDAP search. These AD attributes are marked with the "confidential'" flag. | |||
To give an AD attribute these authorizations, the following steps are necessary:
| |||
notempty
As a result, the machine account of the UTM may no longer be able to read this attribute. The machine account then requires additional rights. | |||
| SSL: | Off | The connection to the Active Directory server can be established using SSL encryption. |  Extended settings
|
|
| |||
| Root certificate: | Certificate | A root certificate can be deposited. | |
| LDAP-Filter: | (|(sAMAccountType=268435456)(sAMAccountType=268435457)(sAMAccountType=805306368)) | sAMAccountType=Restricts authentication to members of the following groups: Further filters are possible
| |
| User-Attribute: | sAMAccountName | Attributes can be defined under which the AD administration stores the user information and which can then be queried by the UTM: | |
| Mail-Attribute: | »proxyAddresses | ||
| The attributes from OTP to Cert-Attribute, which are entered here, usually do not exist in the AD. For example, to store the OTP secret code on the AD, an unused attribute of the AD schema can be used, which contains this secret code of the user. A corresponding instruction can be found in the article Integrating the OTP function into the Active Directory.
|
 Attribute Editor tab of the user properties in AD with example values for WireGuard  Names of the attributes used from the AD
| ||
| OTP-Attribute: | sPOTPSecret | ||
| L2TP-Attribute: | sPL2TPAddress | ||
| WireGuard-Attribute (IPv4): | sPWireguardIP4Address | The AD attribute of the IPv4 address of the WireGuard connection. The IPv4 address can be stored in any AD attribute of the user. If the IPv4 address is stored in extensionAttribute1, extensionAttribute1 is entered here. | |
| WireGuard-Attribute (IPv6): | sPWireguardIP6Address | The AD attribute of the IPv6 address of the WireGuard connection The IPv6 address can be stored in any AD attribute of the user. If the IPv6 address is stored in extensionAttribute2, extensionAttribute2 is entered here. | |
| WireGuard-Public-Key-Attribute: | sPWireguardPubkeyVal | The AD attribute of the public key of the WireGuard connection.
The public key can be stored in any AD attribute of the user. If the public key is stored in extensionAttribute3, extensionAttribute3 is entered here. | |
| SSL-VPN-Attribute (IPv4): | sPOVPNAddress | ||
| SSL-VPN-Attribute (IPv6): | sPOVPNIP6Address | ||
| SSL-Bump-Attribute: | sPSSLBumpMode | ||
| Cert-Attribute: | sPCertificate | ||
| Page Size: | 500 | In larger environments, LDAP requests may exceed the maximum number of records defined on the server side (1000 in AD). With Page Size you can set that the LDAP query is executed piecewise. A page size of 500 means 500 data records per query. A page size of 0 deactivates a step-by-step LDAP query. | |
Connect UTM with Entra ID
Prerequisites for using Entra ID with OpenID Connect (OIDC)
- In order to use Entra ID (former Azure AD), configured Azure Apps are required.
This article includes descriptions of third-party software and is based on the status at the time this page was created.
Changes to the user interface on the part of the manufacturer are possible at any time and must be taken into account accordingly in the implementation.
All information without warranty.
- Application ID
- Client ID
- Secret client key
Login at Microsoft Entra Admin Center
- Neue App-Registrierung erstellen
- Umleitungs-URI (Typ Web) aus der UTM eintragen
- Entweder: Zertifikat hochladen
- Oder: Geheimen Clientschlüssel anlegen
- Ggf. Clientschlüssel kopieren
- Microsoft Graph API-Berechtigung hinzufügen
- Delegierte Berechtigungen offline_access, openid und profile vergeben
- Anwendungsberechtigungen User.Read.All und Group.Read.All hinzufügen (zum Auslesen der Benutzer und Gruppen)
- This completes the configuration in Microsoft Azure.
| 1. | 2. | 3. |
| Abb.1 | Abb.2 | Abb.3 |
| Abbildungen | ||

- Menü App-Registrierungen 1
- Schaltfläche + Neue Registrierung 2

- In Schritt 3 benötigte Wert eingeben
- Dummy-Wert für Anwendungs-ID eintragen
- zu Schritt 4 gehen
- Dort Umleitungs-URI kopieren und im Entra Admin Center eintragen
- Anschließend zu Schritt 3 zurückkehren
- nach Ausführen aller Schritte im Entra Admin Center
die korrekte Anwendungs-ID eintragen

Mit diesem Zertifikat authentifiziert sich der Authentifizierungsprozess der UTM beim Entra ID.
- Zertifikat mit der so beschrifteten Schaltfläche Hinzufügen 11


Wird als Geheimer Wert im Assistenten in Schritt 2 benötigt


Diese Berechtigungen werden für die App (Anwendungs-ID) im AD/LDAP Authentifizierungs Assistenten der UTM in Schritt 3 benötigt
- offline_access
- openid
- profile

- User.Read.All 25
- Group.Read.All 26

Hierfür wird mindestens die Berechtigung Cloudanwendungsadministrator im Entra benötigt

(Wird im UTM-Assistenten in Schritt 2 und Schritt 3 jeweils als Anwendungs-ID (Client-ID) benötigt
(Wird im UTM-Assistenten in Schritt 2 als Verzeichnis-ID (Mandanten-ID) benötigt
- In the Implied Rules, the rule for Redirect Receiver must be activated (On)
Menü Bereich EntraID (OpenID Connect) Regel Redirect-Receiver Ein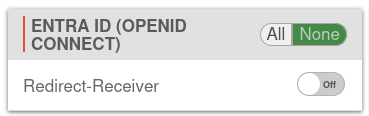

Establish Azure AD connection
Otherwise, the wizard can be started with the button .
Step 1: Directory type
| Caption | Value | Description | UTMuser@firewall.name.fqdn Authentication AD/LDAP Authentication  Step 1
|
|---|---|---|---|
| Directory type: | Select Entra ID as directory type | ||
Step 2: Options | |||
| Directory-ID (Client-ID): | •••••••••••••••••••• | Directory-ID (Client-ID) from the app registration in Entra ID |  Step 2
|
| The entered value is displayed | |||
| Application-ID (Client-ID): | •••••••••••••••••••• | Application-ID (Client-ID) from the app registry in Entra ID. | |
| The entered value is displayed | |||
| Secret value: | •••••••••••••••••••• | Value of the secret client key from the Certificates & Secrets section of Entra ID. | |
| The entered value is displayed | |||
Step 3: Entra ID (OpenID Connect) | |||
| OpenID Connect verwenden: | No | Ermöglicht die Authentifizierung über Entra-ID |  Step 3
|
Step 3: Entra ID (OpenID Connect) aktiviert | |||
| OpenID Connect verwenden: | Yes | Ermöglicht die Authentifizierung über Entra-ID |  Step 3 mit OpenID
|
| Umleitungs-Hostname: | Hostname, unter dem die UTM für den Client erreichbar sein muss. Um den globalen Hostnamen zu verwenden, kann das Feld leer gelassen werden | ||
| App authentication type: | Hier kann zwischen Geheimschlüssel und Zertifikat gewählt werden, was die Eingabe des nächsten Feldes beeinflusst | ||
| Client certificate: Wenn vorher: |
Das Zertifikat zum Authentifizieren der Anwendung gegenüber dem Entra. Das verwendete Zertifikat muss unter Zertifikate und Geheimnisse in der Anwendungs-Verwaltung im Entra importiert sein | ||
| Geheimer Clientschlüssel: Wenn vorher: |
Das Geheimnis zum Authentifizieren der Anwendung gegenüber dem Entra. Hier muss ein gültiger für die Anwendung angelegter geheimer Clientschlüssel verwendet werden (Anwendungsverwaltung->Zertifikate und Geheimnisse) | ||
| The entered value is displayed | |||
| Application-ID (Client-ID): | Application-ID (Client-ID) from the app registry in Entra ID. | ||
| The entered value is displayed | |||
| Umleitungs-Port: | 40008 | Port der UTM, über den die Antwort der Authentifizierung erwartet wird | |
| Umleitungs-Pfad: | 753GDSJD729DFL1 | Zufällige Zeichenfolge als zusätzlicher Pfad in der Redirect URL. Das vermeidet massenhafte Requests durch Scam, die einen Loginversuch auslösen und dann abgewiesen werden müssen. | |
| Generiert eine neu zufällige 15-stellige Zeichenfolge aus Zahlen und Buchstaben | |||
Step 4: Umleitungs-URI | |||
| Umleitungs-URI | Test | Anzeige der Umleitungs URI Gebildet aus dem
|
 Step 4
|
| Kopiert die Umleitungs-URI in die Zwischenablage Diese URI wird als Redirect-URI für die angelegte OpenID-Connect App im Entra-ID benötigt. | |||
Result Entra ID Connection | |||
Status
| |||
| Enabled: | Yes | Entra ID authentication is enabled | UTMuser@firewall.name.fqdn Authentication 
|
| Connection Status: | To confirm, the display changes from gray to green. | ||
| This button is used to update the connection status | |||
| Directory type: | The set directory type | ||
| Options | |||
| Directory-ID (Client-ID): | •••••••••••••••••••• | Directory-ID (Client-ID) from the app registration in Entra ID | |
| The entered value is displayed | |||
| Application-ID (Client-ID): | •••••••••••••••••••• | Application-ID (Client-ID) from the app registry in Entra ID. | |
| The entered value is displayed | |||
| Secret value: | •••••••••••••••••••• | Value of the secret client key from the Certificates & Secrets section of Entra ID. | |
| The entered value is displayed | |||
AD Grant permissions to user groups
UTMuser@firewall.name.fqdn Authentication User
| Active | Permissions | Note |
|---|---|---|
| On | Userinterface | |
| On | Clientless VPN | Gewünschte Berechtigung |
Further information about clientless VPN permissions can be found in the wiki under Clientless VPN.

In the
Only groups that are not empty are listed.
Result
After saving, every user who is a member of the AD group ClientlessVPN can log on to the UTM with their Windows domains access data for using the Clientless VPN.
Verifying the AD connection with CLI
The lines below are the output of the UTM for this command.
Joining and leaving the domain
To validate whether the UTM has already joined the domain:
cli> system activedirectory testjoin
Join is OK
cli>
If this is not the case, the following output will take place
cli> system activedirectory testjoin
Not joined
cli>
In this case the domain can be joined with the following command
cli> system activedirectory join password Beispiel-Admin-Passwort
Password for Administrator@TTT-POINT.LOCAL:
Processing principals to add...
Enter Administrator's password:
Using short domain name -- TTT-POINT
Joined 'SP-UTML' to dns domain 'ttt-point.local'
cli>
The command to leave the domain is
cli> system activedirectory leave password Beispiel-Admin-Passwort
Enter Administrator's password:
Deleted account for 'SP-UTML' in realm 'TTT-POINT.LOCAL'
cli>
When entering or leaving the Active Directory, the administrator password must be entered. The password is not stored, but the AD membership is nevertheless rebootable.
Display AD groups
With the following command the groups can be listed in the Active Directory:
cli> system activedirectory lsgroups
member
------
Abgelehnte RODC-Kennwortreplikationsgruppe
Administratoren
Benutzer
Builtin
ClientlessVPN
Discovery Management
Domänen-Admins
Domänen-Benutzer
Domänen-Gäste
Exchange Servers
...
Users
Windows-Autorisierungszugriffsgruppe
cli>
Verification of users and group membership
The following command checks whether an AD user is assigned to an UTM group:
cli> user check name "m.meier" groups grp_ClientlessVPN
matched
cli>
If this is not the case, the output is
not a member
cli>
Command to display the group membership and permissions for an AD user:
cli> user get name m.meier
name   |groups           |permission
-------+-----------------+----------
m.meier|grp_ClientlessVPN|WEB_USER,VPN_CLIENTLESS
cli>
Domain controller behind site-to-site VPN
In some scenarios, the domain controller is located behind a site-to-site VPN tunnel.
If this is the case, a corresponding zone and rule must be configured.
See also DNS-Relay for IPSec-S2S ‖
DNS-Relay for SSL (OpenVPN) -S2S ‖ DNS-Relay for WireGuard-S2S