Last adaptation to the version: 12.7.0
- Updated to Redesign of the webinterface
This article includes descriptions of third-party software and is based on the status at the time this page was created.
Changes to the user interface on the part of the manufacturer are possible at any time and must be taken into account accordingly in the implementation.
All information without warranty.
Preliminary note
- An AVM Fritz!Box is required
- The remote station equipped with a Securepoint appliance must have a static IP address
The hash values of the preshared key are transmitted unencrypted.
Thus, the security depends on the strength of the preshared key and the hashing method used.
However, since most shared keys only meet the minimum requirements, this mode is not supported.
Configuration of the Fritz!Box
Importing a new firmware version
The manufacturer's homepage can be used to check whether new firmware is available for the Fritz!Box.
For more information, see the section Adjust the configuration file.
Before downloading the new firmware version from AVM's website, make sure that only firmware approved for the existing product can be used.
- The interface of the Fritz!Box is opened in the browser
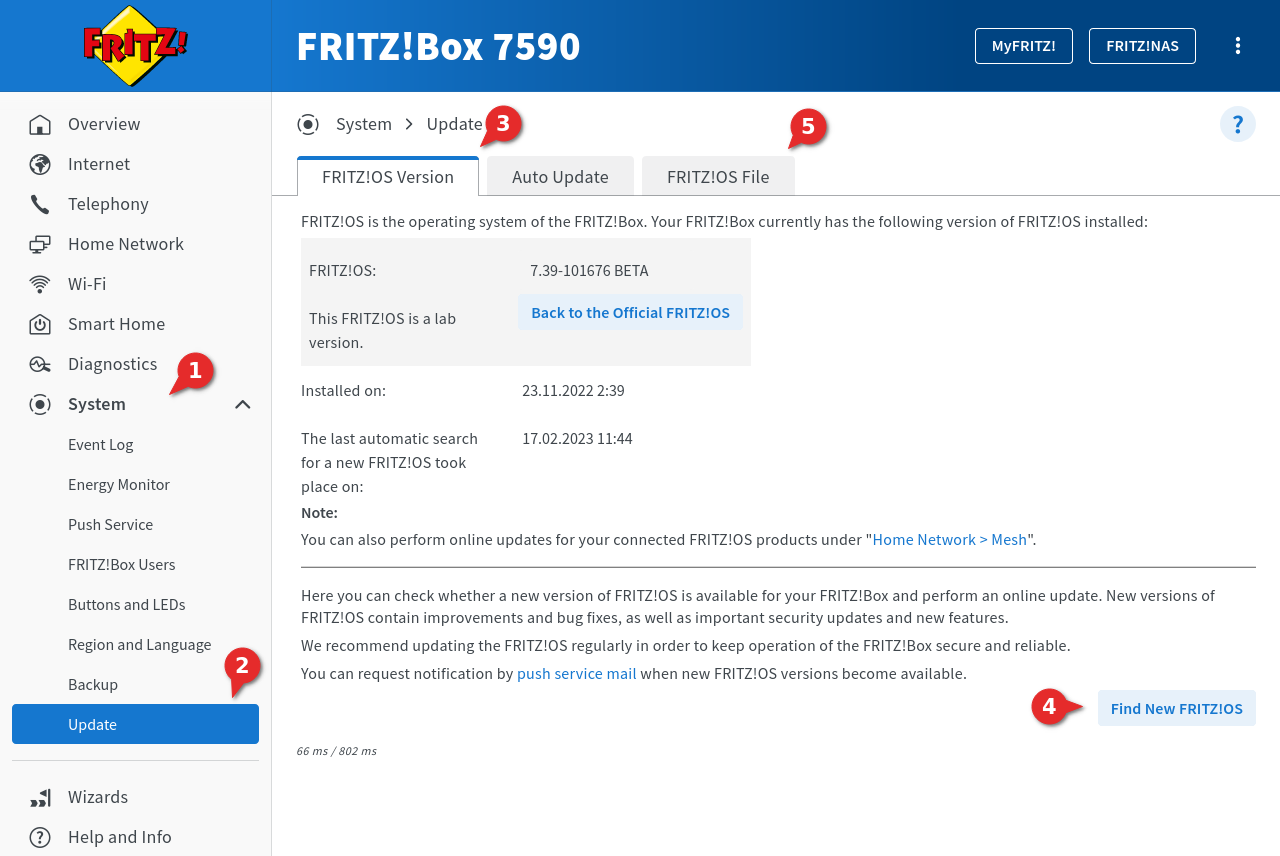
Factory setting: https://192.168.178.1 - Click on ➊ → ➋ notemptyIf the Fritz!Box comes from a cable provider, this function is not available!
- In the dialog Fritz!OS-Version ➌ click on ➍ to search online for an update, or in the dialog Fritz!OS-File ➎ import the downloaded firmware file.
Enable DynDNS
To be able to use a DynDNS in the VPN configuration, this function must be set up beforehand. This requires that an account with a DynDNS service provider is available (Use Securepoint Dynamic DNS Host ).
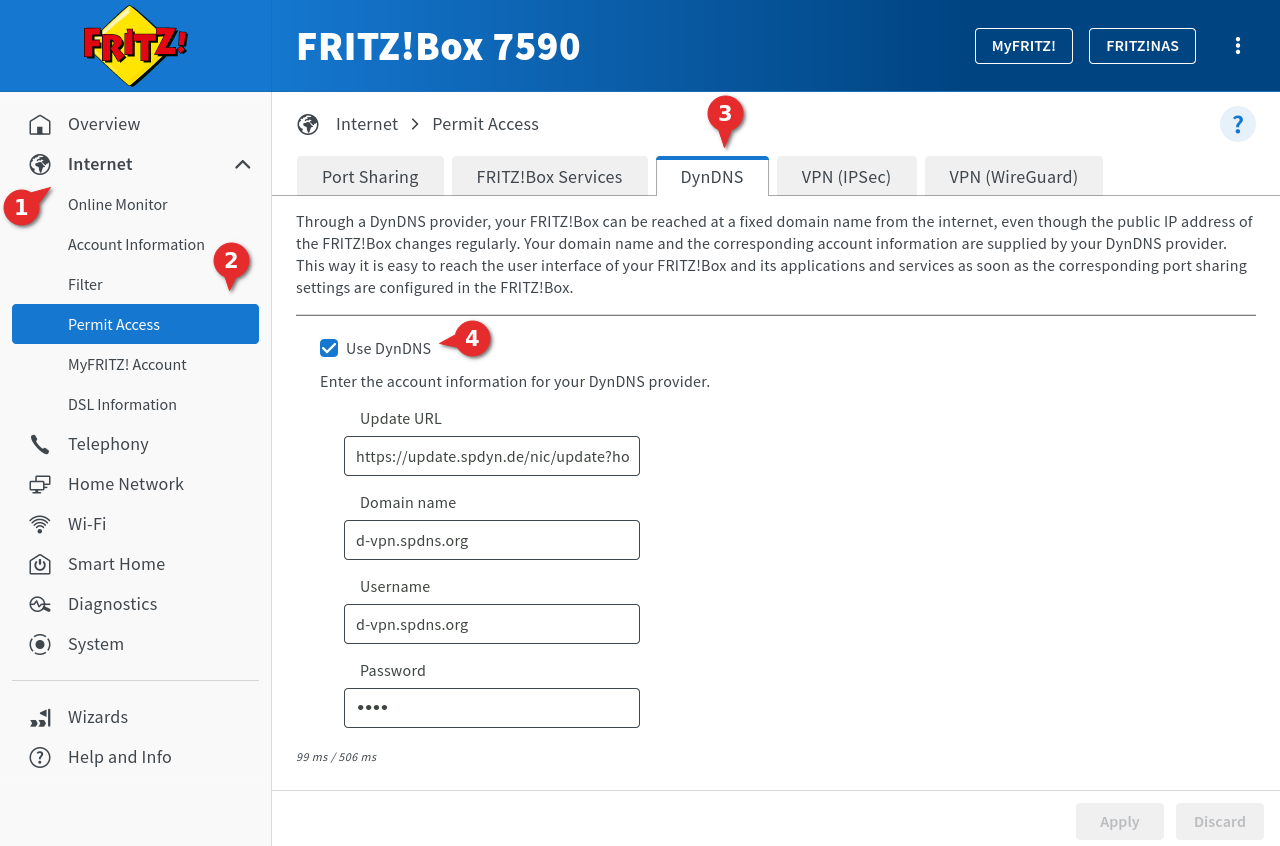
- In the interface of the Fritz!Box open ➊ ➋
- Go to the DynDNS ➌ dialog
- Activation of the checkbox Use DynDNS ➍
- Enter the login data of the DynDNS provider used:
| Caption | Value | Description |
|---|---|---|
| Update-URL | https://update.spdyn.de/nic/update?... | The update-URL of the DynDNS provider |
| Domainname | d-vpn.spdns.de | The domain name for the Fritz!Box with the DynDNS provider |
| Username | d-vpn.spdns.org | The username of the account For spDyn with reseller account also the hostname |
| Password | **** | The password of the account For spDyn with reseller account the token |
- With the button made changes are saved.
Change internal network
According to the default settings of the Fritz!Box VPN Assistant, the factory-set internal network 192.168.178.0/24 may not be used for VPN.
Therefore, the internal network must be changed.
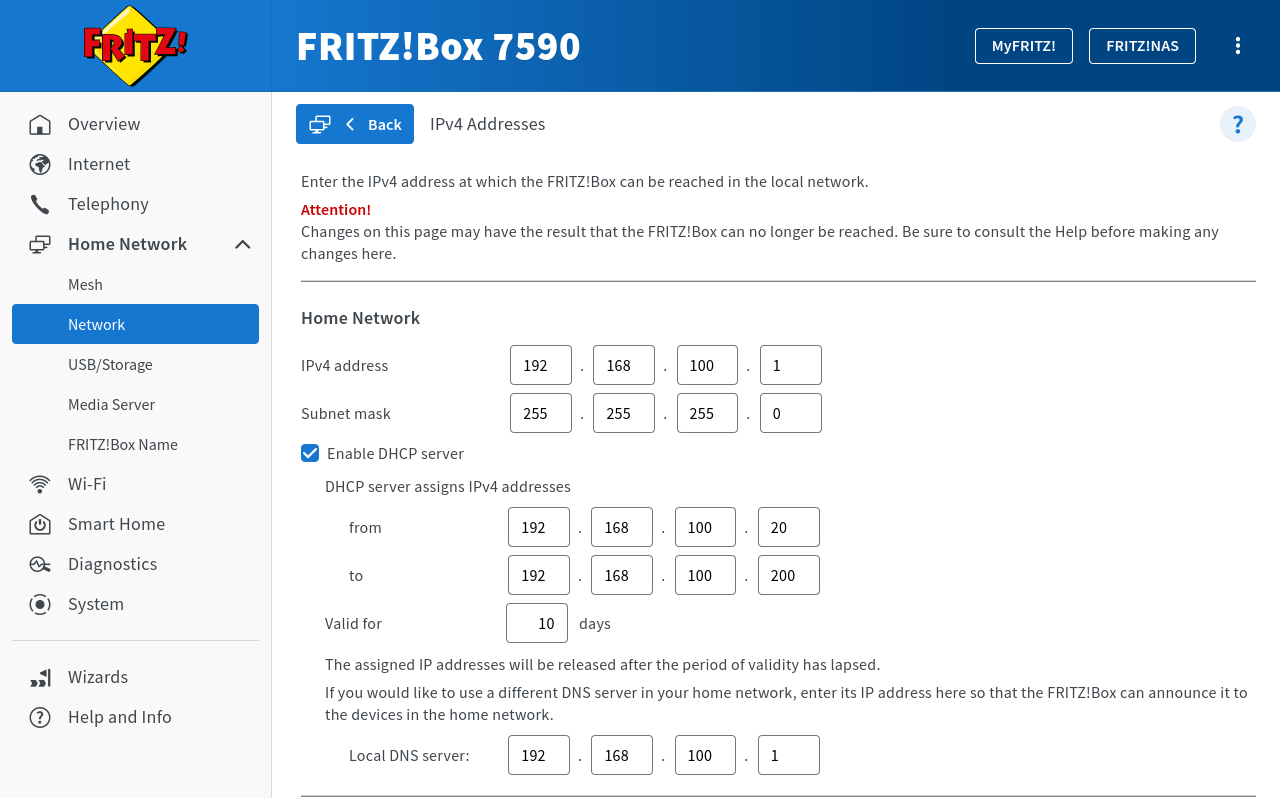
- In the interface of the Fritz!Box go to Home network → Network and switch to the dialog Network Settings
- In the IP Addresses section, click the button.
- Enter the following under Home network:
| Caption | Value | Description |
|---|---|---|
| IPv4 address | 192.168.100.1 | The new IPv4 address for the Fritz!Box |
| Subnet mask | 255.255.255.0 | The subnet mask for the new IPv4 address of the Fritz!Box |
| Enable DHCP server and enter the following: | ||
| from | 192.168.100.20 | The beginning of the span of DHCP IPv4 addresses |
| to | 192.168.100.200 | The end of the span of DHCP IPv4 addresses. |
| Validity | 10Days | The validity of the DHCP IPv4 addresses |
- With the button made changes are saved. A new login to the new IP address of the Fritz!Box is then necessary
Create VPN configuration
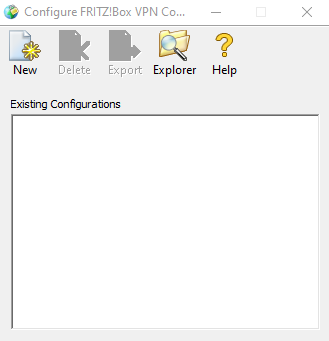
The configuration of the VPN connection is not done via the configuration interface in the browser, but is imported to the Fritz!Box as a file. The configuration file is created with an application software, which is downloaded from the website of the manufacturer AVM. The application software is called Configure Fritz!Box VPN Connection.
- Download and install the Configure Fritz!Box VPN Connection software
- Click on the icon New in the toolbar to create a new configuration file. Two files are always created, of which the fritzbox_fritz_lokal.spdyn.de.cfg file is required The required configuration file always starts with fritzbox_ and in addition the entered DynDNS name of the Fritz!Box from the 2nd setup step in the application software.
A wizard guides you through the creation of the configuration file:
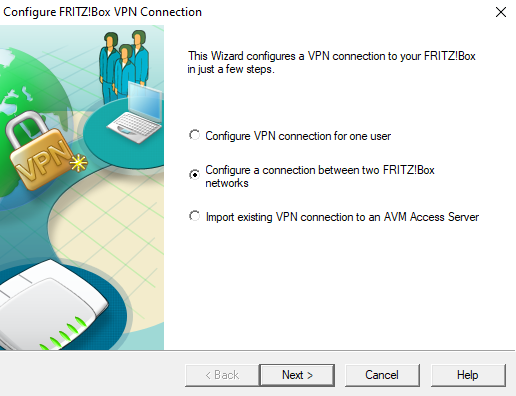
- In the first step, select which devices are to be connected to each other
- Two devices should connect with each other. Activating Configure a connection between two FRITZ!Box networks
- Next
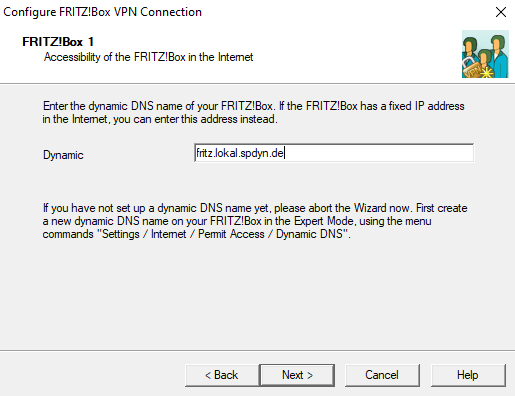
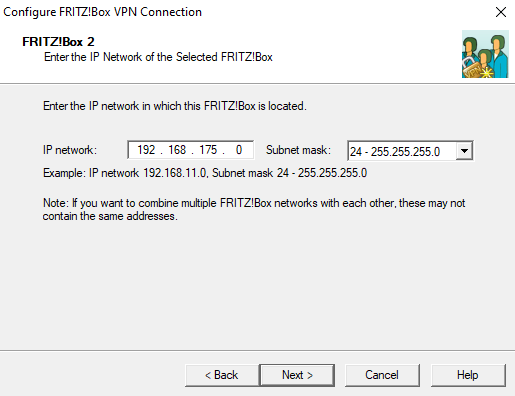
- In this example: fritz_lokal.spdyn.de
- Next
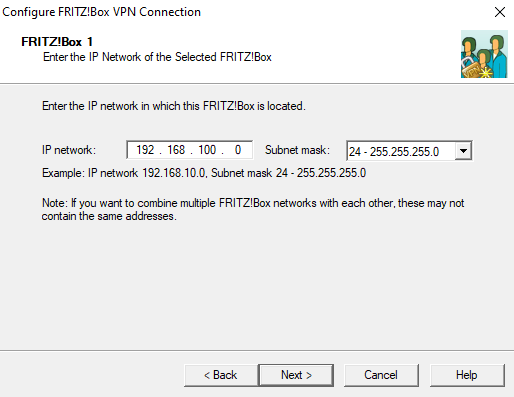
- Click on Next
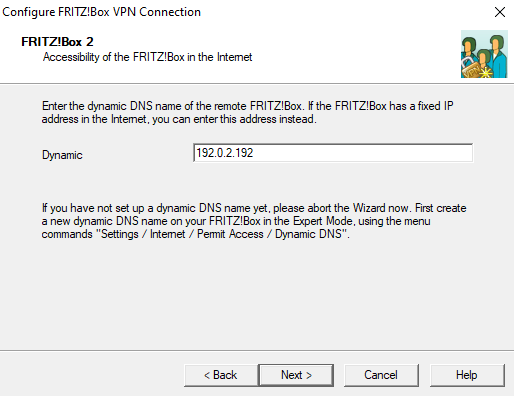
- In this example: 192.0.2.192
- Next
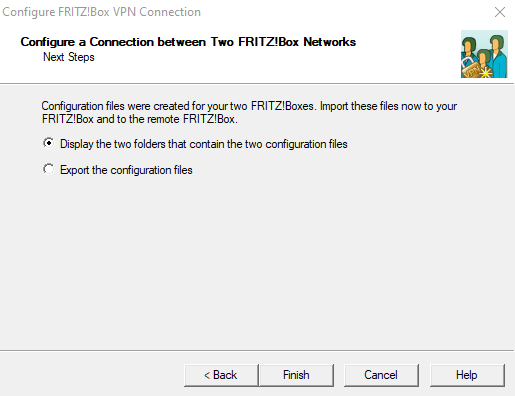
The location of the files is displayed.
- Open this file in any editor
Adjust the configuration file
The configuration file created above will be adjusted.
Entries marked in green are individual configurations.
Necessary manual changes are additionally marked with .
vpncfg {
    connections {
        enabled = yes;
        conn_type = conntype_lan;
        name =  "Securepoint";              //  Name of the connection in the configuration interface
        always_renew = yes;
        reject_not_encrypted = no;
        dont_filter_netbios = yes;
        localip = 0.0.0.0;
        local_virtualip = 0.0.0.0;
        remoteip = 192.0.2.192;               // static IP address of the Securepoint appliance
        remote_virtualip = 0.0.0.0;
        localid {
            fqdn = "fritz_lokal.spdyn.de";    // spdyn DNS name of the Fritz!Box
            //ipaddr = xxx.xxx.xxx.xxx;       // static IP address of the Fritz!Box, if available
        }
        remoteid {
            ipaddr = 192.0.2.192;             // static IP address of the Securepoint appliance
        }
        mode = phase1_mode_idp;               //  Main-Mode
        phase1ss = "dh15/aes/sha";            //  Proposals for Phase 1 (DH15, AES, SHA).
        keytype = connkeytype_pre_shared;
        key = "secret";                       //  VPN Password (Preshared Key)
        cert_do_server_auth = no;
        use_nat_t = no; / yes;                //  Is a site behind a NAT router yes = yes; no = no;
        use_xauth = no;
        use_cfgmode = no;
        phase2localid {
            ipnet {
                ipaddr =  192.168.100.0;      // internal network of the Fritz!Box
                mask = 255.255.255.0;
            }
        }
        phase2remoteid {
            ipnet {
                ipaddr = 192.168.175.0;       //  internal network of the Securepoint appliance
                mask = 255.255.255.0;
            }
        }
        phase2ss =  "esp-all-all/ah-none/comp-all/pfs";              //  with compression
        accesslist = "permit ip any 192.168.175.0 255.255.255.0";    //  internal network of the Securepoint appliance
    }
    ike_forward_rules = "udp 0.0.0.0:500 0.0.0.0:500",
                        "udp 0.0.0.0:4500 0.0.0.0:4500";
}
// EOF
| Caption | Value | Description |
|---|---|---|
| name = | "Securepoint"; | // Name of the connection in the configuration interface The name of the connection has been renamed to a unique term. This is displayed in the Fritz!Box configuration interface when the file has been imported. |
| remoteip = | 192.0.2.192; | // static IP address of the Securepoint appliance This is the static IP address of the Securepoint appliance. Has already been configured in the wizard. |
| localid{ fqdn = |
"fritz_lokal.spdyn.de"; |
// spdyn DNS name of the Fritz!Box Has already been configured in the wizard. |
| //ipaddr = } |
xxx.xxx.xxx.xxx; | // static IP address of the Fritz!Box, if available An IP address can also be entered here if the Fritz!Box has a static IP address. These entries are also set by the wizard. |
| remoteid { ipaddr = } |
192.0.2.192; |
// static IP address of the Securepoint appliance Re-entering the static IP address of the Securepoint appliance. Has already been configured in the wizard. |
| mode = | phase1_mode_idp; | // Main-Mode The transport mode must be changed from "aggressive" to "main", because only this mode is supported by the Securepoint software. |
| phase1ss = | "dh15/aes/sha"; | // Proposals for Phase 1 (DH15, AES, SHA). The encryption parameters for IKE phase 1 must be adjusted. notempty Older Fritz!Box firmware versions only support AES 128 bits, SHA1 and DHA2. |
| key = | "secret"; | // VPN Password (Preshared Key) Enter the preshared key.The preshared key generated by the wizard can also be used. This must then also be stored on the Securepoint appliance. |
| phase2localid { ipnet { |
192.168.100.0; 255.255.255.0; |
// internal network of the Fritz!Box // Subnet mask |
| phase2remoteid { ipnet { |
192.168.175.0; 255.255.255.0; |
// internal network of the Securepoint appliance The internal network of the Securepoint appliance must be listed under phase2remoteid. |
| phase2ss = | "esp-all-all/ah-none/comp-all/pfs" | // with compression The encryption parameters for IKE phase 2 must be identical to those for phase 1. notempty Older Fritz!Box firmware versions only support AES 128 bits, SHA1 and DH2. If "all/all/all" is entered in phase 1, "esp-all-all" can then be entered accordingly. With "ah-none" no authentication header is expected and with "comp-all" compression is supported. |
| accesslist = | "permit ip any 192.168.175.0 255.255.255.0"; | // internal network of the Securepoint appliance |
The so modified configuration file is saved again as fritzbox_fritz_lokal.spdyn.de.cfg.
Add additional networks
If further networks are to be added to the Securepoint appliance, the parameter accesslist in the configuration file is adjusted accordingly.
The networks 192.168.82.0/24 to 192.168.92.0/24 should be accessible via VPN.
This means that only the specified network mask is adjusted in the accesslist parameter:
accesslist = "permit ip any 192.168.82.0 255.255.240.0";
In addition to the network 192.168.175.0/24, the network 192.168.82.0/24 should also be accessible via VPN.
This additional network is added in the accesslist parameter:
accesslist = "permit ip any 192.168.175.0 255.255.255.0", "permit ip any 192.168.82.0 255.255.255.0";
Upload configuration file
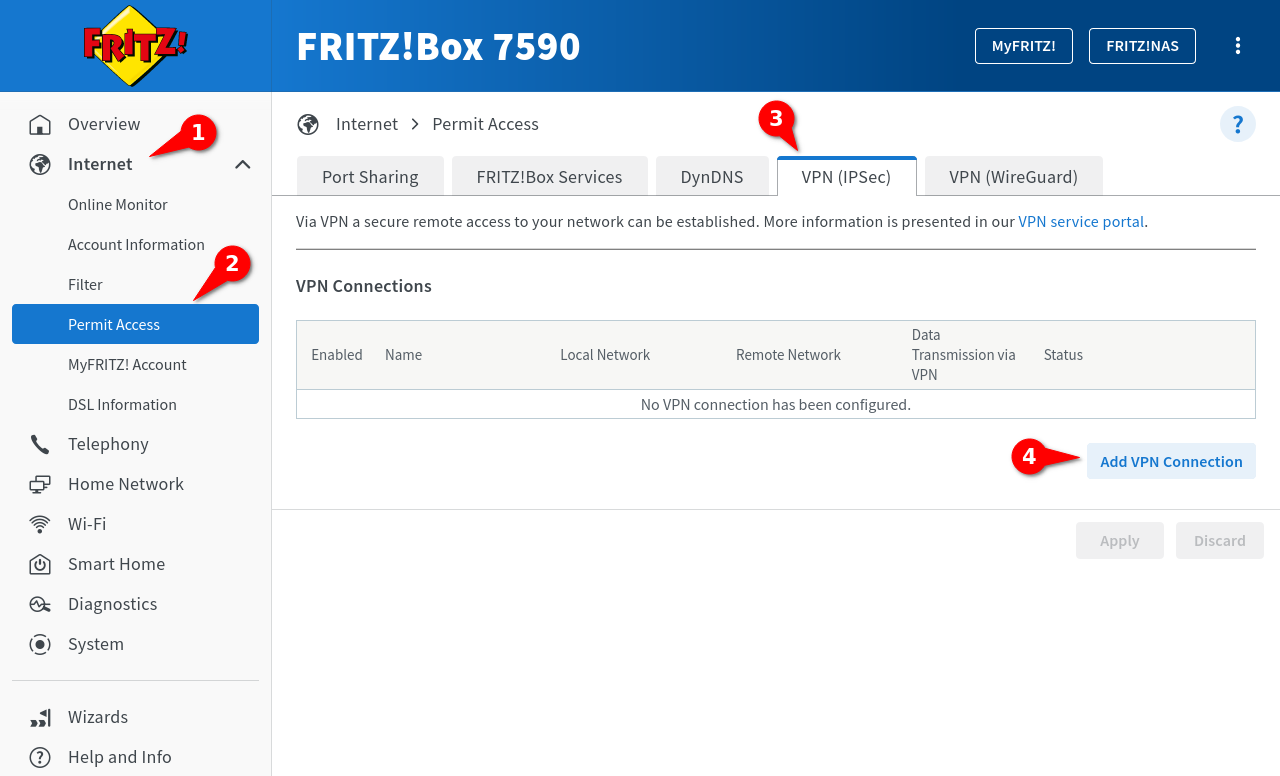
In the logged-in Interace of the Fritz!Box, Internet ➊ → Permit Access ➋ → VPN (IPSec) ➌ on the ➍ is clicked.
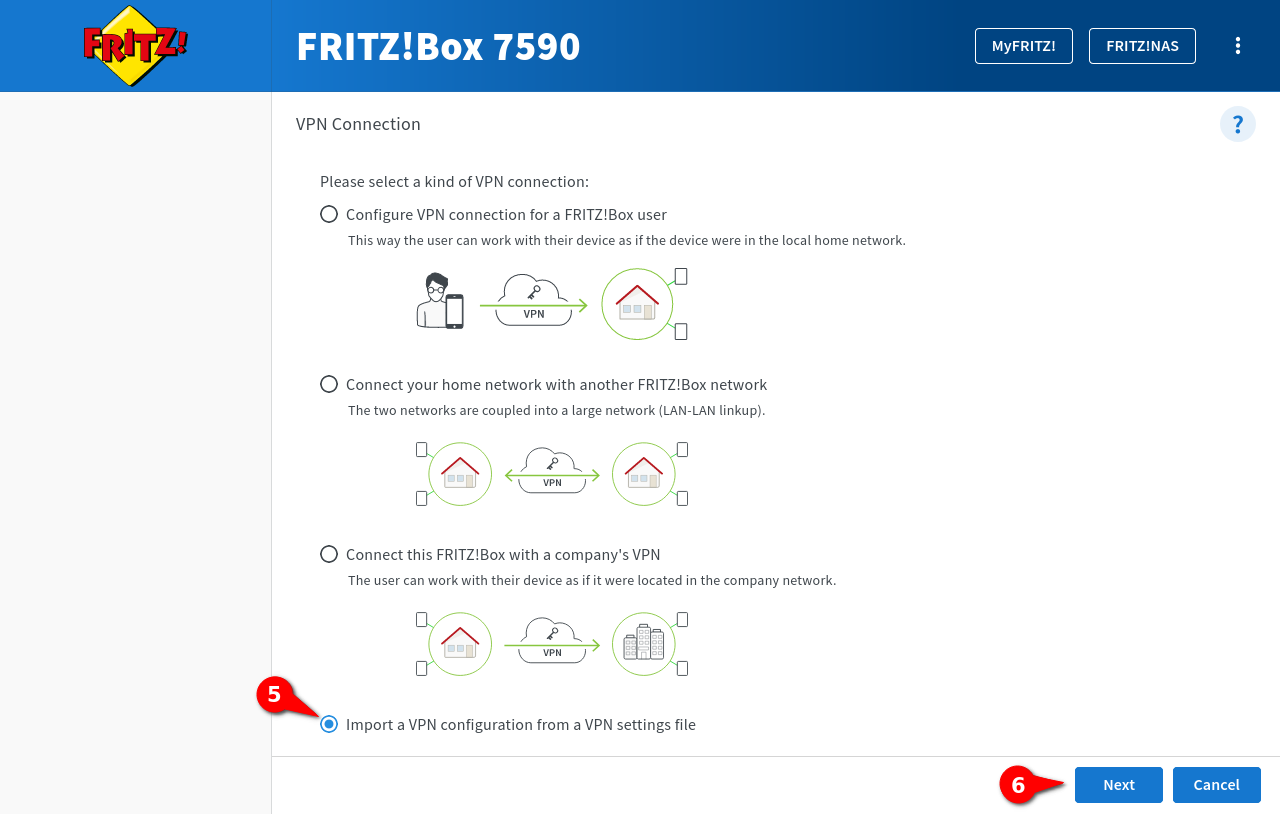
In the VPN Connection window, Import a VPN configuration from a VPN settings file ➎ is selected from the four setup options.
Continue with Next ➏.
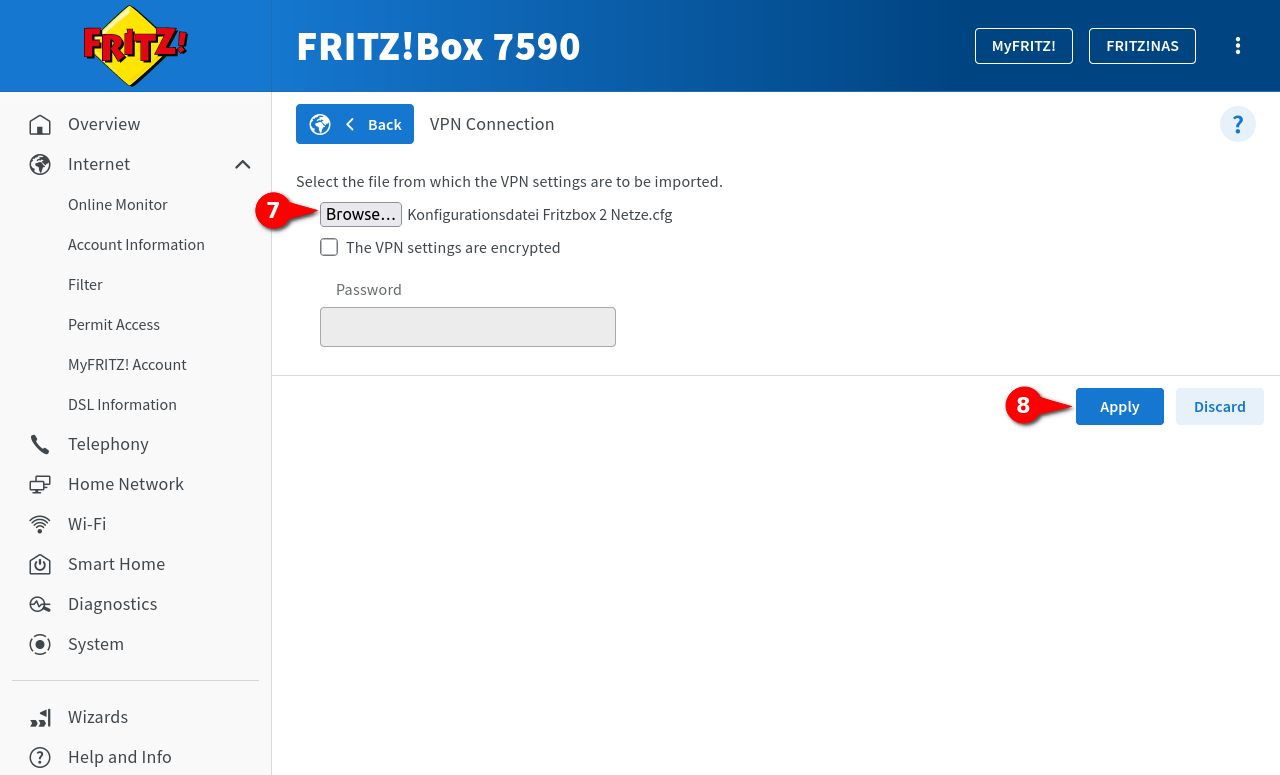
Via the button ➐ the configuration file that was created is selected.
If the file is encrypted, this setting will be enabled. Under Password the password is then entered.
Finally, click on Apply ➑.
Under System → Event Log the connection establishment is logged.
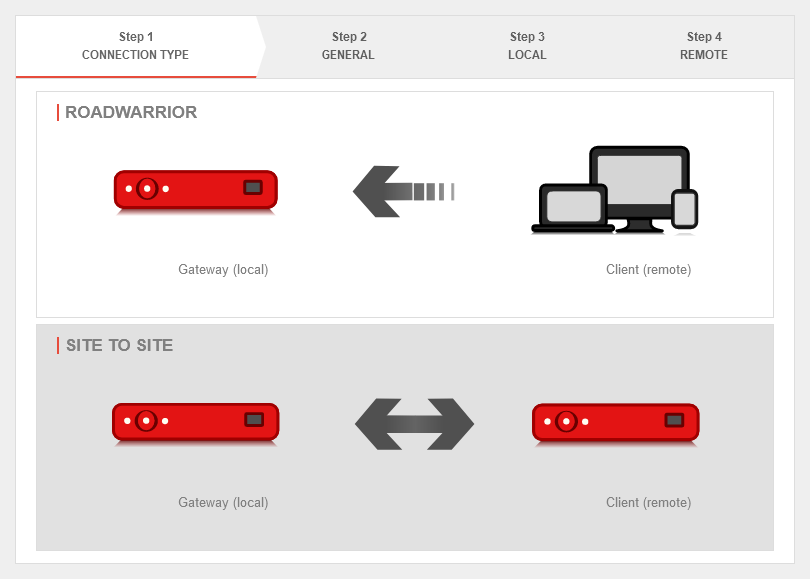
Set up Securepoint Appliance
Subsequently, the settings on the Securepoint appliance must be configured:
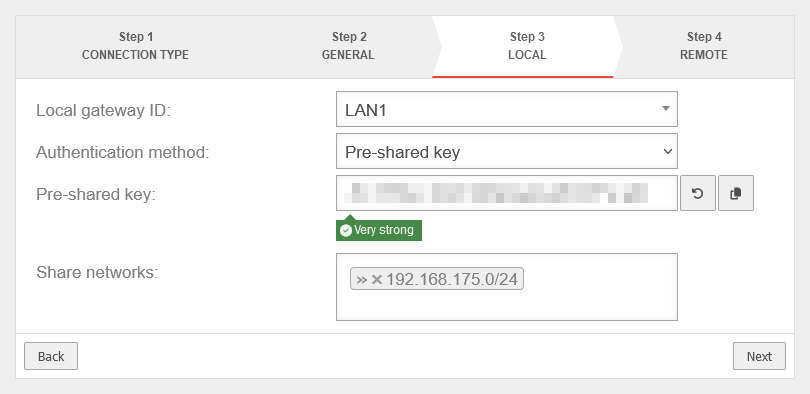
- A site-to-site IPSec connection is established. notemptyUse IKE version 1 and the same preshared key as in the configuration file of the Fritz!Box
- If necessary, create a network object for the IPSec VPN network of the remote station and create the corresponding firewall rules, if they are not created automatically by the wizard
- Adjust the settings of the phases of the IPSec connection. notemptyUse Phase 2 PFS
Establish IPSec S2S connection
Configure IKEv1 phases
notempty
These default values are not supported by the Fritz!Box.
The manufacturer AVM informs which encryption methods and algorithms are supported by the Fritz!Box.
Configure IKEv1 phase 1 | |||
| Under Area Connections, click on for the created IPSec S2S connection and switch to the IKE tab in the Edit Phase 1 dialog. | |||
| Caption | Value | Description | UTMuser@firewall.name.fqdnVPNIPSec 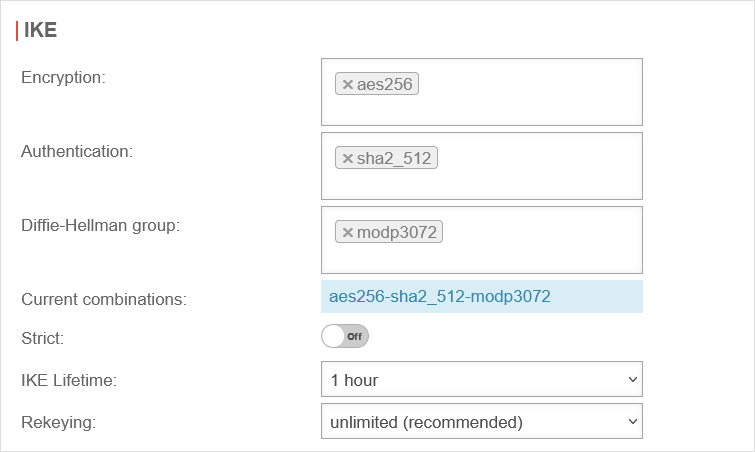 Configuration of phase 1 for IKEv1 Configuration of phase 1 for IKEv1
|
|---|---|---|---|
| Encryption: | Set aes256 as the encryption. You can also select a different one.notempty If the Fritz!Box does not support the set encryption, select aes128. | ||
| Authentication: | Set sha2_512 as authentication. You can also select a different one. notempty If the Fritz!Box does not support the set authentication, select sha1. | ||
| Diffie-Hellman Group: | Set modp3072 (DH15) as the Diffie-Hellman Group. notempty If the Fritz!Box does not support the set Diffie-Hellman Group, select modp1024 (DH2). | ||
| Display weak algorithms: | Off | Is activated if weaker algorithms are required, such as for Authentication: and Diffie-Hellman Group: . | |
| Strict: | Off | If activated, only the configured parameters and no other proposals are used. | |
| IKE Lifetime: | Default |
The IKE Lifetime can be customized. | |
| Rekeying: | Default |
The number of rekeying can be adjusted. | |
| The changes made are saved with the button. | |||
Configure IKEv1 phase 2 | |||
| Under Tab Connections, click on for the created IPSec S2S connection. notempty The set parameters must be identical to those of phase 1. | |||
| Caption | Value | Description | UTMuser@firewall.name.fqdnVPNIPSec 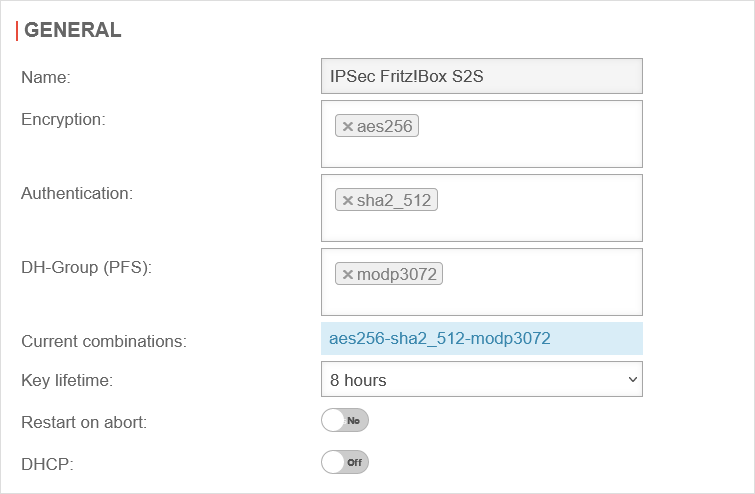 Configuration of phase 2 for IKEv1 Configuration of phase 2 for IKEv1
|
| Encryption: | Set aes256 as the encryption. You can also select a different one.notempty If the Fritz!Box does not support the set encryption, select aes128. | ||
| Authentication: | Set sha2_512 as authentication. You can also select a different one. notempty If the Fritz!Box does not support the set authentication, select sha1. | ||
| Diffie-Hellman Group: | Set modp3072 (DH15) as the Diffie-Hellman Group. notempty If the Fritz!Box does not support the set Diffie-Hellman Group, select modp1024 (DH2). | ||
| Display weak algorithms: | Off | Is activated if weaker algorithms are required, such as for Authentication: and Diffie-Hellman Group: . | |
| Key life time: | Default |
The key life time can be adjusted. | |
| Restart after abort: | Off | If activated, the connection is re-established in the event of an unexpected disconnection. | |
| DHCP: | Off | When activated, the clients receive IP addresses from a local network. Further configurations are required for this, see wiki article on DHCP for IPSec. | |
| The changes made are saved with the button. | |||
Firewall-Rules
| # | Source | Destination | Service | NAT | Action | Active | |||
| HNE | ACCEPT | On | |||||||
| ACCEPT | On |
Initiate IPSec connection

Establish the connection from the Securepoint appliance:
- Switch to Area Connections
- Click the ➊ button on the connection you just created to load the connection data.
- To initiate the connection, click the ➋ button
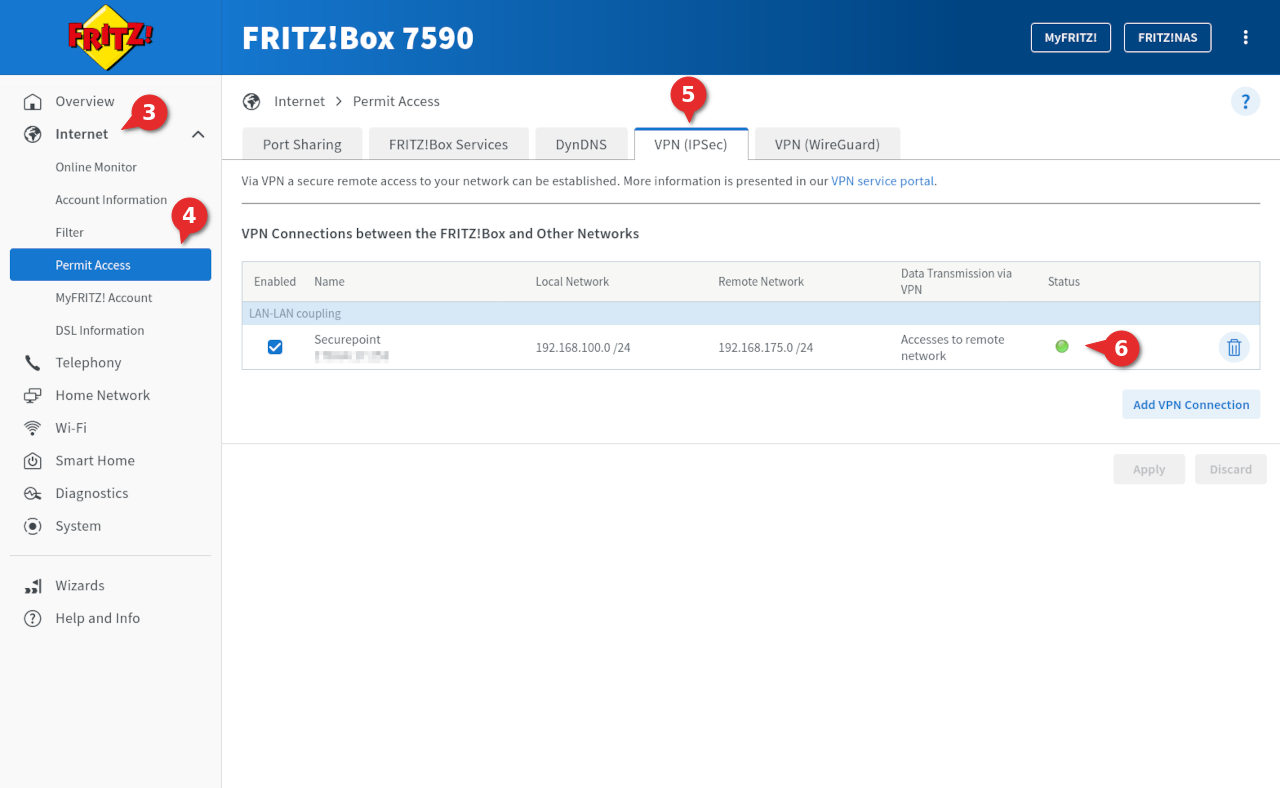
- To view the status of the connection on the Fritz!Box, in the interface of the Fritz!Box go to Internet ➌ → Permit Access ➍
- Switch to the dialog VPN (IPSec) ➎
- In the lower area VPN Connections you can see the created connection
- In the column Status a green circle ➏ is displayed when a connection is established
In this case, a downgrade of the Fritz!Box firmware version, configuration of the Fritz!Box without 2-factor authentication and a renewed update of the Fritz!Box firmware may help.
Nevertheless, the settings made should first be checked, especially for IKEv1.


