Jump to:navigation, search
Wiki


notempty
Dieser Artikel bezieht sich auf eine nicht mehr aktuelle Version!

notempty
Der Artikel für die neueste Version steht hier

notempty
Zu diesem Artikel gibt es bereits eine neuere Version, die sich allerdings auf eine Reseller-Preview bezieht


De.png
En.png
Fr.png


IPSec connections Site-to-Site
Last adaptation to the version: 12.5.0
New:
notempty
This article refers to a Resellerpreview

12.4 12.2.5 12.2.3 12.2 11.7 11.6.12

Access: UTM-IP:Port or UTM-URL:Port
Port as configured at Network / Appliance Settings / Webserver
Default-Port: 11115
i.e.: https://utm.ttt-point.de:11115
Default: https://192.168.175.1:11115
→ VPN →IPSecTab Connections

Introduction

A Site-to-Site connection links two networks together.
For example, the local network of a main office with the local network of a branch office / secondary office.

Public IP addresses, as well as dynamic DNS entries, can be used to connect the two remote gateways.


Preparation

If there is a router (e.g. Fritz!Box or Speedport) in front of the Securepoint appliance, it must be ensured that ESP and UDP 500/ 4500 are active there. See Example configuration with a Fritz!Box.

Configuration of an IPSec Site-to-Site connection

After logging in to the administration interface of the firewall (in the delivery state: https://192.168.175.1:11115), an IPSec connection can be added in the menu → VPN →IPSec Button Add IPSec connection.

Setup Wizard


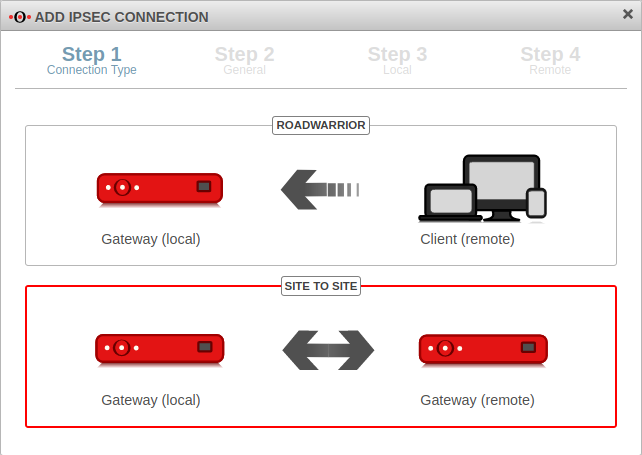
Step 1 - Connection type
Caption Value Description UTM v11.8.8 IPSec S2S Schritt1-en.png
Setup step 1
Selection of the connection type: The following connections are available.
  • Roadwarrior
  • Site to Site
For the configuration of a Site-to-Site connection, this one is selected.

Step 2 - General
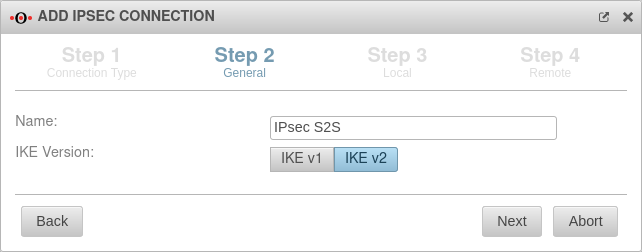
Name: IPSec S2S Name for the connection UTM v12.2.4 IPSec S2S Schritt2-en.png
Setup step 2
IKE Version: IKE v1IKE v2 Default: IKEv2 Selection of the IKE version

When using IKE v2 it is possible to combine multiple subnets under one SA (default for newly created connections).

Without this option, a separate SA is negotiated for each subnet combination. This has significant disadvantages, especially with numerous SAs, and leads to limitations and losses in the stability of the connections due to the design of the IPSec protocol. This option is activated while editing the phase 2 configuration with the entry Group subnet combinations.


Step 3 - Local
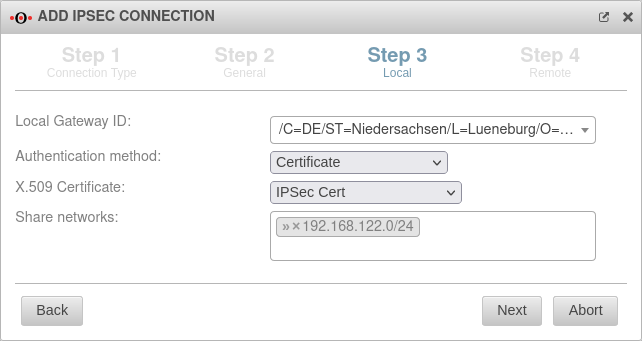
Local Gateway ID: Any interface Any string
The gateway ID flows into the authentication. This can be an IP address, a host name or an interface. On the remote gateway, this value must be configured exactly the same way.
  • If an email address should be used as Gateway ID, it is necessary to insert a double @@ in front of the ID (mail@... becomes @@mail@...). Otherwise the ID will be treated as FQDN
  • Automatically filled in for certificate authentication method after certificate selection.
  • UTM v12.2.4 IPSec S2S Schritt3-en.png
    Setup step 3
    Authentication method: Pre-Shared Key: A pre-shared key is in use
    Certificate A certificate is in use
    RSA
    Only for IKEv1.
    An RSA is in use
    Pre-Shared Key:
    For authentication method pre-shared key.
        An arbitrary PSK
    Creates a very strong key
    Copies the PSK to the clipboard
    X.509 certificate:
    For authentication method certificate.
    Server certificate Selection of a certificate
    This certificate must be created beforehand under → Authentication →Certificates.
    Private RSA key
    For authentication method RSA.
    RSA-Site2Site Private RSA key for identification
    Share networks »192.168.122.0/24 The local network of the remote gateway to be accessed

    Step 4 - Remote Gateway
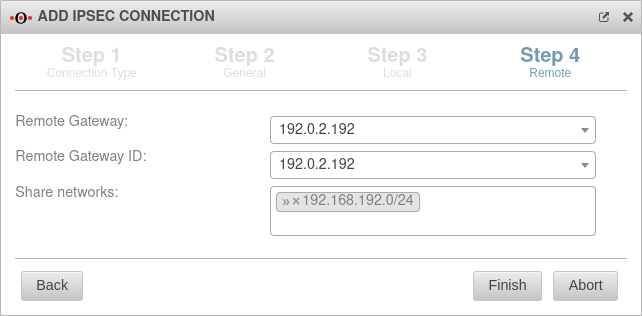
    Remote Gateway 192.0.2.192 Public IP address (or hostname that can be resolved via DNS) of the remote gateway. UTM v12.2.4 IPSec S2S Schritt4-en.png
    Setup step 4
    Remote Gateway ID 192.0.2.192 ID configured as local ID on the remote gateway (any character string).
    Public RSA key
    For authentication method RSA.
    RSA-Site2Site RSA key, the public part of which the remote gateway must use to authenticate itself.
    Share networks »192.168.192.0/24 The local network of the remote gateway to be accessed
    Exit the setup wizard with Finish
  • For S2S connections, it should be checked whether several subnets can be combined via MULTI_TRAFFIC_SELECTOR. This significantly reduces the number of SAs and increases the stability of the connection.
    To do this, the option Group subnet combinations is activated in phase 2.
  • More settings

    In addition to the settings that have already been defined in the wizard, further parameters can be configured:


    IKEv1

    Step-by-step.png


    notempty
    This article refers to a version that is no longer current!

    notempty
    The article for the latest version is here

    notempty
    There is already a newer version of this article, but it refers to a Reseller-Preview


    {{var | DH-Gruppe (PFS) | DH-Gruppe (PFS): | DH-Group (PFS):


    De.png
    En.png
    Fr.png


    Phase 1
    → VPN →IPSecTab Connections Button Phase 1
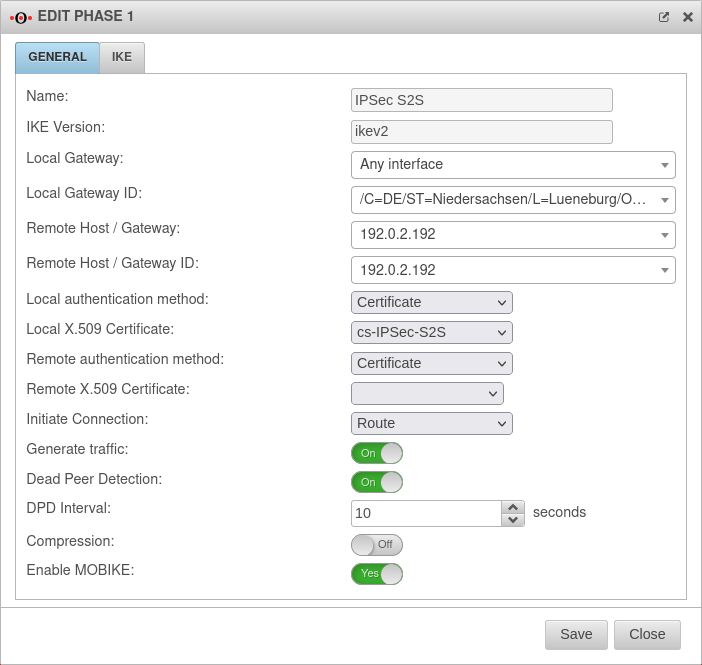
    General

    Tab General

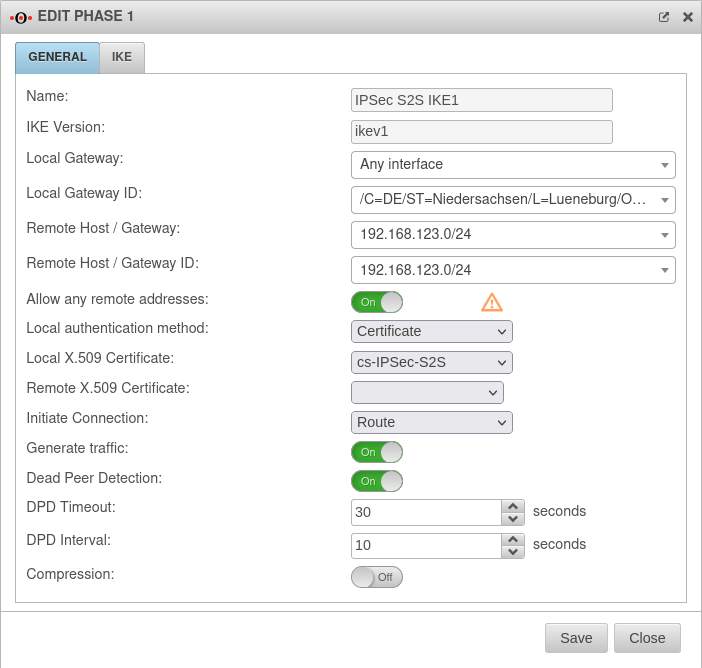
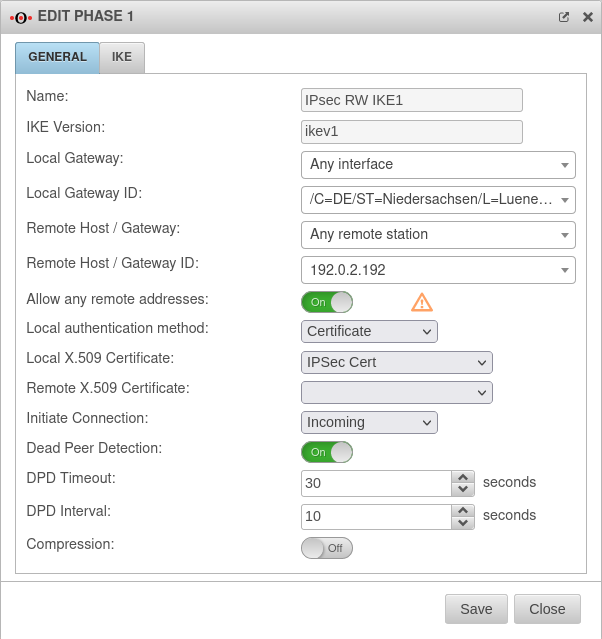
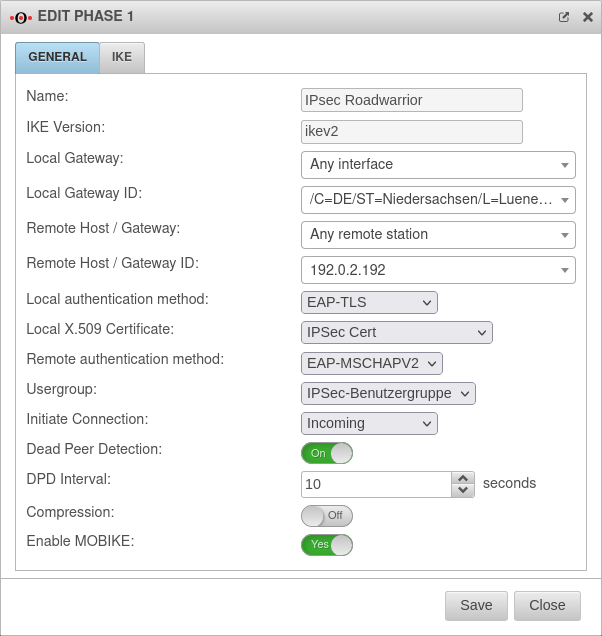
    Caption Value Description UTM v12.4 IPSec S2S IKEv1 Phase1-en.png
    Phase 1 Genereal
    Allow any remote addresses: On
    Default
    Disable this option for site-to-site connections with DynDNS hosts if multiple IPsec connections with a priori unknown addresses (DynDNS S2S, Roadwarrior) are configured.
    Startup behavior:
    Outgoing The tunnel is initiated by the UTM even if no packets are sent.
    Incoming requests are accepted.
    Incoming Default if Remote Host is any The UTM accepts incoming tunnel requests.
    No outgoing connection is created.
    Route Default if Remote Host known The tunnel is initiated by the UTM only when packets are to be sent.notempty
    Only set as default value if Any remote station is not selected as Remote Host / Gateway.
    Route Default if Remote Host known The tunnel is initiated by the UTM only when packets are to be sent.notempty
    Only set as default value if Any remote station is not selected as Remote Host / Gateway.
    Ignore Deactivates the tunnel
    Generate traffic: notempty
    New as of v12.4

    For Initiate Connection Route
    On Prevents unwanted disconnections when no data traffic is taking place
    Dead Peer Detection: On Checks at a set interval whether the tunnel still exists.
    If the tunnel was terminated unexpectedly, the SAs are dismantled.
    (Only then it is also possible to reestablish a new tunnel).
  • When Off deactivated, the option Restart after abort in phase 2 is also automatically deactivated.
  • DPD Timeout: 30Link= seconds Period before the state under Startup behavior is restored.
  • Under IKEv2 this parameter is not available.
    The same values are used here as for regular packets.
  • DPD Interval: 10Link= seconds Testing interval
    Compression: Off Compression is not supported by all remote stations
    Enable MOBIKE: Yes
    Default
    Used to deactivate the MOBIKE option
    Deactivation prevents encrypted data from a remote station from being additionally encapsulated in 4500udp, which leads to problems in communication.
    Tab IKE Settings that must be identical in the UTM and in the client:
    IKE
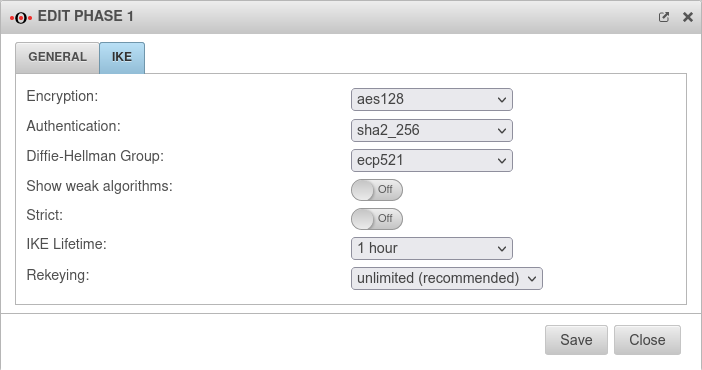
    Caption Default-Werte UTM Default-Werte NCP-Client UTM v12.5.1 IPSec S2E IKEv1 Phase1 IKE-en.png
    Phase 1 IKEv1
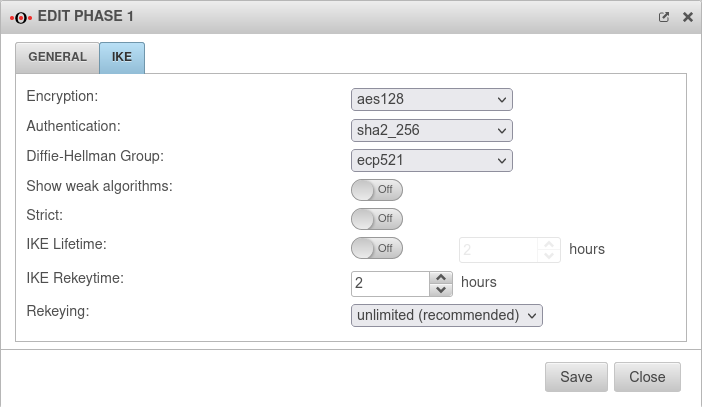
    UTM v12.5.1 IPSec IKEv2 Phase1 IKE-en.png
    Phase 1 IKEv2
    Encryption: aes128 AES 128 Bit
    Authentication: sha2_256 Hash: SHA2 256 Bit
    Diffie-Hellman Group: ecp521 IKE DH-Gruppe: DH2 (modp1024)
    New default value as of v12.5.1
    Tab IKE More settings:
    Caption Value Description
    Show weak algorithms: notempty
    New as of v12.5
    Off Also shows algorithms in the selection dialogs that are considered weak and should not be used.
    Strict: Off The configured parameters (authentication and encryption algorithms) are preferred for connections
    On No further proposals are accepted. A connection is only possible with the configured parameters.
    IKE Life time: notempty
    Change as of v12.5
    Out 3Link= hours Validity period of the Security Association: Agreement between two communicating entities in computer networks. It describes how the two parties apply security services to communicate securely with each other. When using multiple services, multiple security connections must also be established. (Source: Wikipedia 2022) in phase 1
    Can be activated Vorlage:ButtonOn in addition to IKE Rekeytime. If the Lifetime is set, the value must be greater than the Rekeytime.
    IKE Life time: 1 hour Validity period of the Security Association: Agreement between two communicating entities in computer networks. It describes how the two parties apply security services to communicate securely with each other. When using multiple services, multiple security connections must also be established. (Source: Wikipedia 2022) in phase 1
    IKE Rekeytime: notempty
    New as of: v12.4
    notempty
    Change as of v12.5
    2Link= hours The validity period in which the connection is established (initial or after termination)
    notempty
    Starting with version 12.5.0, for already existing' connections that have no rekeytime' set, the value of the lifetime is entered at this point and the value of the lifetime is set to 0.
    This significantly increases the stability of the connection and should not bring any disadvantages.
    If a value has already been set for the rekeytime (possible from v12.4) no change is made.

    Example:
    Current version:
    ike_lifetime = 2
    ike_rekeytime = 0

    After update:
    ike_lifetime = 0
    ike_rekeytime = 2

    ----

    Current version:
    ike_lifetime = 2
    ike_rekeytime = 1

    After update: (without change)
    ike_lifetime =2
    ike_rekeytime = 1
      
    Rekeying: unlimited (recommended) Number of attempts to establish the connection (initial or after abort).
    For E2S connections (Roadwarrior), the setting 3 times can avoid endless attempts to connect to devices that are not correctly logged out.
      

    Phase 2
    → VPN →IPSecTab Connections Button Phase 2
    General

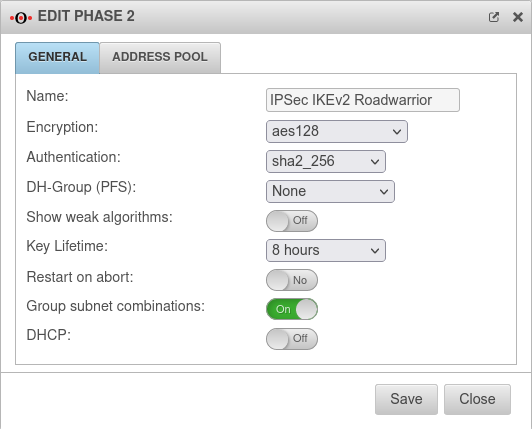
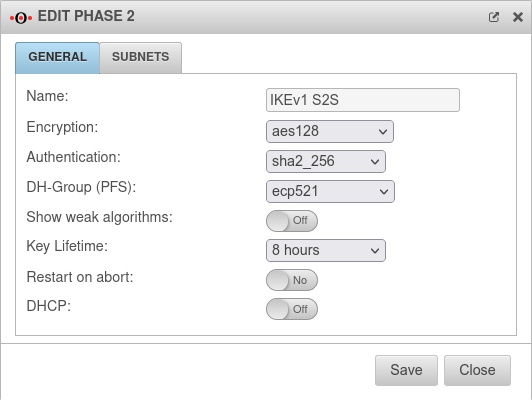
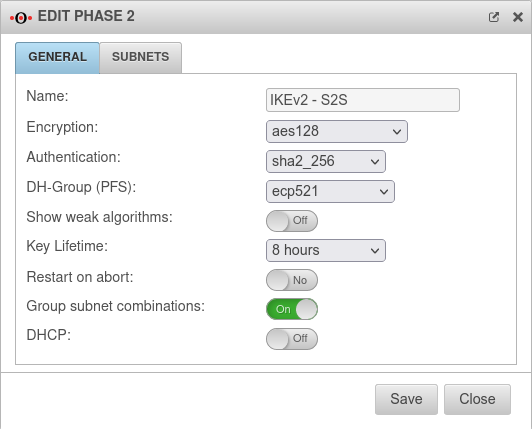
    Tab General : Settings that must be identical in the UTM and in the client:

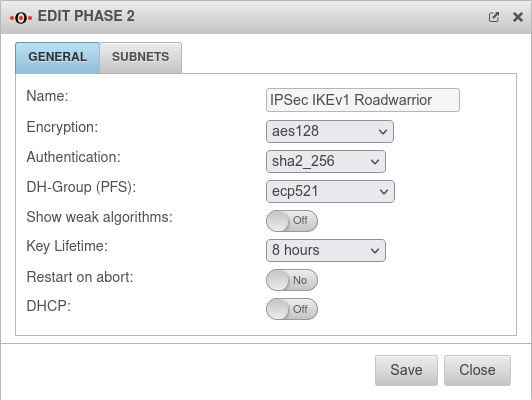
    Caption Default-Werte UTM Default-Werte NCP-Client UTM v12.5.1 IPSec S2E IKEv1 Phase2 Allgemein-en.png
    Phase 2 / Tab General with / IKEv1 / Roadwarrior
    UTM v12.5.1 IPSec S2E IKEv2 Phase2 Allgemein-en.png
    Phase 2 / Tab General with / IKEv2 / Roadwarrior
    UTM v12.5.1 IPSec S2S IKEv1 Phase2 Allgemein-en.png
    Phase 2 / Tab General with / IKEv1 / S2S
    UTM v12.5.1 IPSec S2S IKEv2 Phase2 Allgemein-en.png
    Phase 2 / Tab General with / IKEv2 / S2S
    Encryption: aes128 AES 128 Bit
    Authentication: sha2_256 SHA2 256 Bit
    Diffie-Hellman Group: ecp521 IKE DH-Gruppe: DH2 (modp1024)
    New default value as of v12.5.1
    Diffie-Hellman Group: None IKE DH-Gruppe: DH2 (modp1024)
    Schlüssel-Lebensdauer: 8 hours Validity period of the key in phase 2
    Austausch-Modus Main Mode (nicht konfigurierbar) Aggressive Mode (IKEv1)
  • Must be changed to Main Mode in the NCP client!
    The UTM does not support Aggressive Mode for security reasons.
  • Tab General: More settings

    Show weak algorithms: notempty
    New as of v12.5
    Off Also shows algorithms in the selection dialogs that are considered weak and should not be used.
    Restart on abort: No If the connection was terminated unexpectedly, activating will restore the state configured under Startup behavior in phase 1.
  • The Dead Peer Detection is automatically activated in phase 1.
  • Group subnet combinations: Yes

  • If grouping is not supported by the remote station, only the first subnet is connected despite the status display in the overview to the contrary.
  • If more than one network is configured on the local side or at the remote gateway, a separate SA is negotiated for each subnet combination when it is deactivated.
    This results in numerous subnet combinations and thus many SAs, especially with multiple subnets, and leads to limitations and losses in the stability of the connections due to the design of the IPSec protocol.
    DHCP: Out When enabled (On), clients receive IP addresses from a local network.
  • This requires further configurations, see wiki article on DHCP for IPSec.
  • Address-Pool

    Tab Address-Pool
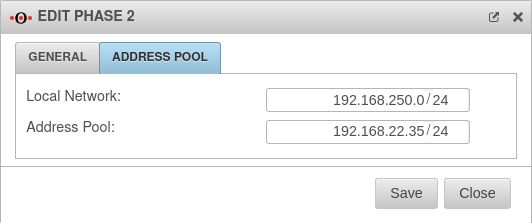
    Caption Value Description UTM v12.2.4 IPSec S2S Phase2 4Adress-Pool-en.png
    Local network: 192.168.250.0/24 The local network to be accessed via the VPN connection (as configured in the wizard in step 3).
    Address-Pool:
    Not with IPSec DHCP
    192.168.22.35/24 The IP address (e.g.: 192.168.22.35/32), or pool in the form of a subnet (e.g.: 192.168.22.35/26 for the pool of 192.168.22.0 -192.168.22.63) which is used under IPSec.
    Subnets

    Tab Subnets
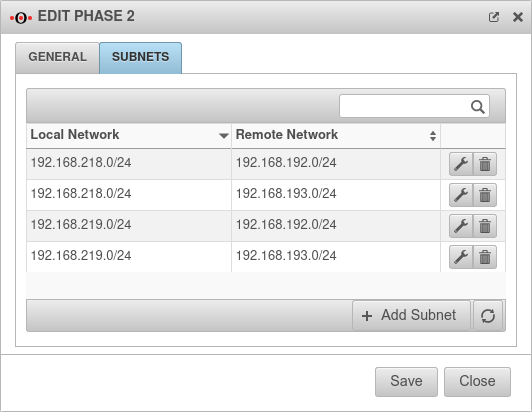
    Scenario: All subnets have access to each other

  • The wizard automatically connects each local network to each remote network.
  • With an SSH login as root, the behavior can be understood particularly well.
    Example with two subnets each.
    Group subnet combinations Enabled

    root@firewall:~# swanctl --list-conns

    IPSec$20S2S: IKEv2, reauthentication every 3060s, no rekeying, dpd delay 10s
     local:  %any
     remote: 192.0.2.192
     local pre-shared key authentication:
       id: 192.168.175.218
     remote pre-shared key authentication:
       id: 192.0.2.192
     IPSec$20S2S: TUNNEL, rekeying every 28260s, dpd action is restart
       local:  192.168.218.0/24 192.168.219.0/24
       remote: 192.168.192.0/24 192.168.193.0/24


    Group subnet combinations Disabled
    root@firewall:~# swanctl --list-conns

     IPSec$20S2S: IKEv2, reauthentication every 3060s, no rekeying, dpd delay 10s
       local:  %any
       remote: 192.0.2.192
       local pre-shared key authentication:
         id: 192.168.175.218
       remote pre-shared key authentication:
         id: 192.0.2.192
       IPSec$20S2S_4: TUNNEL, rekeying every 28260s, dpd action is restart
         local:  192.168.218.0/24
         remote: 192.168.192.0/24
       IPSec$20S2S_5: TUNNEL, rekeying every 28260s, dpd action is restart
         local:  192.168.218.0/24
         remote: 192.168.193.0/24
       IPSec$20S2S_6: TUNNEL, rekeying every 28260s, dpd action is restart
         local:  192.168.219.0/24
         remote: 192.168.192.0/24
       IPSec$20S2S_7: TUNNEL, rekeying every 28260s, dpd action is restart
         local:  192.168.219.0/24
         remote: 192.168.193.0/24
    

    UTM v12.2 IPSec S2S Phase2 4Subnetze-en.png
    All subnets have access to each other
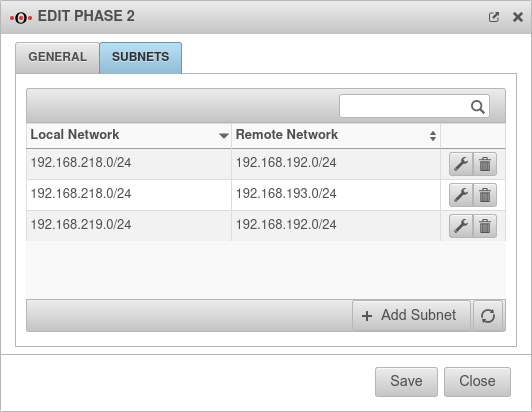
    Scenario: Not all subnets may access every network of the remote gateway

    If in phase two a local network is not connected to all remote networks (or a remote network is not connected to all local ones), this will not be taken into account if the option Group subnet combinations is active!

    notempty
    The Group subnet combinations option will connect all local networks to all remote networks!
    notempty
    Port filter rules make it possible to control access.

    With an SSH login as root, the behavior can be understood particularly well.
    Example with two subnets each.
    Group subnet combinations Enabled root@firewall:~# swanctl --list-conns IPSec$20S2S: IKEv2, reauthentication every 3060s, no rekeying, dpd delay 10s

     local:  %any
     remote: 192.0.2.192
     local pre-shared key authentication:
       id: 192.168.175.218
     remote pre-shared key authentication:
       id: 192.0.2.192
     IPSec$20S2S: TUNNEL, rekeying every 28260s, dpd action is restart
       local:  192.168.218.0/24 192.168.219.0/24
       remote: 192.168.192.0/24 192.168.193.0/24


    Group subnet combinations Disabled
    root@firewall:~# swanctl --list-conns IPSec$20S2S: IKEv2, reauthentication every 3060s, no rekeying, dpd delay 10s

     local:  %any
     remote: 192.0.2.192
     local pre-shared key authentication:
       id: 192.168.175.218
     remote pre-shared key authentication:
       id: 192.0.2.192
     IPSec$20S2S_4: TUNNEL, rekeying every 28260s, dpd action is restart
       local:  192.168.218.0/24
       remote: 192.168.192.0/24
     IPSec$20S2S_5: TUNNEL, rekeying every 28260s, dpd action is restart
       local:  192.168.218.0/24
       remote: 192.168.193.0/24
     IPSec$20S2S_6: TUNNEL, rekeying every 28260s, dpd action is restart
       local:  192.168.219.0/24
       remote: 192.168.192.0/24
    

    UTM v12.2 IPSec S2S Phase2 3Subnetze-en.png
    The second local subnet is connected only to one remote subnet

    Troubleshooting

    Detailed Troubleshooting instructions can be found in the Troubleshooting Guide If an email address should be used as gateway ID, it is necessary to insert a double @@ in front of the ID (mail@... becomes @@mail@...). Otherwise the ID will be treated as FQDN


    IKEv2

    Step-by-step.png


    notempty
    This article refers to a version that is no longer current!

    notempty
    The article for the latest version is here

    notempty
    There is already a newer version of this article, but it refers to a Reseller-Preview


    {{var | DH-Gruppe (PFS) | DH-Gruppe (PFS): | DH-Group (PFS):


    De.png
    En.png
    Fr.png


    Phase 1
    → VPN →IPSecTab Connections Button Phase 1
    General

    Tab General

    Caption Value Description UTM v12.4 IPSec S2S IKEv2 Phase1-en.png
    Phase 1 Genereal
    Allow any remote addresses: On
    Default
    Disable this option for site-to-site connections with DynDNS hosts if multiple IPsec connections with a priori unknown addresses (DynDNS S2S, Roadwarrior) are configured.
    Startup behavior:
    Outgoing The tunnel is initiated by the UTM even if no packets are sent.
    Incoming requests are accepted.
    Incoming Default if Remote Host is any The UTM accepts incoming tunnel requests.
    No outgoing connection is created.
    Route Default if Remote Host known The tunnel is initiated by the UTM only when packets are to be sent.notempty
    Only set as default value if Any remote station is not selected as Remote Host / Gateway.
    Route Default if Remote Host known The tunnel is initiated by the UTM only when packets are to be sent.notempty
    Only set as default value if Any remote station is not selected as Remote Host / Gateway.
    Ignore Deactivates the tunnel
    Generate traffic: notempty
    New as of v12.4

    For Initiate Connection Route
    On Prevents unwanted disconnections when no data traffic is taking place
    Dead Peer Detection: On Checks at a set interval whether the tunnel still exists.
    If the tunnel was terminated unexpectedly, the SAs are dismantled.
    (Only then it is also possible to reestablish a new tunnel).
  • When Off deactivated, the option Restart after abort in phase 2 is also automatically deactivated.
  • DPD Timeout: 30Link= seconds Period before the state under Startup behavior is restored.
  • Under IKEv2 this parameter is not available.
    The same values are used here as for regular packets.
  • DPD Interval: 10Link= seconds Testing interval
    Compression: Off Compression is not supported by all remote stations
    Enable MOBIKE: Yes
    Default
    Used to deactivate the MOBIKE option
    Deactivation prevents encrypted data from a remote station from being additionally encapsulated in 4500udp, which leads to problems in communication.
    Tab IKE Settings that must be identical in the UTM and in the client:
    IKE
    Caption Default-Werte UTM Default-Werte NCP-Client UTM v12.5.1 IPSec S2E IKEv1 Phase1 IKE-en.png
    Phase 1 IKEv1
    UTM v12.5.1 IPSec IKEv2 Phase1 IKE-en.png
    Phase 1 IKEv2
    Encryption: aes128 AES 128 Bit
    Authentication: sha2_256 Hash: SHA2 256 Bit
    Diffie-Hellman Group: ecp521 IKE DH-Gruppe: DH2 (modp1024)
    New default value as of v12.5.1
    Tab IKE More settings:
    Caption Value Description
    Show weak algorithms: notempty
    New as of v12.5
    Off Also shows algorithms in the selection dialogs that are considered weak and should not be used.
    Strict: Off The configured parameters (authentication and encryption algorithms) are preferred for connections
    On No further proposals are accepted. A connection is only possible with the configured parameters.
    IKE Life time: notempty
    Change as of v12.5
    Out 3Link= hours Validity period of the Security Association: Agreement between two communicating entities in computer networks. It describes how the two parties apply security services to communicate securely with each other. When using multiple services, multiple security connections must also be established. (Source: Wikipedia 2022) in phase 1
    Can be activated Vorlage:ButtonOn in addition to IKE Rekeytime. If the Lifetime is set, the value must be greater than the Rekeytime.
    IKE Life time: 1 hour Validity period of the Security Association: Agreement between two communicating entities in computer networks. It describes how the two parties apply security services to communicate securely with each other. When using multiple services, multiple security connections must also be established. (Source: Wikipedia 2022) in phase 1
    IKE Rekeytime: notempty
    New as of: v12.4
    notempty
    Change as of v12.5
    2Link= hours The validity period in which the connection is established (initial or after termination)
    notempty
    Starting with version 12.5.0, for already existing' connections that have no rekeytime' set, the value of the lifetime is entered at this point and the value of the lifetime is set to 0.
    This significantly increases the stability of the connection and should not bring any disadvantages.
    If a value has already been set for the rekeytime (possible from v12.4) no change is made.

    Example:
    Current version:
    ike_lifetime = 2
    ike_rekeytime = 0

    After update:
    ike_lifetime = 0
    ike_rekeytime = 2

    ----

    Current version:
    ike_lifetime = 2
    ike_rekeytime = 1

    After update: (without change)
    ike_lifetime =2
    ike_rekeytime = 1
      
    Rekeying: unlimited (recommended) Number of attempts to establish the connection (initial or after abort).
    For E2S connections (Roadwarrior), the setting 3 times can avoid endless attempts to connect to devices that are not correctly logged out.
      

    Phase 2
    → VPN →IPSecTab Connections Button Phase 2
    General

    Tab General : Settings that must be identical in the UTM and in the client:

    Caption Default-Werte UTM Default-Werte NCP-Client UTM v12.5.1 IPSec S2E IKEv1 Phase2 Allgemein-en.png
    Phase 2 / Tab General with / IKEv1 / Roadwarrior
    UTM v12.5.1 IPSec S2E IKEv2 Phase2 Allgemein-en.png
    Phase 2 / Tab General with / IKEv2 / Roadwarrior
    UTM v12.5.1 IPSec S2S IKEv1 Phase2 Allgemein-en.png
    Phase 2 / Tab General with / IKEv1 / S2S
    UTM v12.5.1 IPSec S2S IKEv2 Phase2 Allgemein-en.png
    Phase 2 / Tab General with / IKEv2 / S2S
    Encryption: aes128 AES 128 Bit
    Authentication: sha2_256 SHA2 256 Bit
    Diffie-Hellman Group: ecp521 IKE DH-Gruppe: DH2 (modp1024)
    New default value as of v12.5.1
    Diffie-Hellman Group: None IKE DH-Gruppe: DH2 (modp1024)
    Schlüssel-Lebensdauer: 8 hours Validity period of the key in phase 2
    Austausch-Modus Main Mode (nicht konfigurierbar) Aggressive Mode (IKEv1)
  • Must be changed to Main Mode in the NCP client!
    The UTM does not support Aggressive Mode for security reasons.
  • Tab General: More settings

    Show weak algorithms: notempty
    New as of v12.5
    Off Also shows algorithms in the selection dialogs that are considered weak and should not be used.
    Restart on abort: No If the connection was terminated unexpectedly, activating will restore the state configured under Startup behavior in phase 1.
  • The Dead Peer Detection is automatically activated in phase 1.
  • Group subnet combinations: Yes

  • If grouping is not supported by the remote station, only the first subnet is connected despite the status display in the overview to the contrary.
  • If more than one network is configured on the local side or at the remote gateway, a separate SA is negotiated for each subnet combination when it is deactivated.
    This results in numerous subnet combinations and thus many SAs, especially with multiple subnets, and leads to limitations and losses in the stability of the connections due to the design of the IPSec protocol.
    DHCP: Out When enabled (On), clients receive IP addresses from a local network.
  • This requires further configurations, see wiki article on DHCP for IPSec.
  • Address-Pool

    Tab Address-Pool
    Caption Value Description UTM v12.2.4 IPSec S2S Phase2 4Adress-Pool-en.png
    Local network: 192.168.250.0/24 The local network to be accessed via the VPN connection (as configured in the wizard in step 3).
    Address-Pool:
    Not with IPSec DHCP
    192.168.22.35/24 The IP address (e.g.: 192.168.22.35/32), or pool in the form of a subnet (e.g.: 192.168.22.35/26 for the pool of 192.168.22.0 -192.168.22.63) which is used under IPSec.
    Subnets

    Tab Subnets
    Scenario: All subnets have access to each other

  • The wizard automatically connects each local network to each remote network.
  • With an SSH login as root, the behavior can be understood particularly well.
    Example with two subnets each.
    Group subnet combinations Enabled

    root@firewall:~# swanctl --list-conns

    IPSec$20S2S: IKEv2, reauthentication every 3060s, no rekeying, dpd delay 10s
     local:  %any
     remote: 192.0.2.192
     local pre-shared key authentication:
       id: 192.168.175.218
     remote pre-shared key authentication:
       id: 192.0.2.192
     IPSec$20S2S: TUNNEL, rekeying every 28260s, dpd action is restart
       local:  192.168.218.0/24 192.168.219.0/24
       remote: 192.168.192.0/24 192.168.193.0/24


    Group subnet combinations Disabled
    root@firewall:~# swanctl --list-conns

     IPSec$20S2S: IKEv2, reauthentication every 3060s, no rekeying, dpd delay 10s
       local:  %any
       remote: 192.0.2.192
       local pre-shared key authentication:
         id: 192.168.175.218
       remote pre-shared key authentication:
         id: 192.0.2.192
       IPSec$20S2S_4: TUNNEL, rekeying every 28260s, dpd action is restart
         local:  192.168.218.0/24
         remote: 192.168.192.0/24
       IPSec$20S2S_5: TUNNEL, rekeying every 28260s, dpd action is restart
         local:  192.168.218.0/24
         remote: 192.168.193.0/24
       IPSec$20S2S_6: TUNNEL, rekeying every 28260s, dpd action is restart
         local:  192.168.219.0/24
         remote: 192.168.192.0/24
       IPSec$20S2S_7: TUNNEL, rekeying every 28260s, dpd action is restart
         local:  192.168.219.0/24
         remote: 192.168.193.0/24
    

    UTM v12.2 IPSec S2S Phase2 4Subnetze-en.png
    All subnets have access to each other
    Scenario: Not all subnets may access every network of the remote gateway

    If in phase two a local network is not connected to all remote networks (or a remote network is not connected to all local ones), this will not be taken into account if the option Group subnet combinations is active!

    notempty
    The Group subnet combinations option will connect all local networks to all remote networks!
    notempty
    Port filter rules make it possible to control access.

    With an SSH login as root, the behavior can be understood particularly well.
    Example with two subnets each.
    Group subnet combinations Enabled root@firewall:~# swanctl --list-conns IPSec$20S2S: IKEv2, reauthentication every 3060s, no rekeying, dpd delay 10s

     local:  %any
     remote: 192.0.2.192
     local pre-shared key authentication:
       id: 192.168.175.218
     remote pre-shared key authentication:
       id: 192.0.2.192
     IPSec$20S2S: TUNNEL, rekeying every 28260s, dpd action is restart
       local:  192.168.218.0/24 192.168.219.0/24
       remote: 192.168.192.0/24 192.168.193.0/24


    Group subnet combinations Disabled
    root@firewall:~# swanctl --list-conns IPSec$20S2S: IKEv2, reauthentication every 3060s, no rekeying, dpd delay 10s

     local:  %any
     remote: 192.0.2.192
     local pre-shared key authentication:
       id: 192.168.175.218
     remote pre-shared key authentication:
       id: 192.0.2.192
     IPSec$20S2S_4: TUNNEL, rekeying every 28260s, dpd action is restart
       local:  192.168.218.0/24
       remote: 192.168.192.0/24
     IPSec$20S2S_5: TUNNEL, rekeying every 28260s, dpd action is restart
       local:  192.168.218.0/24
       remote: 192.168.193.0/24
     IPSec$20S2S_6: TUNNEL, rekeying every 28260s, dpd action is restart
       local:  192.168.219.0/24
       remote: 192.168.192.0/24
    

    UTM v12.2 IPSec S2S Phase2 3Subnetze-en.png
    The second local subnet is connected only to one remote subnet

    Troubleshooting

    Detailed Troubleshooting instructions can be found in the Troubleshooting Guide If an email address should be used as gateway ID, it is necessary to insert a double @@ in front of the ID (mail@... becomes @@mail@...). Otherwise the ID will be treated as FQDN


    Rulebook

    To grant access to the internal network, the connection must be allowed.

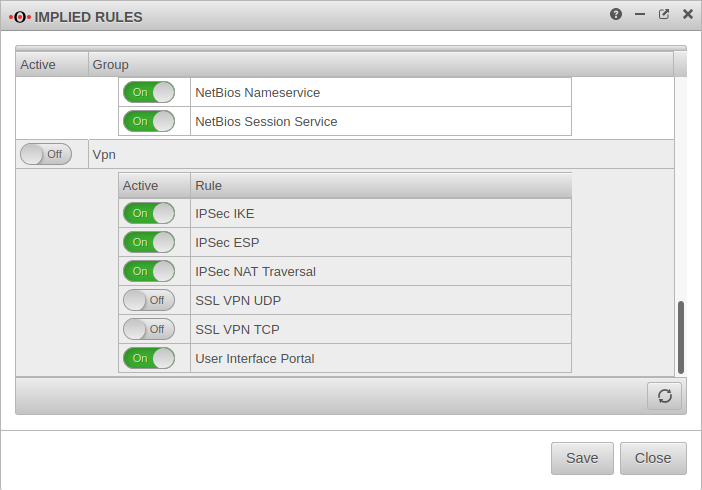
    It is possible, but not recommended to do this with implied rules under → Firewall →Implied Rules section VPN to configure this.
    However, these Implied Rules release the ports used for IPSec connections on all interfaces.

    UTM v11.8.8 Implizite-Regeln IPSec-en.png
    Implied rules
    As a general rule:
    Only what is needed and only for the one who needs it is released!

    Create network object

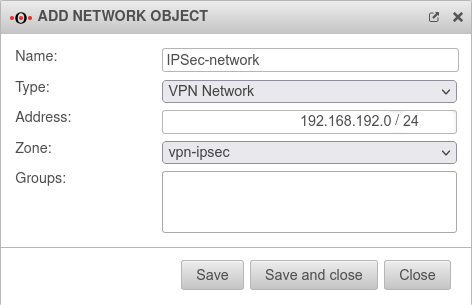
    A network object must be created for the remote network.
    → Firewall →Port FilterTab Network Objects Button Add Object

  • If several subnets exist on the remote gateway, a network object must be created for each subnet.
    If the corresponding authorizations are to be assigned, these can be combined into network groups.
  • Name: IPSec-S2S Name for the IPSec S2S network object UTM v12.2 Netzwerkobjekt IPSec-en.png
    Network object
    Type: VPN network Type to be selected
    Address: 192.168.192.0/24 The IP address of the local network of the opposite side, as entered in the Installation Wizard in Step 4 - Remote Gateway in the line Share networks.
    So in this example the network 192.168.192.0/24.
    Zone: vpn-ipsec Zone to be selected
    Group:     Optional: One or more groups to which the network object belongs.

    Port filter rule

    Two port filter rules must be created.
    Menu → Firewall →PortfilterTab Add Rule Button +
  • If there are different access rights from/to local and remote networks, multiple port filter rules must be setup.

  • UTM v11.8.5 Firewall Regel-IPSEC.png
    Port filter rules
    First rule
    Source: internal-network Host or network (-pool), which should get access to the internal network
    Destination: IPSec network Destination
    Service: benötigter Dienst Service or service group that is needed
    NAT
    Type:
    Hidenat Exclude
    Network object: external-interface

    Second rule
    Source: IPSec network Host or network (-pool), which should get access to the internal network
    Destination: internal-network Destination
    Service: benötigter Dienst Service or service group that is needed
    NAT: No NAT

    Configuration of the second gateway

    It should be noted that the IKE version is identical on both sides.

    Use of a Securepoint UTM

    On the remote gateway, the settings must be made in a similar way

    • A new IPSec VPN connection is created using the IPSec wizard
    • A network object for the IPSec network is created
    • Port filter rules are created
    Remote Gateway step 2
    • The same authentication method must be selected
    • The same authentication key (PSK, certificate, RSA key) must be available
    • The same IKE version must be used
    Remote Gateway step 3
    • As Local Gateway ID the Remote Gateway ID from step 4 of the first UTM must now be used
    • Under Share Networks the (there remote) network from step 4 of the first UTM must also be used
    Remote Gateway step 4
    • The public IP address (or a hostname that can be resolved via DNS) of the first UTM must be entered as Remote Gateway.
      (This address was not required in the wizard of the first UTM).
    • The Local Gateway ID from step 3 of the first UTM must be used as Remote Gateway ID
    • Under Share networks the (there local) network from step 3 of the first UTM must also be used.
    Create network object of the remote gateway
    • The network object of the remote gateway represents the network of the first UTM.
      Correspondingly, the network address of the local network of the first UTM must be entered under Address.
      In the example 192.168.218.0/24

    Notes

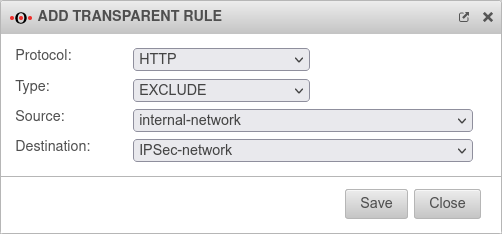
    Transparent rule

    The transparent HTTP proxy

    If a server behind the Site-to-Site connection is to be accessed from the internal network via HTTP, the transparent HTTP proxy may filter the packets.
    This can lead to errors while accessing the target.
    To prevent this from happening, a rule Exclude must be created in the → Applications →HTTP-ProyTab Transparent mode Button Add transparent rule menu with source internal-network to target name-vpn-network-object and protocol HTTP.


    Troubleshooting

    Detailed Troubleshooting instructions can be found in the Troubleshooting Guide