notempty
notempty
notempty Dieser Artikel bezieht sich auf eine nicht mehr aktuelle Version!
notempty
Der Artikel für die neueste Version steht hier
Zu diesem Artikel gibt es bereits eine neuere Version, die sich allerdings auf eine Reseller-Preview bezieht
notempty
notempty
notempty This article refers to a version that is no longer current!
notempty
The article for the latest version is here
There is already a newer version of this article, but it refers to a Reseller-Preview
Configure Site-to-Site VPN (S2S) with WireGuard
Last adaptation to the version: 12.5.1
New:
- AD-Benutzer als Peer auswählbar
notempty
This article refers to a Resellerpreview
Configure Site-to-Site VPN (S2S) with WireGuard
Last adaptation to the version: 12.5.1
New:
- Der Endpunkt Port im Einrichtungsschritt 2 ist manuell einstellbar
- AD-Benutzer als Peer auswählbar
notempty
This article refers to a Resellerpreview
Configuration under
Requirements
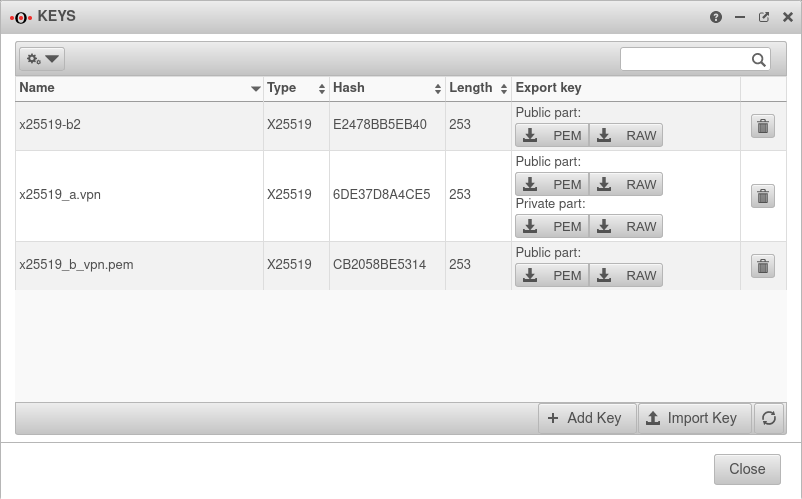
- Key type x25519 on both sides of the WireGuard connection
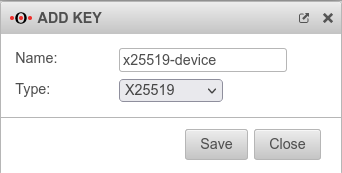
- Public x25519 key of the respective remote terminal is available
Create WireGuard connection
- A WireGuard connection provides access for multiple peers if necessary
- Each connection is secured with its own key pair
- All peers of a connection use its public key
- Each peer needs its own key pair for authentication
In addition, each peer should be secured with a strong PSK.
Given may the following configuration:
| Location A | location B | Transfer net | |
|---|---|---|---|
| FQDN | a.vpn.anyideas.de | b.vpn.anyideas.de | – |
| Local network IPv4 | 10.1.0.0/16 | 10.2.0.0/16 | 10.0.1.0/24 |
| Local tunnel IPv4 | 10.0.1.1/24 | 10.0.1.2/24 | – |
| Local network IPv6 | fd00:a:0:0::0/64 | fd00:b:0:0::0/64 | fd00:0:0:0::0/64 |
| Local tunnel IPv6 | fd00:0:0:0::1/64 | fd00:0:0:0::2/64 | – |
| UTM | Roadwarrior | Transfer net | |
|---|---|---|---|
| FQDN | a.vpn.anyideas.de | – | – |
| Local network IPv4 | 10.1.0.0/16 | – | 10.0.1.0/24 |
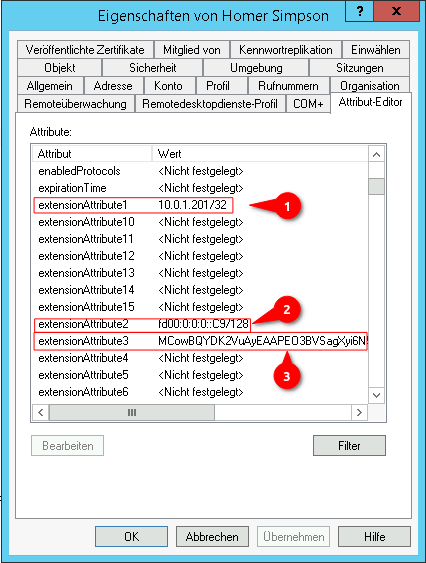
| Local tunnel IPv4 | 10.0.1.1/24 | 10.0.1.201/24 | – |
| Local network IPv6 | fd00:a:0:0::0/64 | – | fd00:0:0:0::0/64 |
| Local tunnel IPv6 | fd00:0:0:0::1/64 | fd00:0:0:0::C9/64 | – |
Configuration at location A
|
Start assistant with the button Step 1 - InterfaceLocation A Step 1 - Interface
| |||
| Caption | Value | Description | 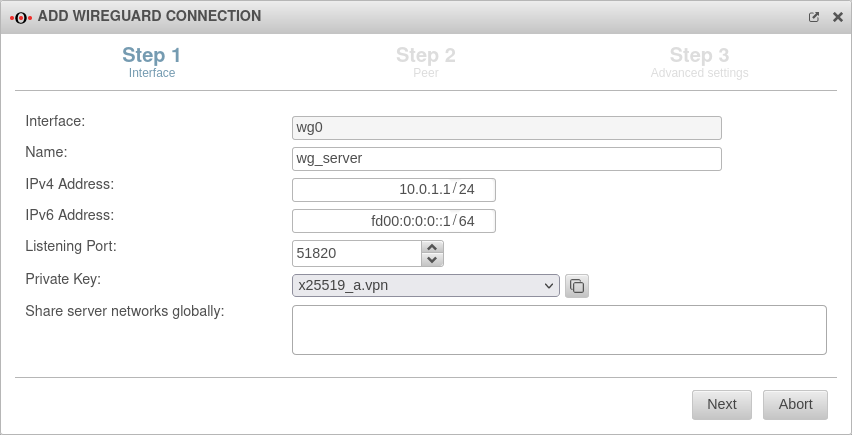 |
|---|---|---|---|
| Interface: | wg0 | Name of the interface that will be created for the connection (automatic default, cannot be changed) | |
| Name: | wg_server | Unique name for the connection | |
| IPv4 address: | 10.0.1.1/24 | IPv4 address for the network interface of the transfer network at location A This determines the network IP of the transfer net (here: 10.0.1.1/24) | |
| IPv6 address: | fd00:0:0:0::1/64 | IPv6 address for the network interface of the transfer network at location A (optional) This determines the network IP of the transfer net (here: fd00:0:0:0::1/64) | |
| Listening Port: | 51820 | Default-Port for WireGuard connections | |
| Private key: | Private key in x25519 format. Only those keys that also have a private key part can be selected. | ||
| If there is no local key in x25519 format yet, this button can be used to generate one. | |||
| Share server networks globally: | Networks on the (local) server side that the WireGuard tunnels of the peers can access in principle.notempty For the actual access additional network objects and portfilter rules are needed!
| ||
Step 2 - PeerLocation A Step 2 - Peer
| |||
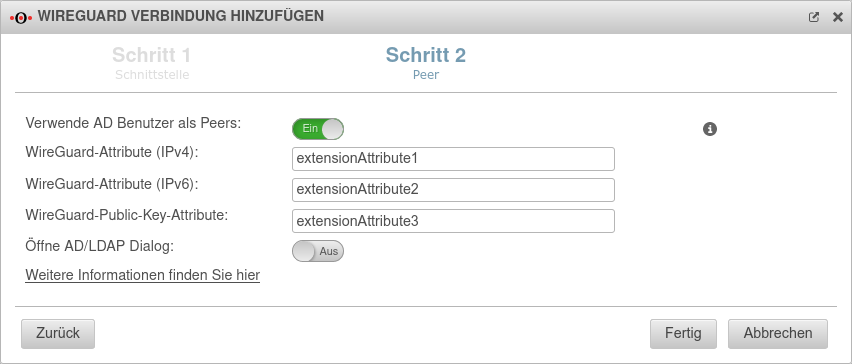
| Verwende AD Benutzer als Peers: | No | Bei Aktivierung On können die Daten für Roadwarrior aus einem AD ausgelesen werden. | 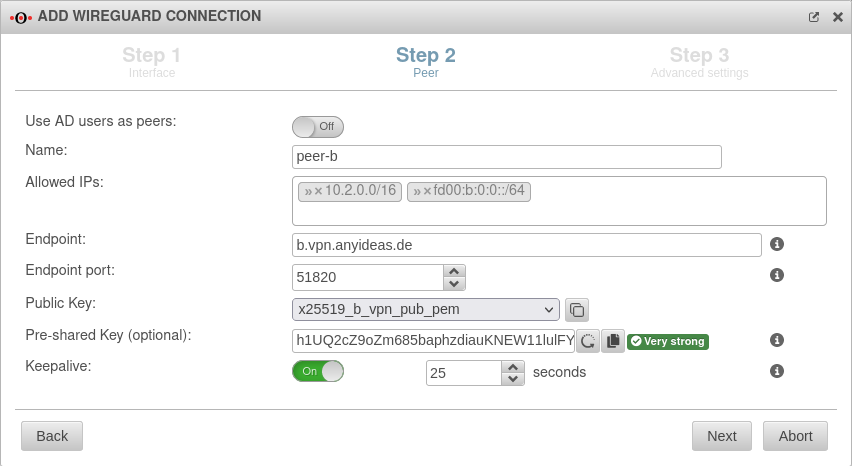 |
Als Vorgabe sind Werte eingetragen, die unter Tab Erweitert konfiguriert wurden.
| |||
| Name: | peer-b | Description of remote terminal | |
| Allowed IPs: | » ✕10.2.0.0/16 » ✕fd00:b:0:0::/64 | Local network IP of the remote terminal notempty For the actual access additional network objects and portfilter rules are needed!
| |
| Endpoint: | b.vpn.anyideas.de | Public IP or within the public DNS resolvable FQDN of the remote terminal | |
| Endpoint Port: |
51820 | listening-port of the remote terminal | |
| Public key: | Public key of the roadwarrior in x25519 format. Only keys that have 'no private key can be selected. Only keys for which there is not yet a connection on this interface can be selected. The PublicKey must be unique within a connection, as the routing of incoming packets is carried out via it. If the same PublicKey is to be used for a peer, e.g. for a fallback, another WireGuard connection must be created for this. | ||
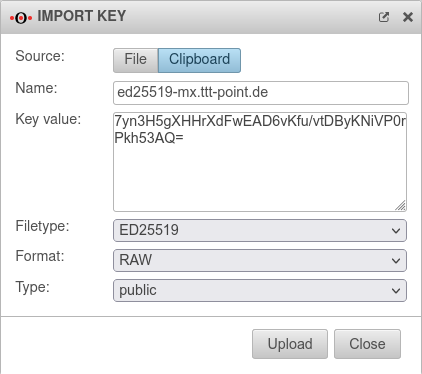
| If the public key of the remote terminal is not yet known, this button can be used to open the import of the key management. Export and import of the keys is also possible via the clipboard | |||
| Pre-Shared Key: | …8DmBioPyPNqZ7Rk= | Pre-shared key for further securing the connection (optional) | |
| Generates a very strong pre-shared key | |||
| Copies the PSK to the clipboard | |||
| Keepalive: | Off | Regularly sends a signal. This keeps connections open on NAT routers. On Activation is recommended. | |
| 25 Sekunden | Interval in seconds at which a signal is sent | ||
Step 3 - Advanced settingsLocation A Step 3 - Advanced settings
| |||
| Create routes to the peer's networks: | No | Activation On is recommended. Routes are created to the networks / hosts that were entered in step 2 under Allowed IPs with the interface as gateway that was displayed in step 1. |
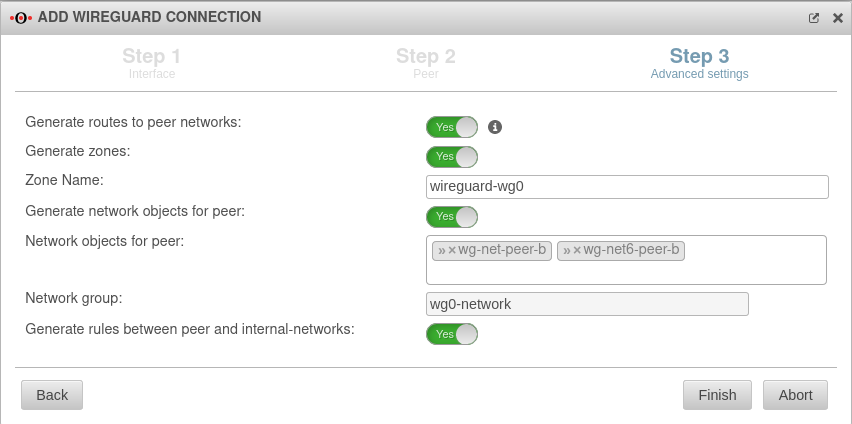 |
| Generate zones: | No | Generates a new zone for the WireGuard port | |
| Zone Name: | wireguard-wg0 | Name for the WireGuard connection zone | |
| Generate network objects for peer: | No » ✕net-wg-peer-b |
Creates Yes button when enabled for network objects (IPv4 and if necessary IPv6) of the remote terminal. Automatic suggestion can also be changed. | |
| Network group: | wg0-network | Network group of the connection is displayed | |
| Generate rules between peer and internal-networks: | No | Generates autogenerated rules that facilitate implementation. notempty It is essential to replace these rules with your own rules that allow only necessary services with necessary network objects.
| |
| Beendet den Assistenten
| |||
Configuration at location B Configuration at location B
Start assistant with the button Step 1 - Interfacelocation B Step 1 - Interface
| |||
| Interface: | wg0 | Name of the interface that will be created for the connection (automatic default, cannot be changed) | 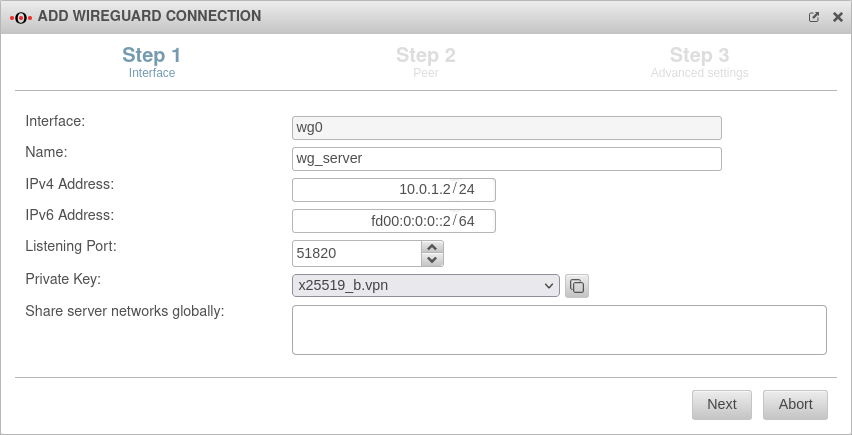 |
| Name: | wg_server | Unique name for the connection | |
| IPv4 address: | 10.0.1.2/24 | IPv4 address for the network interface of the transfer network at location B Here you have to select an IP from the network that was set at location A (here: 10.0.1.2/24) | |
| IPv6 address: | fd00:0:0:0::2/64 | IPv6 address for the network interface of the transfer network at location A (optional) Here you have to choose an IP from the network that has been defined at location A(here: fd00:0:0::2/64) | |
| Listening Port: | 51820 | Default-Port for WireGuard connections | |
| Private key: | Private key in x25519 format. Only those keys that also have a private key part can be selected. | ||
| The public key was already needed in location A, hence there should already be a private key. If necessary, it can also be imported via the clipboard. | |||
Step 2 - Peerlocation B Step 2 - Peer
| |||
| Verwende AD Benutzer als Peers: | No | Bei Aktivierung On können die Daten für Roadwarrior aus einem AD ausgelesen werden. | 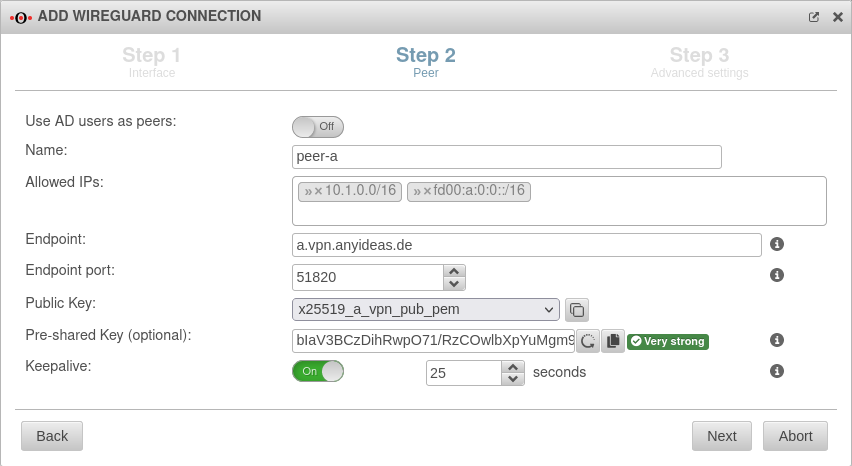 |
| Name: | peer-a | Description of remote terminal (here: Location A) | |
| Allowed IPs: | » ✕10.1.0.0/16» ✕fd00:a:0:0::/64 | Local network IP of remote terminal (here: Location A) | |
| Endpoint: | a.vpn.anyideas.de | Public IP or within the public DNS resolvable FQDN of the remote terminal (here: Location A) | |
| Endpoint Port: |
51820 | Listening-port of the remote terminal (here: Location A) | |
| Public key: | Public key of the remote terminal (here: Location A) in x25519 format. Only keys that have noprivate key are selectable. | ||
| If the public key of the remote terminal is not yet known, this button can be used to open the import of the key management. | |||
| Pre-Shared Key: | …R0Z0DWUs+iCDFYzpP4= | Pre-shared key for further securing the connection (optional) | |
| Generates a very strong pre-shared key | |||
| Copies the PSK to the clipboard | |||
| Keepalive: | Off | Regularly sends a signal. This keeps connections open on NAT routers. On Activation is recommended. | |
| 25 | Interval in seconds at which a signal is sent | ||
Step 3 - Advanced settingslocation B Step 3 - Advanced settings
| |||
| Create routes to the peer's networks: | No | Activation On is recommended. Routes are created to the networks / hosts that were entered in step 2 under Allowed IPs with the interface as gateway that was displayed in step 1. |
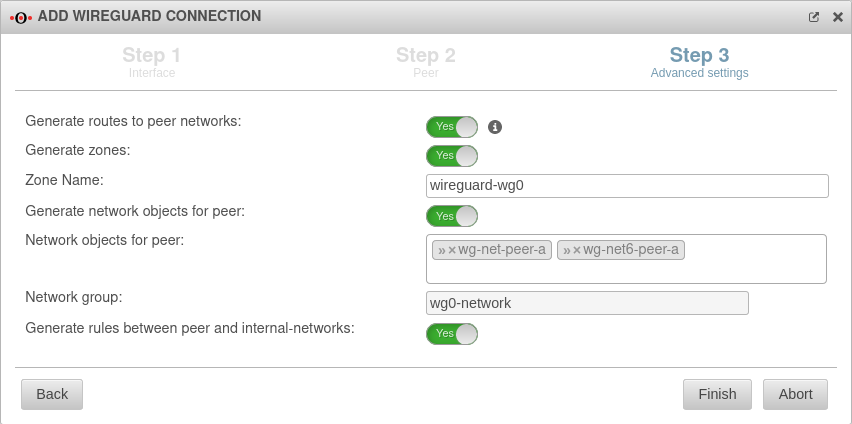 |
| Generate zones: | No | Generates a new zone for the WireGuard port | |
| Generate network objects for peer: | No » ✕net-wg-peer-a |
Creates Yes button when enabled for network objects (IPv4 and if necessary IPv6) of the remote terminal. Automatic suggestion can also be changed. | |
| Generate rules between peer and internal-networks: | No | Generates autogenerated rules that facilitate implementation. notempty It is essential to replace these rules with your own rules that allow only necessary services with necessary network objects.
| |
Fritzbox as remote terminal | |||
| The following steps are a short description of the procedure. For a more detailed description, please consult the Wiki article WireGuard S2S with a Fritz!Box. If a third-party hardware is used as remote station, the following approach is recommended:
[Interface]
notemptyPrivateKey = $PRIVATE_KEY_FRITZBOX
ListenPort = $LISTENPORT_WIREGUARD_FRITZBOX
Address = $LOCAL_IP_FRITZBOX/$NETMASK
Enabling the option Allow NetBIOS over this connection may solve problems, e.g. with SMB orTP. .
|
|||
Widget
Im Admininterface existiert ein Widget für die Übersicht der WireGuard-Verbindungen. Weitere Informationen sind im Wiki-Artikel UTM Widget zu finden.
