Keine Bearbeitungszusammenfassung |
|||
| (42 dazwischenliegende Versionen von einem anderen Benutzer werden nicht angezeigt) | |||
| Zeile 1: | Zeile 1: | ||
= Howto-Multipath Routing = | = Howto-Multipath Routing = | ||
=== Multipath Routing === | === Multipath Routing === | ||
The coupling of two or more internet connections with a Securepoint appliance is also called "Multipath Routing". With | The coupling of two or more internet connections with a Securepoint appliance is also called "Multipath Routing". With multipath-routing it's possible to seperate the data traffic between the internet connections. This will reduce the load of the internet connections. Also multipath routing will improve the redundancy of your network, especially if you are using different internet-providers. With multipath-routing the data traffic will be weighted and split to the different internet connections. | ||
At failure of one of the internet connections, the securepoint appliance will switch to an other acitve internet connection. Thereby the usage of the other internet connections increased, but you are able to use all the services furthermore, without any restrictions. If the interrupted internet connection will be restored, the services will be switched back. | At failure of one of the internet connections, the securepoint appliance will switch to an other acitve internet connection. Thereby the usage of the other internet connections increased, but you are able to use all the services furthermore, without any restrictions. If the interrupted internet connection will be restored, the services will be switched back. | ||
| Zeile 13: | Zeile 13: | ||
=== Checklist for Multipath Routing === | === Checklist for Multipath Routing === | ||
If you don't need an elaborate instruduction, you can use this | If you don't need an elaborate instruduction, you can use this [[#Howto-Multipath_Routing_english_checklist| checklist]] to set up your multipath routing. This checklist can also be used at troubleshooting. | ||
== | == Szenarios == | ||
The binding of the firewall to two internet connections can be | The binding of the firewall to two internet connections can be done in different ways. | ||
In this howto, two of the possible methods will be presented. Both scenarios assume, that the internet connection is an ADSL connection. It's possible to use ISDN or VDSL or a mix of these. | In this howto, two of the possible methods will be presented. Both scenarios assume, that the internet connection is an ADSL connection. It's possible to use ISDN or VDSL or a mix of these. | ||
| Zeile 26: | Zeile 26: | ||
In scenario 2, the Firewall will be connected to a modem direclty. The secound internet connection will be connected via a router. | In scenario 2, the Firewall will be connected to a modem direclty. The secound internet connection will be connected via a router. | ||
[[Datei:multi_szenario2.png| center| thumb| 550px| <font size=1>One of the two DSL connections will be connected | [[Datei:multi_szenario2.png| center| thumb| 550px| <font size=1>One of the two DSL connections will be connected via a router.</font>]] | ||
== Multipath Routing with two direclty connected internet connections == | == Multipath Routing with two direclty connected internet connections == | ||
For this configuration the appliance has to be connected directly to the DSL-Modems, so that the internet connections are directly managed by the firewall. | For this configuration the appliance has to be connected directly to the DSL-Modems, so that the internet connections are directly managed by the firewall. | ||
=== | === Add DSL-interfaces === | ||
You have to set up two DSL interfaces, to establish the connection for the appliance to the internet provider. Depending on the protocol, that is used by the provider, you have to set up two PPPoE or two PPTP interfaces (or in case only one). | |||
* Move to "Network" in the navigation-bar and click on "Networkconfiguration". | * Move to "Network" in the navigation-bar and click on "Networkconfiguration". | ||
| Zeile 40: | Zeile 40: | ||
* Leave the field "name" at default. | * Leave the field "name" at default. | ||
* In the dropdown menu for "interface" you have to choose the interface which the ppp-interface is bound on. Don't use the interface eth1, because it's | * In the dropdown menu for "interface" you have to choose the interface which the ppp-interface is bound on. Don't use the interface eth1, because it's blocked for the internal network. You can use eth0 (external network) and eth2 (DMZ) if you use an appliance with only three interfaces. | ||
* Click on "Next". | * Click on "Next". | ||
==== Add DSL-provider ==== | |||
* Now you type your login details for your DSL connection. | * Now you type your login details for your DSL connection. | ||
* Click on "Next" | * Click on "Next" | ||
* Now you have to set the zones for the interface. | |||
* Click on "Finish" | ==== Zones ==== | ||
* Now you have to set the zones for the interface. '''Note, that You have to choose different zones to your default external-interface. The best solution for this problem is, to add two new zones for the new interface (for example "external2" and "firewall-external2"''' | |||
* Click on "Finish". | |||
==== extended settings ==== | |||
* The field PPP-interface is already preassigned. The interfaces will be designated with ppp and a sequential number. | * The field PPP-interface is already preassigned. The interfaces will be designated with ppp and a sequential number. | ||
* In the field "DSL-provider" you have to choose a previously created internet service provider. | * In the field "DSL-provider" you have to choose a previously created internet service provider. | ||
* Click on finish. | * Click on finish. | ||
* Click on refresh interfaces. | * Click on refresh interfaces. | ||
<br> | |||
=== Add PPTP-Interface === | |||
If you are using a PPTP interface you have to set more settings. | If you are using a PPTP interface you have to set more settings. | ||
* In the "Networkconfiguration" you have to click on "+PPTP". | * In the "Networkconfiguration" you have to click on "+PPTP". | ||
| Zeile 59: | Zeile 67: | ||
* Now you have to set the zones for the interface. Choose "external" and "firewall-external". | * Now you have to set the zones for the interface. Choose "external" and "firewall-external". | ||
* Click on "Finish". | * Click on "Finish". | ||
[[Datei:add_ppp0.png| left| thumb| 200px| <font size=1>add ppp0</font>]] | |||
<br><br> | |||
<br><br> | |||
<br><br> | |||
<br><br> | |||
<br> | |||
If you are using two PPTP connections, following settings will be possible. | If you are using two PPTP connections, following settings will be possible. | ||
| Zeile 69: | Zeile 85: | ||
local ethernet IP-address 10.0.0.120 | local ethernet IP-address 10.0.0.120 | ||
mask 255.255.255.128/25 | mask 255.255.255.128/25 | ||
<br> | |||
<br> | |||
=== Add network objects === | === Add network objects === | ||
If you are using two PPTP connections, following settings will be possible. | If you are using two PPTP connections, following settings will be possible. | ||
To establish seperated rules for both DSL connections, you have to add another network object for the internet and one network object for the secound external interface. | To establish seperated rules for both DSL connections, you have to add another network object for the internet and one network object for the secound external interface. | ||
Inasmuch as zones can be assigned only one time, you have to use zones, that are not used (e.g. | Inasmuch as zones can be assigned only one time, you have to use zones, that are not used (e.g. DMZ1). Another possibility is to add a new zone. | ||
==== | ==== Add secound network object ==== | ||
* In the navigation bar you have to move to the entry "Firewall" and click on "Portfilter" in the dropdown menu. | * In the navigation bar you have to move to the entry "Firewall" and click on "Portfilter" in the dropdown menu. | ||
[[Datei:internet2_english.png| thumb| 150px| <font size=1>add secound network object for internet</font>]] | |||
Click on the tab "Network Objects". In the list you can find all network objects, which are either created by default or added by an administrator. | Click on the tab "Network Objects". In the list you can find all network objects, which are either created by default or added by an administrator. | ||
| Zeile 84: | Zeile 102: | ||
* For "type" you have to choose "Network (Address). | * For "type" you have to choose "Network (Address). | ||
* In the field "Address" you have to type 0.0.0.0/0. | * In the field "Address" you have to type 0.0.0.0/0. | ||
* In the field " | * In the field "Zone" you have to choose dmz1. | ||
* Click on "Save" | * Click on "Save" | ||
<br> | |||
==== | ==== Add external network object ==== | ||
Now you have to add another network object for the secound interface. | Now you have to add another network object for the secound interface. For the first interface, an network object is already created by default. Set the zone to an other than "firewall-external", because it's already used by the first external interface (e.g. firewall-dmz1). Another possibility is to add a new zone. | ||
* Click on "Add Object" in the window "Network Objects". | * Click on "Add Object" in the window "Network Objects". | ||
[[Datei:static_network_object_external2.png| thumb| 180px| <font size=1>add external-interface2</font>]] | |||
* In the following windows you have to type a name for the external interface. In this example we named it "external-interface2". | * In the following windows you have to type a name for the external interface. In this example we named it "external-interface2". | ||
* The field "type" | * The field "type" | ||
| Zeile 99: | Zeile 119: | ||
* Choose the zone "firewall-dmz1". | * Choose the zone "firewall-dmz1". | ||
* Click on save. | * Click on save. | ||
<br> | |||
< | |||
=== Hide-NAT setup === | === Hide-NAT setup === | ||
| Zeile 117: | Zeile 136: | ||
* Click on "Update Rules". | * Click on "Update Rules". | ||
[[Datei:rule_hide_nat.png| left| thumb| 400px| <font size=1>add first Hide-NAT rule</font>]] | |||
[[Datei:rule_hide_nat2.png| right| thumb| 400px| <font size=1>add secound Hide-NAT rule</font>]] | |||
<br> | |||
<br> | |||
<br> | |||
<br> | |||
<br> | |||
<br> | |||
<br> | |||
<br> | |||
<br> | |||
<br> | |||
<br> | |||
<br> | |||
<br> | |||
<br> | |||
<br> | |||
<br> | |||
<br> | |||
<br> | |||
<br> | |||
=== Set rules and weighting === | === Set rules and weighting === | ||
| Zeile 124: | Zeile 166: | ||
* Change to the tab "Routing". | * Change to the tab "Routing". | ||
* Click on the button "Add Default Route". | * Click on the button "Add Default Route". | ||
* In the field " | * In the field "Gateway Interface" you have to set one PPPoE interface. | ||
* Set the radio button to "Gateway Interface" and choose one of the two ppp-interfaces. | * Set the radio button to "Gateway Interface" and choose one of the two ppp-interfaces. | ||
* Click on "Save". | * Click on "Save". | ||
| Zeile 135: | Zeile 177: | ||
* Click on "save" and repeat the process. Set the secound PPPoE interface as "Gateway Interface". | * Click on "save" and repeat the process. Set the secound PPPoE interface as "Gateway Interface". | ||
<<< | [[Datei:default_route_add.png| left| thumb| 300px| <font size=1>add default route</font>]] | ||
[[Datei:add_weighting.png| center| thumb| 350px| <font size=1>add weighting</font>]] | |||
<br> | |||
=== Multipath router with DSL connection and router access === | === Multipath router with DSL connection and router access === | ||
| Zeile 143: | Zeile 188: | ||
==== Network configuration ==== | ==== Network configuration ==== | ||
For the DSL connection you need to add a provider and a PPPoE interface ( | For the DSL connection you need to add a provider and a PPPoE interface ([[#Add DSL-provider| Add DSL-provider]] und [[#Add DSL-interfaces| Add DSL-interfaces]]). The provider will be bound over ppp0 to the interface eth0. The router will be connected to the interface eth2. If you got an appliance with more than three interfaces, you can use an other interface. | ||
* Connect the router to eth2. | * Connect the router to eth2. | ||
| Zeile 152: | Zeile 197: | ||
==== Hide-NAT ==== | ==== Hide-NAT ==== | ||
Here you also need two network objects for the internet, before you add the hide-NAT rules. For the configuration of the network objects you can read the chapter | Here you also need two network objects for the internet, before you add the hide-NAT rules. For the configuration of the network objects you can read the chapter [[#Add network objects| Add network objects]]. | ||
* Move to "Firewall" in the navigation bar and click on "Portfilter". | * Move to "Firewall" in the navigation bar and click on "Portfilter". | ||
* Click on "Add Rule" and configure the following rule. | * Click on "Add Rule" and configure the following rule. | ||
Aktuelle Version vom 21. Dezember 2016, 16:25 Uhr
Howto-Multipath Routing
Multipath Routing
The coupling of two or more internet connections with a Securepoint appliance is also called "Multipath Routing". With multipath-routing it's possible to seperate the data traffic between the internet connections. This will reduce the load of the internet connections. Also multipath routing will improve the redundancy of your network, especially if you are using different internet-providers. With multipath-routing the data traffic will be weighted and split to the different internet connections.
At failure of one of the internet connections, the securepoint appliance will switch to an other acitve internet connection. Thereby the usage of the other internet connections increased, but you are able to use all the services furthermore, without any restrictions. If the interrupted internet connection will be restored, the services will be switched back.
Additional to the multipath routing the Securepoint appliance will adopt the "Load Balancing" whereby the load will distributed to the different internet connections.
Source Routing
When using more than one internet connection, the data traffic will be devided to the internet connections.
For certain applications (Mailserver, VPN, ...) it's possible to use the same internet connection any time. In this case you have to assign an unambiguously route to the client. This function is called "Source Routing". The route is dependent to the application.
Checklist for Multipath Routing
If you don't need an elaborate instruduction, you can use this checklist to set up your multipath routing. This checklist can also be used at troubleshooting.
Szenarios
The binding of the firewall to two internet connections can be done in different ways.
In this howto, two of the possible methods will be presented. Both scenarios assume, that the internet connection is an ADSL connection. It's possible to use ISDN or VDSL or a mix of these.
In scenario 1, both DSL connections will be connected with the firewall directly over a modem.

In scenario 2, the Firewall will be connected to a modem direclty. The secound internet connection will be connected via a router.

Multipath Routing with two direclty connected internet connections
For this configuration the appliance has to be connected directly to the DSL-Modems, so that the internet connections are directly managed by the firewall.
Add DSL-interfaces
You have to set up two DSL interfaces, to establish the connection for the appliance to the internet provider. Depending on the protocol, that is used by the provider, you have to set up two PPPoE or two PPTP interfaces (or in case only one).
- Move to "Network" in the navigation-bar and click on "Networkconfiguration".
- Click on the button "+PPPoE"
The interface wizard will be shown.
- Leave the field "name" at default.
- In the dropdown menu for "interface" you have to choose the interface which the ppp-interface is bound on. Don't use the interface eth1, because it's blocked for the internal network. You can use eth0 (external network) and eth2 (DMZ) if you use an appliance with only three interfaces.
- Click on "Next".
Add DSL-provider
- Now you type your login details for your DSL connection.
- Click on "Next"
Zones
- Now you have to set the zones for the interface. Note, that You have to choose different zones to your default external-interface. The best solution for this problem is, to add two new zones for the new interface (for example "external2" and "firewall-external2"
- Click on "Finish".
extended settings
- The field PPP-interface is already preassigned. The interfaces will be designated with ppp and a sequential number.
- In the field "DSL-provider" you have to choose a previously created internet service provider.
- Click on finish.
- Click on refresh interfaces.
Add PPTP-Interface
If you are using a PPTP interface you have to set more settings.
- In the "Networkconfiguration" you have to click on "+PPTP".
- Now you have to enter the local ip-address of the firewall and the ip-address of the modem. Leave the name at the default.
- Click on "Next".
- Now you have to enter your login details for the DSL connection.
- Click on "Next".
- Now you have to set the zones for the interface. Choose "external" and "firewall-external".
- Click on "Finish".
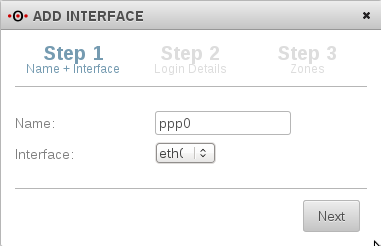
If you are using two PPTP connections, following settings will be possible.
ppp0 local ethernet IP-address 10.0.0.140 mask 255.255.255.128/25
ppp1
local ethernet IP-address 10.0.0.120
mask 255.255.255.128/25
Add network objects
If you are using two PPTP connections, following settings will be possible. To establish seperated rules for both DSL connections, you have to add another network object for the internet and one network object for the secound external interface. Inasmuch as zones can be assigned only one time, you have to use zones, that are not used (e.g. DMZ1). Another possibility is to add a new zone.
Add secound network object
- In the navigation bar you have to move to the entry "Firewall" and click on "Portfilter" in the dropdown menu.
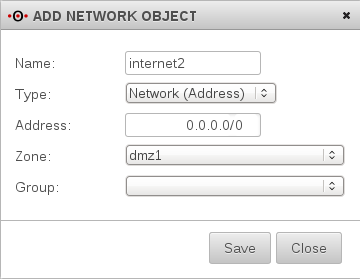
Click on the tab "Network Objects". In the list you can find all network objects, which are either created by default or added by an administrator.
- To add another network object, click on the button "add object".
- In the pop-up window you have to type a name for the network object in the field "name".
- For "type" you have to choose "Network (Address).
- In the field "Address" you have to type 0.0.0.0/0.
- In the field "Zone" you have to choose dmz1.
- Click on "Save"
Add external network object
Now you have to add another network object for the secound interface. For the first interface, an network object is already created by default. Set the zone to an other than "firewall-external", because it's already used by the first external interface (e.g. firewall-dmz1). Another possibility is to add a new zone.
- Click on "Add Object" in the window "Network Objects".
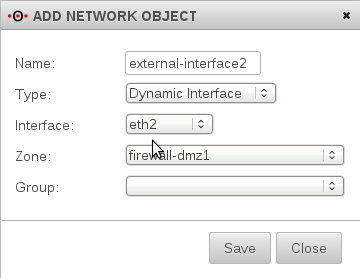
- In the following windows you have to type a name for the external interface. In this example we named it "external-interface2".
- The field "type"
* Choose "Dynamic Interface", if you get a new ip-address from your ISP, each time you connect.
* Choose "Static Interface", if you got a fixed ip-address from your ISP.
- In the field "Interface", you have to set the interface, at which the secound internet connection is connected.
- Choose the zone "firewall-dmz1".
- Click on save.
Hide-NAT setup
In order to setup the hide-NAT, you need to create rules. You can only change this settings, if there is a network object for the internal network. Normally this network object is created by default.
- Move to "Firewall" in the navigation bar and click on "Portfilter".
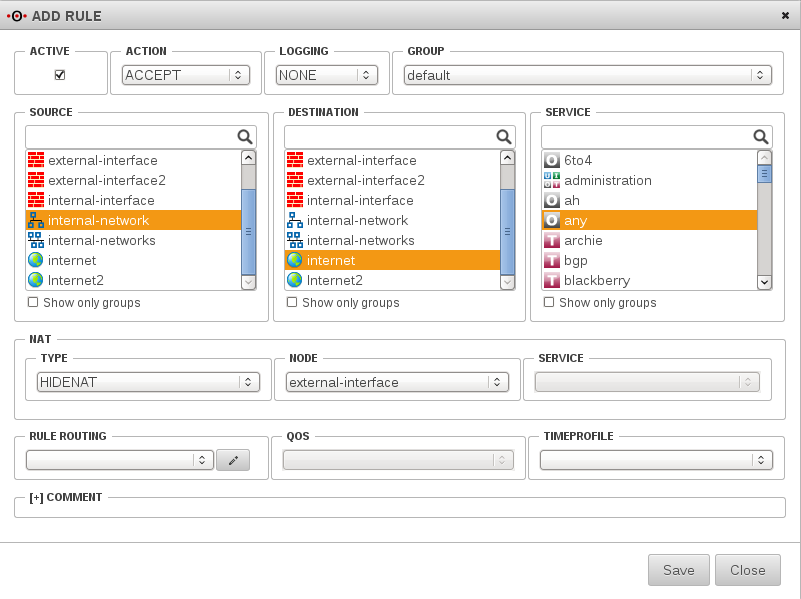
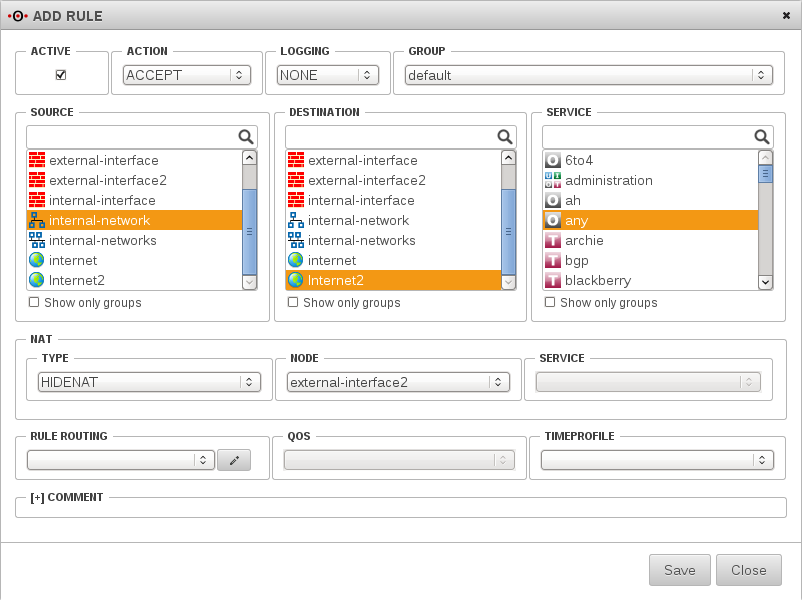
- Click on "add rule" and configure the following rule.
internal-network -> internet -> any
NAT: Hidenat -> external-interface
- Click on "save".
- Click on "add rule" again and configure the following rule.
internal-network -> internet2 -> any
NAT: Hidenat -> external-interface2
- Click on "save".
- Click on "Update Rules".
Set rules and weighting
You have to set default routes for both connections.
- Move to "Network" in the navigation-bar and click on "Network Configuration" in the dropdown menu.
- Change to the tab "Routing".
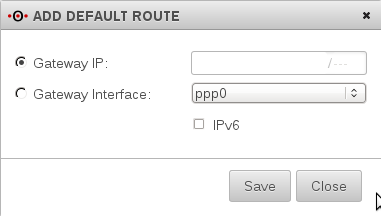
- Click on the button "Add Default Route".
- In the field "Gateway Interface" you have to set one PPPoE interface.
- Set the radio button to "Gateway Interface" and choose one of the two ppp-interfaces.
- Click on "Save".
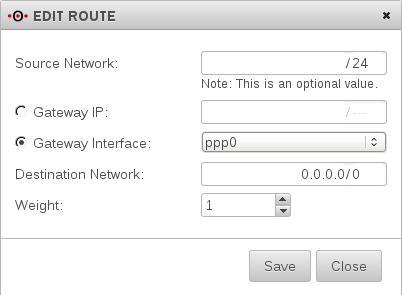
- To set the weighting click on the "Edit" button in the default route.
- In the field "Weight" you can set the weighting of the default route.
- In this tutorial, the weighting will be set to 1.
If you use internet connections with different bandwith, you should adjust the weighting accordingly. The weighting will be calculated by the factor of the two numbers. Therefore a route with the weighting 2 will be claimed twice as strong as a route with the weight 1.
- Click on "save" and repeat the process. Set the secound PPPoE interface as "Gateway Interface".
Multipath router with DSL connection and router access
In this scenario, the securepoint will manage one DSL-connection. One secound DSL-connection will be realized with a router.
In priciple the configuration is the same like you are using two direclty connected DSL connetions. In contrast to this setup you only have to add one PPPoE interface with one DSL provider.
Network configuration
For the DSL connection you need to add a provider and a PPPoE interface ( Add DSL-provider und Add DSL-interfaces). The provider will be bound over ppp0 to the interface eth0. The router will be connected to the interface eth2. If you got an appliance with more than three interfaces, you can use an other interface.
- Connect the router to eth2.
- Move to "Network" in the navigation-bar and click on "Network Configuration" in the dropdown menu.
- You have to click on the "Edit"-symbol in the line of the interface eth2.
- In the tab "IP Adresses" you have to enter an ip-address for the interface. This ip-address has to be located in the network of the router. In this example, we use 192.168.100.2/24.
- Click on "Add" and afterwards on "Save".
Hide-NAT
Here you also need two network objects for the internet, before you add the hide-NAT rules. For the configuration of the network objects you can read the chapter Add network objects.
- Move to "Firewall" in the navigation bar and click on "Portfilter".
- Click on "Add Rule" and configure the following rule.
internal-network -> internet -> any
NAT: Hidenat -> external-interface
- Click on "save".
- Click on "Add Rule" and configure the following rule.
internal-network -> internet2 -> any
NAT: Hidenat -> external-interface2
- Click on "Save".
routing and weighting
In this construction you have to set default routes too.
- Move on "Network" in the navigation-bar and click on "Network Configuration" in the dropdown menu.
- Change to the tab "Routing".
- Click on the button "Add Default Route".
- Set the "Gateway Interface" to 0.0.0.0/0 "ppp0".
- Click on "Save".
- To add the weighting click on the "Edit"-button and enter your corresponding entry.
- In this example the weighting 1 is chosen.
- Click on "Save".
- Click on the button "Add Default Gateway" again.
- This time you enter the internal ip-address of the router in the field "gateway". In this example it is 192.168.100.1.
- Click on "Save".
- Enter the desired weighting in the settings.
- Click on "Save".
disadvantages of scenario 2
In contrast to the configuration with two directly connected DSL connections, the appliance will not notice, if the DSL connection of the router will fail. The appliance would furthermore send the data packets via the router, although the router has no connection to the internet.
If the two DSL connections will be direclty managed by the appliance, the failure of one DSL connection will be noticed. The firewall will redirect the whole data traffic via the existing connection. This will increase the load of the existing connection, but the connection will not abort. If the DSL connection will rebuilt, the data traffic will be distributed to the two connections.