Creating and configuring an Ethernet interface
Last adaptation to the version: 14.0.0 (11.2024)
New:
- New autonegotiation option: Default
- Speed and duplex are adjustable, even if autonegotiation is switched on
- Interfaces can be reset
This article refers to a Beta version
Network interfaces General
| Only if → Show reset interface options On | |||
| Button | Description | UTMuser@firewall.name.fqdnNetwork 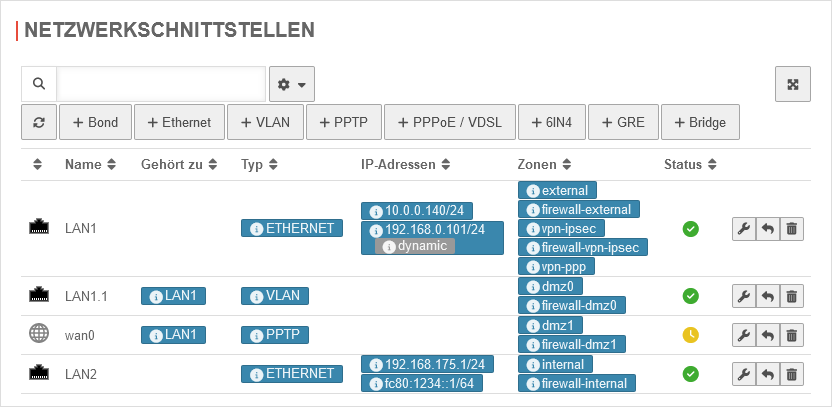 Network interfaces overview Network interfaces overview
| |
|---|---|---|---|
| Edit | Edit the respective interface | ||
| Resetnotempty New as of v14.0.0 |
Resetting the interface options, this includes everything that is found with the CLI command interface get in the options column (list here), as well as the hotwire configuration. | ||
| Delete | Deletes the respective interface | ||
| In the table settings (), the display and content of the table can be configured. notempty New as of v14.0.0 | |||
| Show reset of interface options: | Off | When activated On, the button for resetting a network interface is displayed | 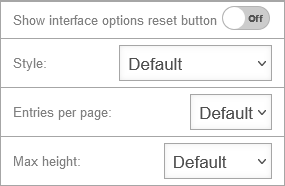 |
| Style: | Customizes the style of the table for this table (for more detailed information on the configuration options, see Tools) | ||
| Entries per page: | Adjusts the entries per page of the table individually for this table (for more detailed information on the configuration options, see | ||
| Max height: | Adjusts the maximum display height of the table for this table individually (for more detailed information on the configuration options, see | ||
Creating an Ethernet interface
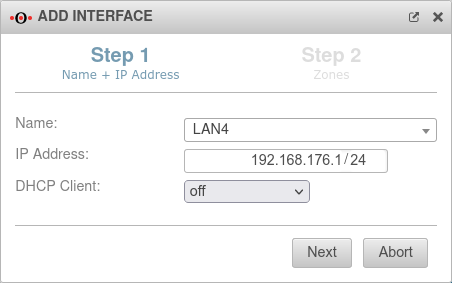
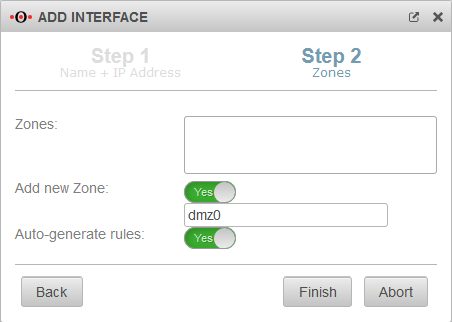
The creation of an Ethernet interface is done with a wizard in the menu Area Network interfaces button .
Any number of interfaces can be created on UTMs with the naming scheme “eth”x.
On UTMs with the naming scheme “LAN”x or “A”x, only interfaces that actually exist can be created.
On UTMs with the naming scheme “LAN”x or “A”x, only interfaces that actually exist can be created.
Finish the wizard with the button.
Edit an Ethernet interface
The configuration of an Ethernet interface is done in the menu Area Network interfaces button
General
General
| Caption | Value | Description | UTMuser@firewall.name.fqdnNetworkNetwork configuration 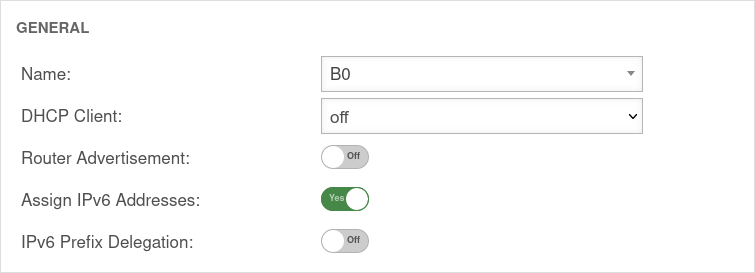
|
|---|---|---|---|
| Name: | LAN1 | The name of the interface cannot be changed afterwards. | |
| DHCP-Client: | Here the setting is made whether - and if so, for which IP protocol - the interface should obtain its IP addresses from a DHCP server. | ||
| Router Advertisement: | Off | If the UTM has received an IPv6 prefix (on an external interface), it can make the Default Gateway and the subnet known via router advertisement and at the same time distribute corresponding IPv6 addresses in the connected network. (See article IPv6 Prefix Delegation). | |
| Assign IPv6 addresses: | On | If it is not desired that the UTM distributes IPv6 addresses, but only the default gateway, then this option must be deactivated. | |
| IPv6 Prefix Delegation: | Off | Enables IPv6 prefex delegation to get IPv6 prefixes allocated on this interface. (For external interfaces only.) | |
SettingsSettings | |||
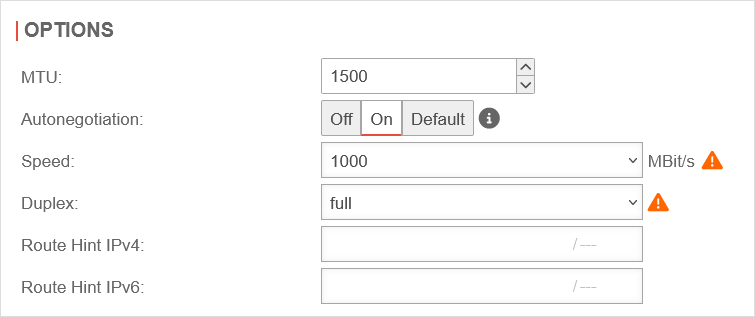
| MTU: | 1500 | The Maximum Transmission Unit specifies the maximum packet size that can be transmitted without fragmentation. Depending on the type of network (cable, Ethernet, VPN use), other values can help with connection problems here. |
 |
| Autonegotiation: notempty New option: Default |
Allows (on) or prohibits (off) Ethernet network ports from independently negotiating and configuring the maximum possible transmission speed and duplex mode.
Or does not perform an autonegotiation check (default) and therefore does not generate an error if the option cannot be changed. | ||
| Speed: notempty Even with autonegotiation activated |
MBit/s MBit/s MBit/s |
Speed of network communication | |
| Duplex: notempty Even with autonegotiation activated |
Duplex allows data packets to be sent and received simultaneously. HUBs usually only support Halfduplex. If autonegotiation mode is enabled at one end of the link and full-duplex operation is forced at the other end, the autonegotiating subscriber will recognize the link as half-duplex, resulting in a large number of transmission errors. →Wikipedia | ||
| Route Hint IPv4: | Via the field "Route Hint" it is possible to define the gateway of the interface. This has the advantage, for example, that only the interface (e.g. LAN3) has to be specified in routing and not directly the gateway IP. | ||
| Route Hint IPv6: | Via the field "Route Hint" it is possible to define the gateway of the interface. This has the advantage, for example, that only the interface (e.g. LAN3) has to be specified in routing and not directly the gateway IP. | ||
Enable autonegotiate: interface set name "LAN1" options [ pause_autoneg=1 ] | |||
IP AddressesIP Addresses | |||
| IP Addresses | »192.168.121.1/24»fc80:1234::1/64 | Under the menu item IP addresses one or more addresses can be assigned to an interface. |  |
ZonesZones | |||
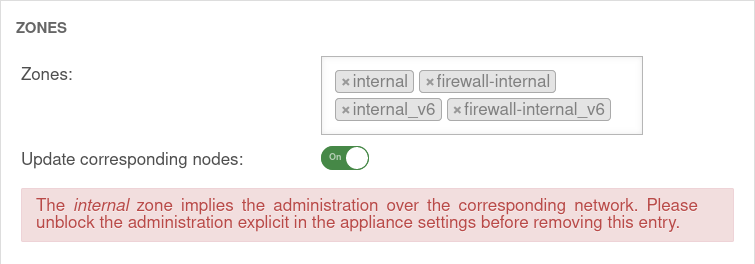
| Zones | »internal»firewall-internal»internal_v6»fireall-internal_v6 | Under the menu item Zones the zones of the interface are defined. If the zone internal is not assigned to an interface and the administration via the web interface is not explicitly enabled, the web interface can not be accessed anymore! |
 |
DynDNSDynDNS | |||
| Enabled: | Yes | Enables or disables (default) the DynDNS function | 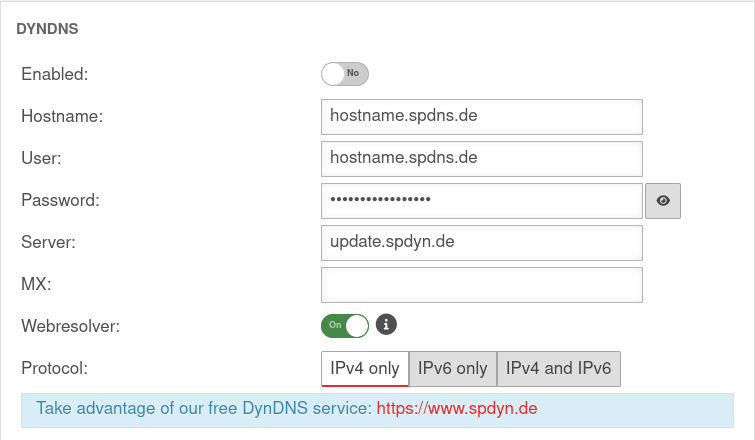 |
| Hostname: | hostname.spdns.de | Desired Hostname | |
| User: | hostname.spdns.de | The corresponding user name must be entered here. | |
| Password: | The password must be entered here. | ||
| Server: | update.spdyn.de | The securepoint update server | |
| MX: | |||
| Webresolver: | On | Must be activated if the NAT router is located before the DNS (i.e.: UTM → Fritzbox/Speedport → internet) | |
| Protocol: | The DNS service can be activated for IPv4 or IPv6 addresses only, or both IPv4 and IPv6. | ||
FallbackFallback | |||
| Fallback interface: | wan3 | Interface that stands in for the main interface in the case of a malfunction. The absence of malfunctions is verified by ping-checking an IP. Further notes on the configuration of a fallback can be found in a separate Wiki article. |
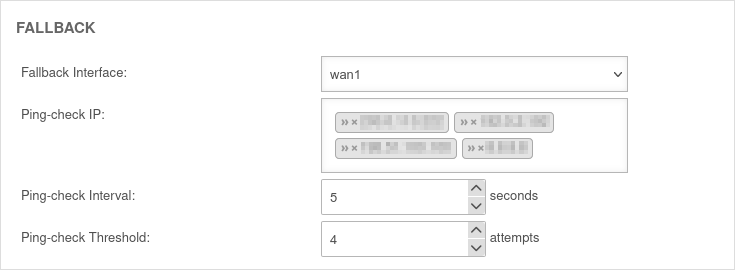 |
| Ping-check IP: | »203.0.2.203 »192.0.2.192 Example IPs must be replaced |
Host(s) to which the ping check is to be performed. This can also be a host in the internal network if necessary. This may also be a host in the internal network. If a ping check host does not respond, the subsequent IP address is tried immediately. If none of the ping check hosts responds, this is considered a failed attempt and checked again after the ping check interval. | |
| Ping-check Intervall: | 5 Seconds | Period between ping attempts | |
| Ping-check Threshold: | 4 Attempts | Number of failed ping attempts before switching to the fallback interface. | |
