Jump to:navigation, search
Wiki


De.png
En.png
Fr.png


Forwarding DNS requests for the domain to the DNS server through the VPN tunnel
Last adaptation to the version: 12.6.1
New:
  • Simplified rule in the DNS server network for SSL-VPN and WireGuard connections 04.2024
  • Updated to Redesign of the webinterface
  • Packetfilter rule Source and destination corrected
Last updated: 
04.2024
notempty
This article refers to a Resellerpreview

12.3 11.7

Access: UTM-IP:Port or UTM-URL:Port
Port as configured at Network / Appliance Settings / Webserver
Default-Port: 11115
i.e.: https://utm.ttt-point.de:11115
Default: https://192.168.175.1:11115
Applications Nameserver


Introduction

In this scenario, the UTM and clients of a remote site are to be connected to the domain at the main site.

  • All DNS requests for the domain to the DNS server, through the VPN tunnel, are forwarded to the main site.
  • The UTM shall provide DNS for the clients in the remote site.
  • Requests for the domain network shall be forwarded in the VPN tunnel to the DNS server in the main site.


Creating the DNS Relay Zone


Set Firewall as Namesever

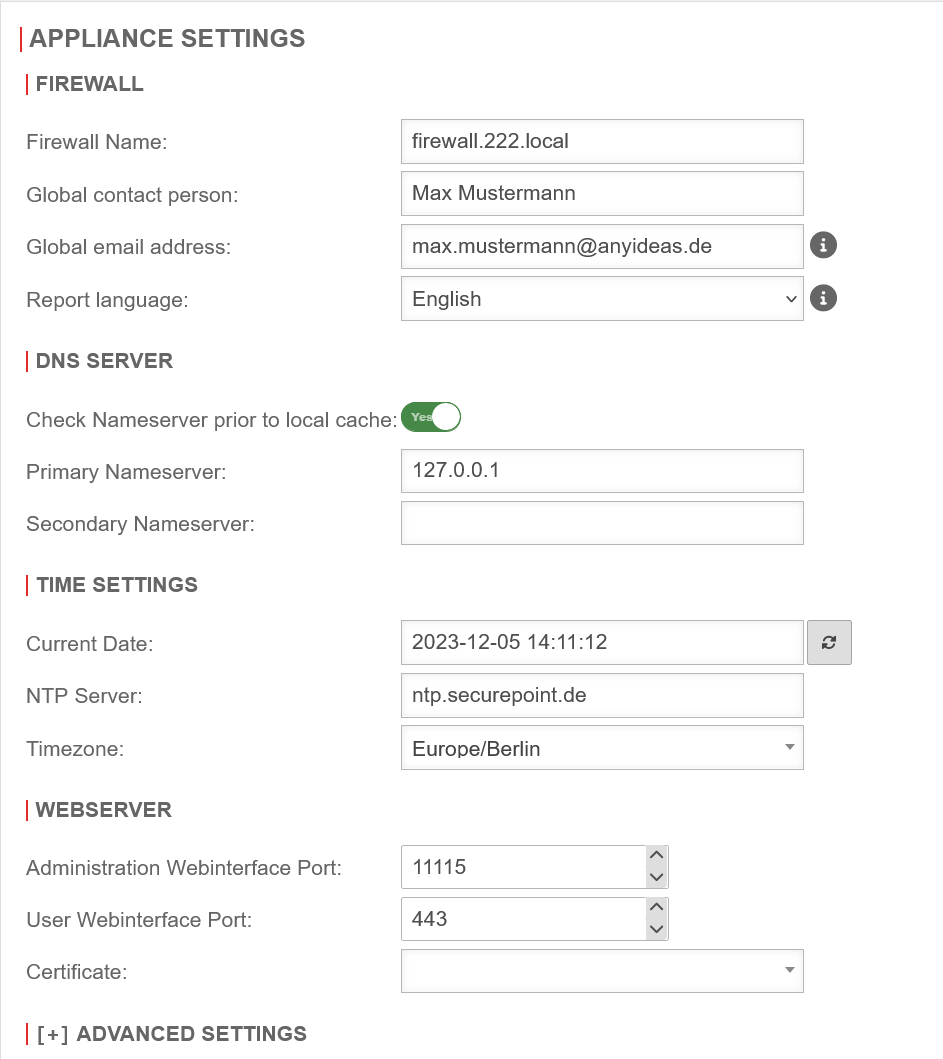
Server settings UTMuser@firewall.name.fqdnNetwork UTM v12.6 Nameserver Servereinstellungen-en.pngNameserver IP The first step is to define the UTM itself as the nameserver of the firewall.

  1. Configuration under Network Server settings  Area Server settings section
    DNS Server
  2. Field Primary nameserver set the IP to 127.0.0.1 (localhost) as IP.
  3. Save with
  • If no nameserver is stored, DNS queries are resolved via the root DNS servers and the DNS servers stored there for the top-level domains


  • Create DNS Relay

    Applications Nameserver  Area Zones
    The next step is to create a relay zone.

    Nameserver UTMuser@firewall.name.fqdnApplications UTM v12.6.1 DNS Relay Nameserver Relay-Zone anlegen-en.png
    Step 1
    • Open the Zones tab in the Nameserver window.
    • Click on the Add Relay Zone button to create a new relay zone
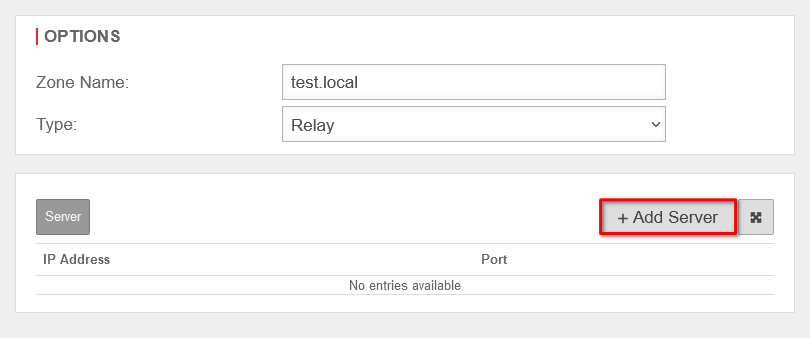
    Add relay zone UTMuser@firewall.name.fqdnApplicationsNameserver UTM v12.6.1 DNS Relay Zone anlegen DNS Relay IP-Adresse-en.png
    Step 2
    • Under Zone name: enter the desired domain name
    • Select as Type: Relay
    • Click on the Add Server button to enter the IP address of the nameserver
    Add server UTMuser@firewall.name.fqdnApplicationsNameserver UTM v12.6.1 DNS Relay Zone anlegen DNS Relay IP Adresse Nameserver-en.png
    Step 3
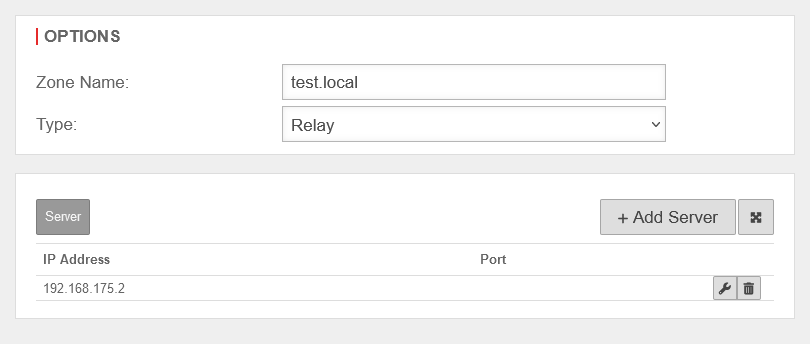
    • Under IP address: the IP address of the remote nameserver is entered
    Add relay zone UTMuser@firewall.name.fqdnApplicationsNameserver UTM v12.6.1 DNS Relay Zone anlegen DNS Relay-en.png
    Step 4
    View of the finished relay zone.
    In order to use this, Save and close the dialog Add Relay Zone and the dialog Nameserver.


    After creating the relay zone, the firewall forwards all requests to the DNS server at the main site on the domain network.


    DNS Relay for an IPSec Site-to-Site Tunnel

    In order to forward internal domain requests to a remote nameserver that is on an IPSec network, note that by default, all direct requests addressed to external nameservers are sent from the firewall with the external IP. However, a public IP is not routed into an IPSec tunnel.

    Create network object

    Firewall Network objects
    The packet filter rules in the Implied rules are automatically activated. This means that no network object is yet available for the IPSec network.

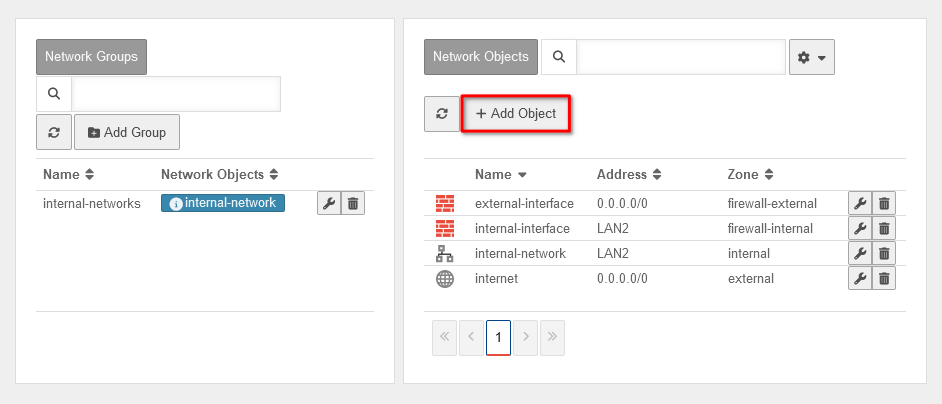
    The following objects are preconfigured at delivery: Network object associated interface object Network objects UTMuser@firewall.name.fqdnFirewall Update rules UTM v12.6.1 DNS Relay IPSec Netzwerkobjekt Uebersicht-en.pngOverview of network objects
    World.svg Internet Interface.svg external-interface
    Network.svg internal-network Interface.svg internal-interface
    only with min. 3 existing interfaces Network.svg dmz1-network Interface.svg dmz1-interface
    In order to create the appropriate network object, click on the Add object button in the  Network objects  area.
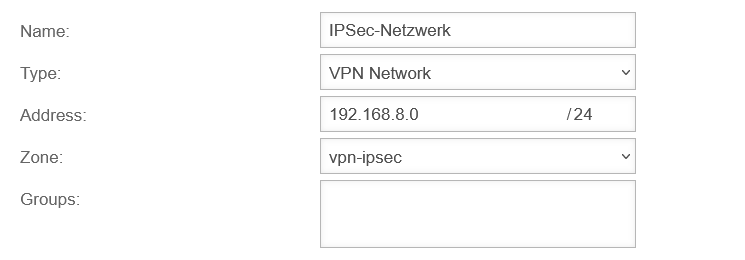
    Caption Value Description Add network objects UTMuser@firewall.name.fqdnFirewallNetwork objects UTM v12.6.1 DNS Relay IPSec Netzwerkobjekt hinzufuegen-en.png
    Name: IPSec-Network Name for the IPSec network
    Type: VPN-Network Choose VPN network
    Address: 192.168.8.0/24 IP address of the IPSec network
    Zone: vpn-ipsec The corresponding VPN IPSec zone
    Groups:     A corresponding group can be entered
    Network object and dialog Save and Close

    Create rule

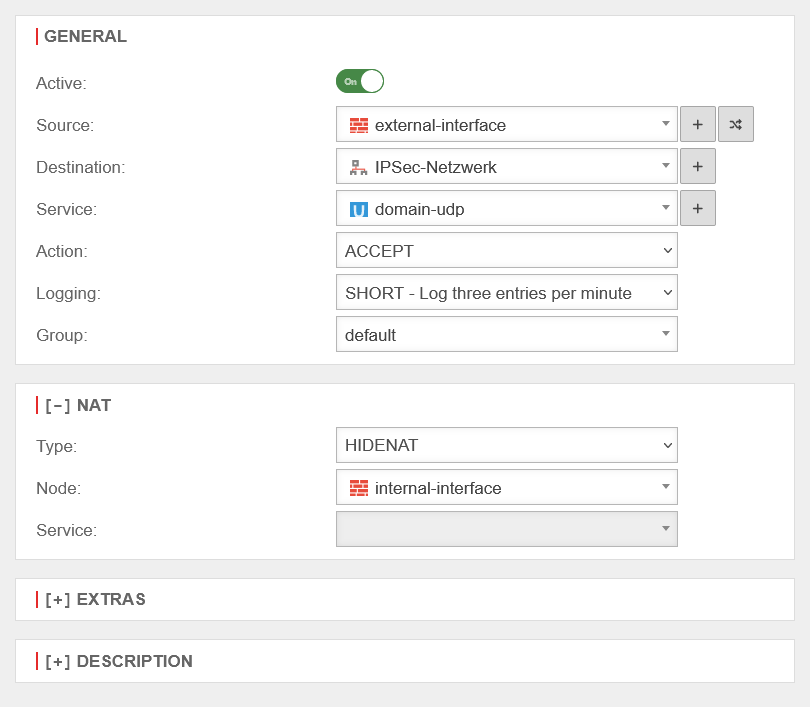
    The last step is to create a firewall rule with a Hide NAT.
    This causes DNS forwarding to also go to the tunnel and not directly to the Internet.

    Caption Value Add rule UTMuser@firewall.name.fqdnFirewallPacketfilter UTM v12.6.1 DNS Relay IPSec Paketfilter erstellen-en.pngCreating the rule
    Active: On
    Quelle: Interface.svg external-interface
    Target: Vpn-network.svg IPSec-Network
    Service: Udp.svg domain-udp
    Action: ACCEPT
    [-] NAT
    Type: HIDENAT
    Network object: Interface.svg internal-interface
    Click Save or Save and Close to save this rule.

    Then Update rules

    With this rule, all domain UDP requests made through the firewall to the remote nameserver are natted over the IP of the internal interface and can thus be routed into the IPSec tunnel.

    notempty
    If multipath routing is configured, such a rule must be created for each external interface.


    DNS Relay for an OpenVPN Site-to-Site Tunnel

    In order to forward internal domain requests to a remote nameserver located in an OpenVPN network, note that by default all direct requests directed to external nameservers are send from the firewall with the external IP. However, a public IP is not routed into an OpenVPN tunnel.

    Central configuration in the DNS server network

    Simplified solution with packet filter rule in the network of the DNS server
    If there are several branch offices, the simplest option is often to release the entire transfer network on the server side. This requires a packetfilter rule on the UTM in the DNS server network.

    Creating the network object for the transfer network

    UTM im DNS-Server Netzwerk Firewall Network Objects Box  Network objects  Button Add object

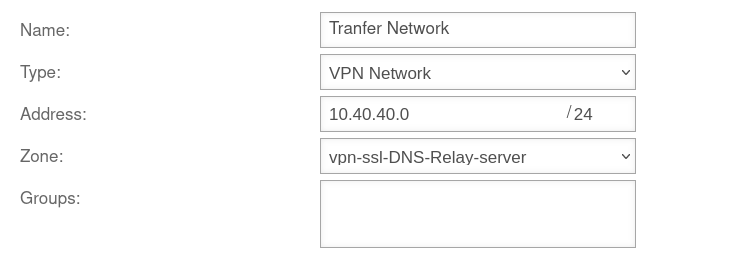
    Caption Value Description Add network objects UTMuser@firewall.name.fqdnFirewallNetwork objects UTM v12.7 Netzwerkobjekt Transfernetz-en.png Network object for the transfer network
    Name: Transfer Netz Designation for the transfer network
    Type: VPN-Network Type of network object
    Address: 10.40.40.0/24 Network IP, as displayed under VPN SSL-VPN under Transfer network
    Zone: vpn-ssl-DNS-Relay-server Zone is automatically suggested.
    By default, the name of the SSL connection with the prefix vpn-ssl-
    Groups:     A corresponding group can be entered
    Network object and dialog Save and Close
    Network object DNS server

    A network object for the DNS server (type: Host) should already exist.
    If not, it must also be created.

    UTM in the DNS server network Firewall Network Objects Box  Network objects  Button Add object

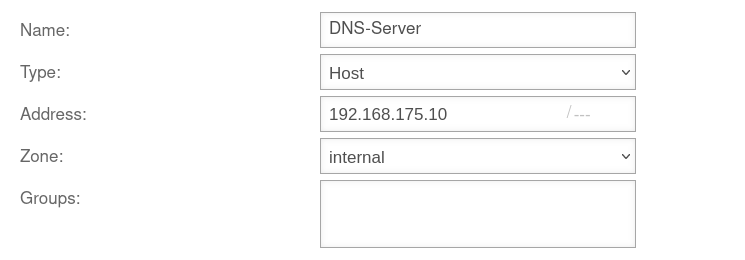
    Caption Value Description Add network objects UTMuser@firewall.name.fqdnFirewallNetwork objects UTM v12.7 Netzwerkobjekt DNS-Server-en.png Network object for the DNS server
    Name: DNS-Server Designation for the DNS server
    Type: Host Type of network object
    Address: 192.168.175.10/-- Fixed IP address at which the DNS server can be reached
    Zone: internal Zone is automatically suggested
    Groups:     A corresponding group can be entered
    Network object and dialog Save and Close


    Create rule

    Firewall Packetfilter  Button Add rule

  • This rule does not require NAT
  • Then Update rules
  • # Quelle Target Service NAT Action Active
    Dragndrop.png 4 Vpn-network.svg Transfer network Host.svg DNS-Server Udp.svg domain-udp Accept On

    This packetfilter rule allows the SSL-VPN transfer network and thus all S2S clients on this SSL-VPN tunnel to access the DNS server


    notempty
    Alternative

    Decentralized configuration on each S2S client

    If a central configuration in the DNS server network is not desired or possible, a NAT rule can be created on each S2S client.

  • These steps must be carried out with every S2S client!
  • Create zone

    UTM in the S2S client network Network Zone Configuration
    In order to route the DNS requests into the OpenVPN tunnel, a new interface zone must be created on the UTM.
    A new zone is created with the Add zone button.

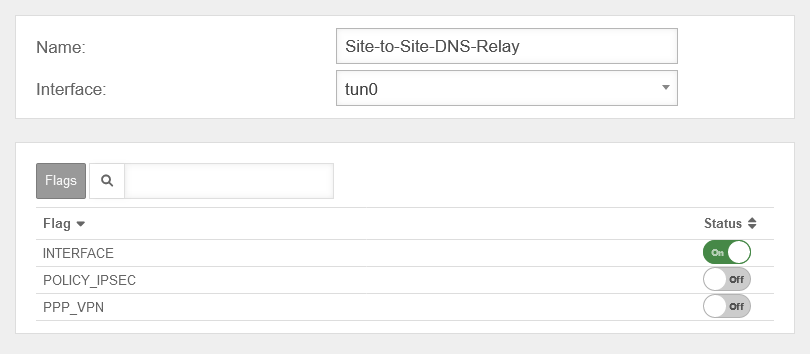
    Caption Value Description Add zone UTMuser@firewall.name.fqdnNetworkZone settings UTM v12.6.1 DNS Relay OpenVPN Zone-en.pngDialog Add zone with flag Interface
    Name: Site-to-Site-DNS-Relay Name for the interface zone
    Interface: tun0 Select the corresponding interface tunX
    Interface: On Enable FLAG Interface for this zone
    Dialog Save and close


    Create Open-VPN network objects

    UTM in the S2S client network Firewall Network Objects
    The packet filter rules in the Implied rules are automatically activated. This means that no network object is yet available for the Open-VPN network.

    The following objects are preconfigured at delivery: Network object associated interface object Network objects UTMuser@firewall.name.fqdnFirewall Update rules UTM v12.6.1 DNS Relay IPSec Netzwerkobjekt Uebersicht-en.pngOverview of network objects
    World.svg Internet Interface.svg external-interface
    Network.svg internal-network Interface.svg internal-interface
    only with min. 3 existing interfaces Network.svg dmz1-network Interface.svg dmz1-interface
    In order to create the appropriate network object, click on the Add object button in the  Network objects  area.
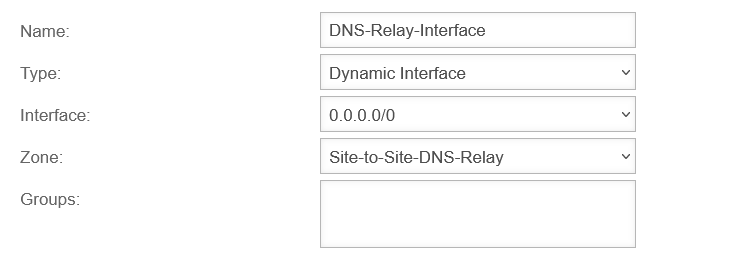
    Caption Value Description Add network objects UTMuser@firewall.name.fqdnFirewallNetwork objects UTM v12.6.1 DNS Relay OpenVPN S2S Netzwerkobjekt hinzufuegen OpenVPN Interface-en.png
    Name: DNS-Relay-Interface Name for the Open VPN network
    Type: Dynamic interface Select dynamic interface
    Interface: 0.0.0.0/0 select this interface
    Zone: Site-to-Site-DNS-Relay Select the corresponding Open VPN zone
    Groups:     A corresponding group can be entered
    Network object and dialog Save and Close


    Create rule

    UTM in the S2S client network Firewall Packetfilter  Button Add rule

    The last step is to create a firewall rule with a Hide NAT.
    This causes DNS forwarding to also go to the tunnel and not directly to the Internet.

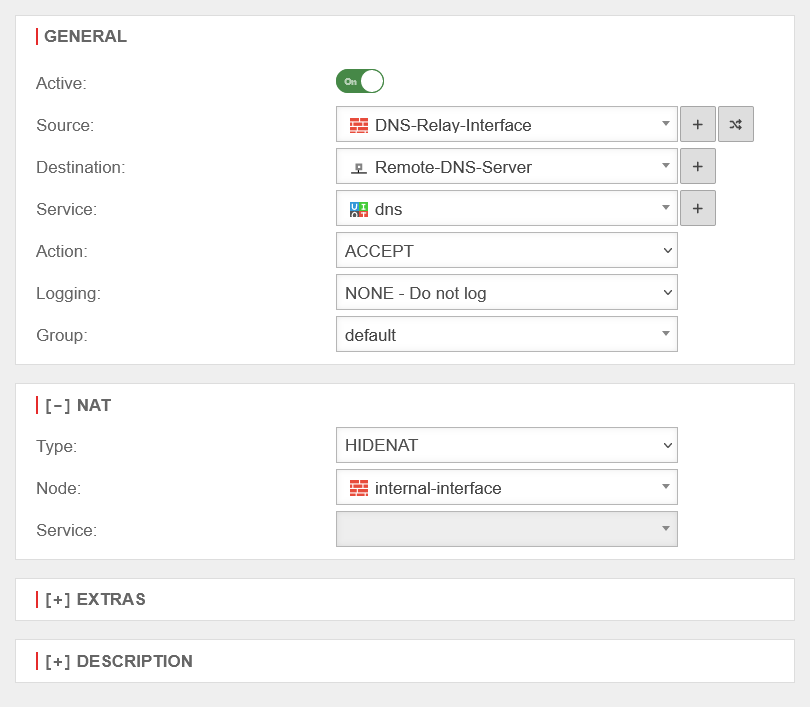
    Caption Value Add rule UTMuser@firewall.name.fqdnFirewallPacketfilter UTM v12.6.1 DNS Relay Paketfilterregel DNS Relay Interface-en.pngCreating the rule
    Active: On
    Quelle: Interface.svg DNS-Relay-Interface
    Target: Host.svg Remote-DNS-Server
    Service: Service-group.svg dns
    Action: ACCEPT
    [-] NAT
    Type: HIDENAT
    Optional if domain controller does not want to respond to requests from the transfer network
    Network object: Interface.svg internal-interface
    Dialog Save and close
    Then Update rules


    DNS Relay for a WireGuard Site-to-Site Tunnel

    The internal domain requests can also be forwarded to a remote nameserver located in a WireGuard network. The configuration of such a scenario requires an existing WireGuard site-to-site VPN (S2S) connection.


    Central configuration in the DNS server network

    Simplified solution with packet filter rule in the network of the DNS server
    If there are several branch offices, the simplest option is often to release the entire transfer network on the server side. This requires a packetfilter rule on the UTM in the DNS server network.


    Creating the network object for the transfer network

    UTM im DNS-Server Netzwerk Firewall Network Objects Box  Network objects  Button Add object

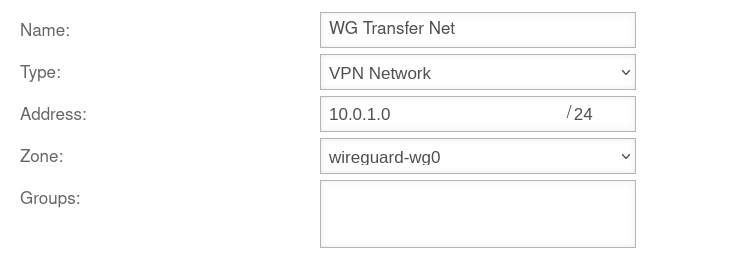
    Caption Value Description Add network objects UTMuser@firewall.name.fqdnFirewallNetwork objects UTM v12.7 Netzwerkobjekt WG Transfernetz-en.png Network object for the WireGuard transfer network
    Name: Transfer Netz Designation for the transfer network
    Type: VPN network Type of network object
    Address: 10.0.1.0/24 Network IP of the transfer network.
    Under VPN WireGuard WireGuard connection edit you will find the IP address and subnet mask of the interface under IPv4Address or IPv6 Address. The network IP can be derived from this accordingly.
    For example, 10.0.1.2/24 → becomes 10.0.1.0/24
    For example, fd00::2/64 → becomes fd00::0/64
      
    Zone: wireguard-wg0 Zone is automatically suggested.
    Per default the name of the WireGuard tunnel with the prefix wireguard
    Groups:     A corresponding group can be entered
    Network object and dialog Save and Close
    Network object DNS server

    A network object for the DNS server (type: Host) should already exist.
    If not, it must also be created.

    UTM in the DNS server network Firewall Network Objects Box  Network objects  Button Add object

    Caption Value Description Add network objects UTMuser@firewall.name.fqdnFirewallNetwork objects UTM v12.7 Netzwerkobjekt DNS-Server-en.png Network object for the DNS server
    Name: DNS-Server Designation for the DNS server
    Type: Host Type of network object
    Address: 192.168.175.10/-- Fixed IP address at which the DNS server can be reached
    Zone: internal Zone is automatically suggested
    Groups:     A corresponding group can be entered
    Network object and dialog Save and Close


    Create rule

    UTM in the DNS server network Firewall Packetfilter  Button Add rule

  • This rule does not require NAT
  • Then Update rules
  • # Quelle Target Service NAT Action Active
    Dragndrop.png 4 Vpn-network.svg Transfer network Host.svg DNS-Server Udp.svg domain-udp Accept On

    This packetfilter rule allows the SSL-VPN transfer network and thus all S2S clients on this SSL-VPN tunnel to access the DNS server


    notempty
    Alternative

    Decentralized configuration on each S2S client

    If a central configuration in the DNS server network is not desired or possible, a NAT rule can be created on each S2S client.


    Create zone

    UTM in the S2S client network Network Zone Configuration  Button Zone hinzufügen
    In order to route the DNS requests into the WireGuard tunnel, a new interface zone must be created on the UTM.

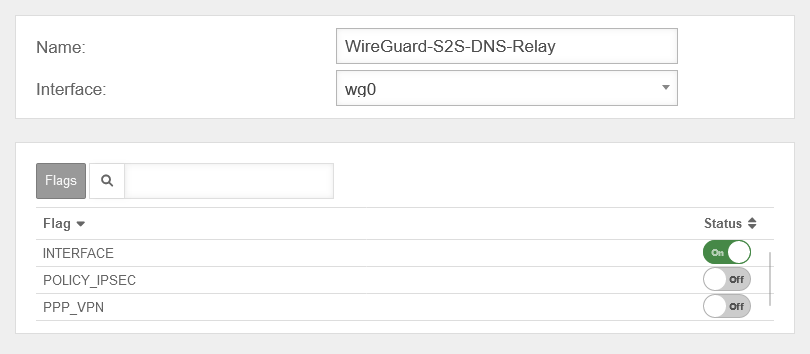
    Caption Value Description Add zone UTMuser@firewall.name.fqdnNetworkZone settings UTM v12.6.1 DNS Relay WireGuard Zone-en.pngDialog Add zone with flag Interface
    Name: WireGuard-S2S-DNS-Relay Name for the interface zone
    Interface: wg0 Select the corresponding WireGuard interface wg0
    Interface: On Enable FLAG Interface for this zone
    Dialog Save and close


    Create WireGuard network objects

    UTM in the S2S client network Firewall Network Objects
    The packet filter rules in the Implied rules are automatically activated. This means that no network object is yet available for the WireGuard network.

    The following objects are preconfigured at delivery: Network object associated interface object Network objects UTMuser@firewall.name.fqdnFirewall Update rules UTM v12.6.1 DNS Relay IPSec Netzwerkobjekt Uebersicht-en.pngOverview of network objects
    World.svg Internet Interface.svg external-interface
    Network.svg internal-network Interface.svg internal-interface
    only with min. 3 existing interfaces Network.svg dmz1-network Interface.svg dmz1-interface
    In order to create the appropriate network object, click on the Add object button in the  Network objects  area.
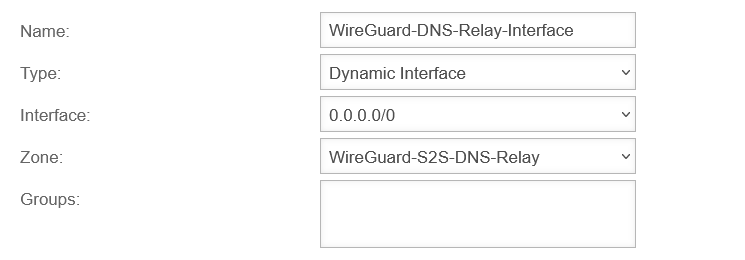
    Caption Value Description Add network objects UTMuser@firewall.name.fqdnFirewallNetwork objects UTM v12.6.1 DNS Relay WireGuard S2S Netzwerkobjekt hinzufuegen WireGuard Interface-en.png
    Name: WireGuard-DNS-Relay-Interface Name for the WireGuard network
    Type: Dynamic interface Select dynamic interface
    Interface: 0.0.0.0/0 select this interface
    Zone: WireGuard-S2S-DNS-Relay Select the corresponding WireGuard zone
    Groups:     A corresponding group can be entered
    Network object and dialog Save and Close


    Create rule

    UTM in the S2S client network Firewall Packetfilter  Button Add rule

    The last step is to create a firewall rule with a Hide NAT.
    This causes DNS forwarding to also go to the tunnel and not directly to the Internet.

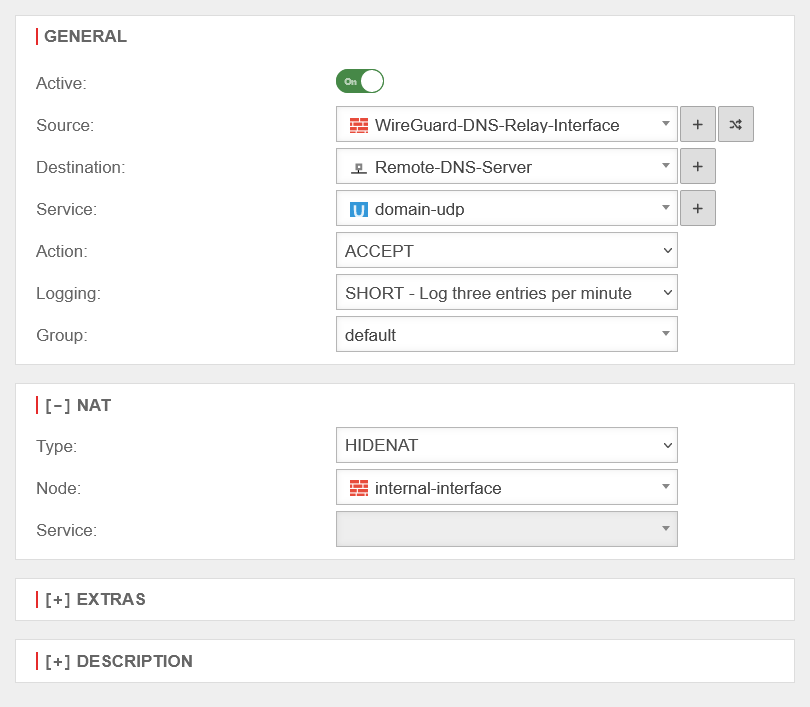
    Caption Value Add rule UTMuser@firewall.name.fqdnFirewallPacketfilter UTM v12.6.1 DNS Relay WireGuard S2S Paketfilter erstellen-en.pngCreating the rule
    Active: On
    Quelle: Interface.svg WireGuard-DNS-Relay-Interface
    Target: Host.svg Remote-DNS-Server
    Service: Udp.svg domain-udp
    Action: ACCEPT
    [ - ] NAT
    Type: HIDENAT
    Optional if domain controller does not want to respond to requests from the transfer network
    Network object: Interface.svg internal-interface
    Dialog Save and close
    Then Update rules