In dieser Seite werden die Variablen für unterschiedliche Sprachen definiert.
Diese Seite wird auf folgenden Seiten eingebunden
IPSec Verbindungen with Multipathrouting
Last adaptation to the version: 12.6.0
New:
- Updated to Redesign of the webinterface
This article refers to a Beta version
Introduction
Many companies now rely on multipath routing, i.e. several Internet lines on one UTM, for the benefit of performance and also as a failsafe measure. In the following, you will learn what you need to bear in mind for such a setup in conjunction with one or more IPSec tunnels.
Basic configuration of an IPSec Site-to-Site connection
After logging in to the administration interface of the firewall (in the delivery state: https://192.168.175.1:11115), an IPSec connection can be added in the menu button + Add IPSec connection.
Setup Wizard
Step 1 - Connection type
|
| Caption |
Value |
Description
|
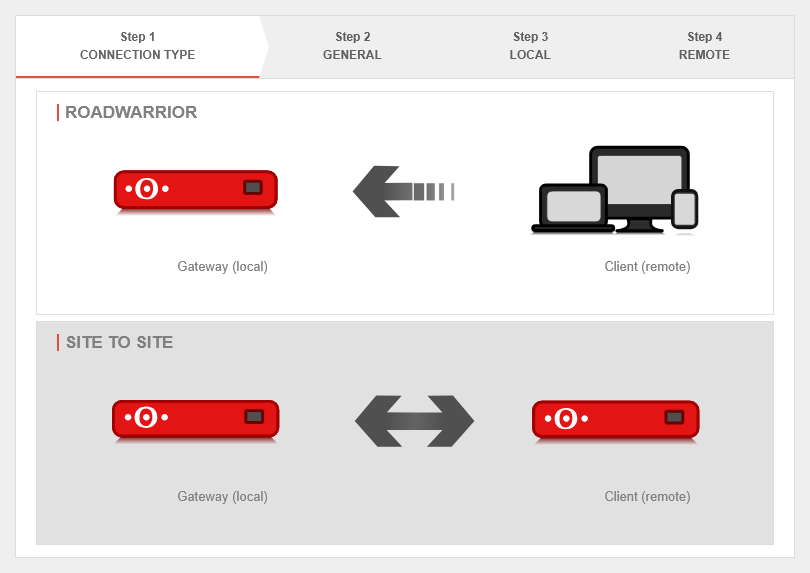 Setup step 1 Setup step 1
|
| Selection of the connection type: |
The following connections are available.
|
For the configuration of a Site to Site connection, this one is selected.
|
|
|
Step 2 - General
|
| Name: |
IPSec S2S Branch |
Name for the connection
|
 Setup step 2
|
| IKE Version: |
IKE v1IKE v2
Default: IKEv2 |
Selection of the IKE version.
When using IKE v2 it is possible to combine multiple subnets under one SA (default for newly created connections).
Without this option, a separate SA is negotiated for each subnet combination. This has significant disadvantages, especially with numerous SAs, and leads to limitations and losses in the stability of the connections due to the design of the IPSec protocol. This option is activated while editing the phase 2 configuration with the entry Group subnet combinations. |
|
|
Step 3 - Local
|
| Local Gateway ID: |
Any interface |
Any string.
The gateway ID flows into the authentication. This can be an IP address, a host name or an interface. On the remote gateway, this value must be configured exactly the same way.
If an email address should be used as Gateway ID, it is necessary to insert a double @@ in front of the ID (mail@... becomes @@mail@...). Otherwise the ID will be treated as FQDN Automatically filled in for certificate authentication method after certificate selection.
|
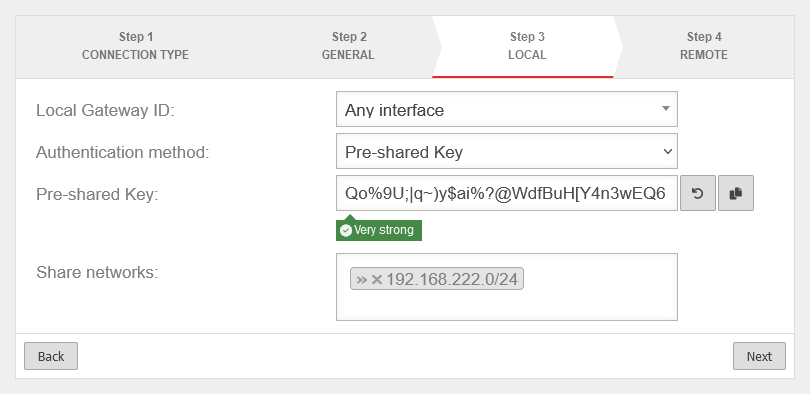 Setup step 3
|
| Authentication method: |
Pre-Shared Key |
A pre-shared key is in use
|
| Certificate |
A certificate is in use
|
Pre-Shared Key
For authentication method pre-shared key. |
|
An arbitrary PSK
|
|
Creates a very strong key
|
|
Copies the PSK to the clipboard
|
X.509 Certificate:
For authentication method certificate. |
Server certificate |
Selection of a certificate
This certificate must be created beforehand under .
|
| Share networks: |
»192.168.222.0/24 |
The local network of the remote gateway to be accessed
|
|
|
Step 4 - Remote Gateway
|
| Remote Gateway: |
192.0.2.192 |
Public IP address (or hostname that can be resolved via DNS) of the remote gateway.
|
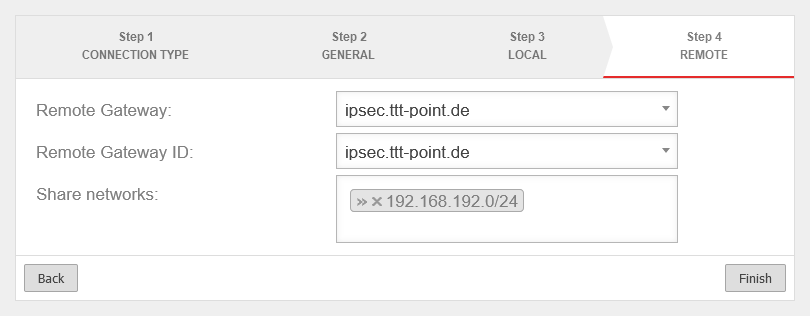 Setup step 4
|
| Remote Gateway ID: |
192.0.2.192 |
ID configured as local ID on the remote gateway (any character string).
|
| Share networks: |
»192.168.192.0/24 |
The local network of the remote gateway to be accessed
|
| Exit the setup wizard with Finish
|
For S2S connections, it should be checked whether several subnets can be combined via MULTI_TRAFFIC_SELECTOR. This significantly reduces the number of SAs and increases the stability of the connection.
To do this, the option Group subnet combinations is activated in phase 2.
|
|
|
Use case 1: Additional PPPoE line

Use case 1
The first possible way to connect an additional line is to connect another ADSL connection in addition to the existing Internet connection (wan0). To configure the second PPPoE line, please refer to this manual.
Configuration with ADSL
| In the case of ADSL as the second line, the network configuration under Area Network interfaces should look as follows:
|
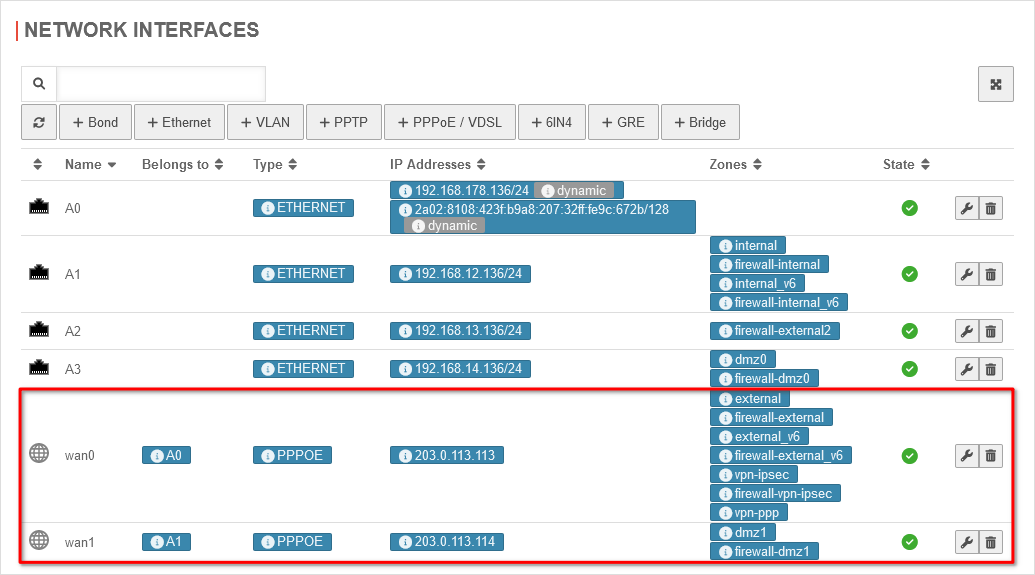 Network configuration for ADSL Network configuration for ADSL
|
| In this case, phase 1, under Area Connections button Phase 1, of the IPSec connection should look like this:
|
| Caption |
Value |
Description
|
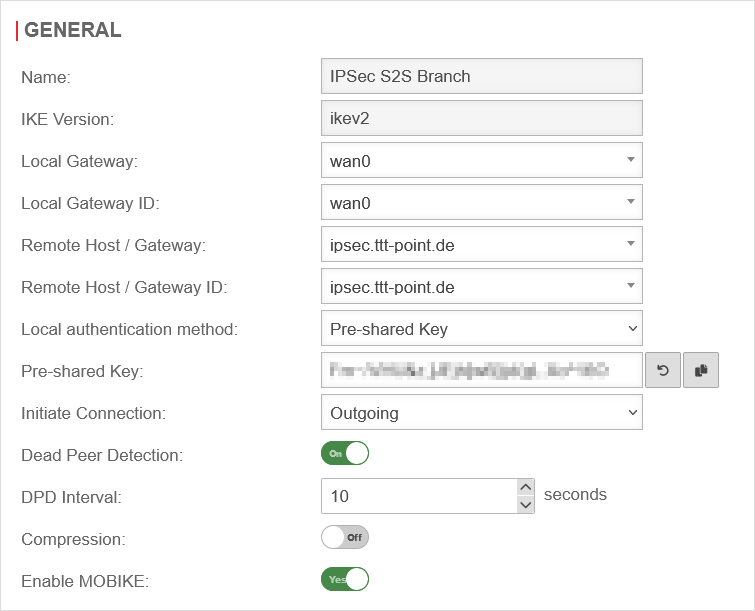 Phase 1 configuration for ADSL Phase 1 configuration for ADSL
|
| IKE Version: |
ikev2 |
Selection of the IKE version.
When using IKE v2 it is possible to combine multiple subnets under one SA (default for newly created connections).
|
| Local Gateway: |
wan0 |
|
| Local Gateway ID: |
wan0 |
Any string.
The gateway ID flows into the authentication. This can be an IP address, a host name or an interface. On the remote gateway, this value must be configured exactly the same way.
If an email address should be used as Gateway ID, it is necessary to insert a double @@ in front of the ID (mail@... becomes @@mail@...). Otherwise the ID will be treated as FQDN Automatically filled in for certificate authentication method after certificate selection.
|
| Remote Host / Gateway: |
ipsec.ttt-point.de |
|
| Remote Host / Gateway ID: |
ipsec.ttt-point.de |
|
| Local authentication method: |
Pre-Shared Key |
|
| Start up behavior: |
Outgoing |
|
|
|
Use case 2: Additional SDSL line

Use case 2
The second possible way to connect an additional line is to connect an SDSL line in addition to the existing wan0 line. In this case, you have a public IP on the interface and a predefined gateway for this line.
Configuration with SDSL
| In the case of SDSL as the second line, the network configuration under Area Network interfaces is as follows:
|
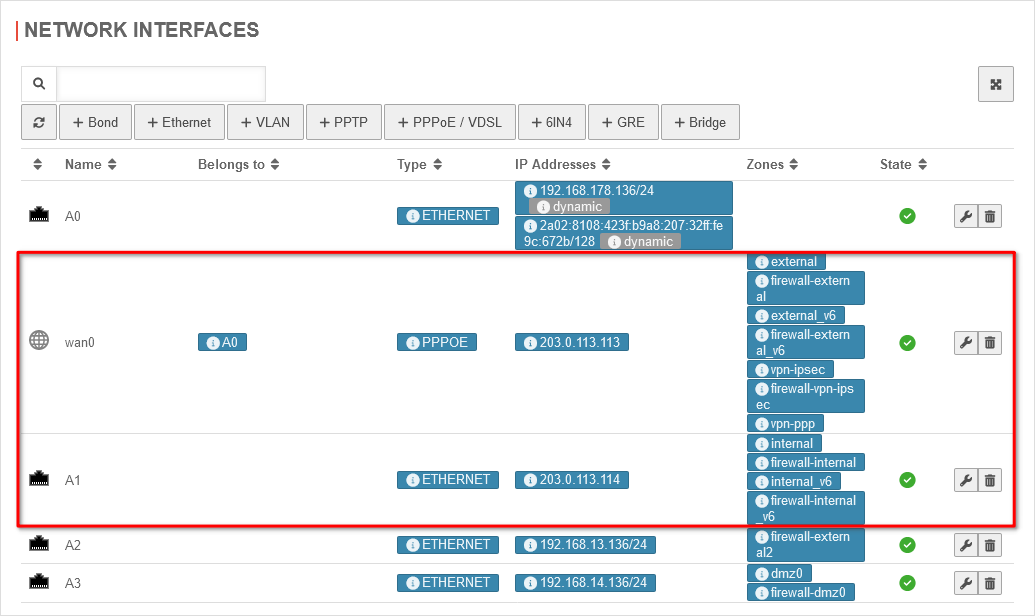 Network configuration for SDSL Network configuration for SDSL
|
| In this case, phase 1, under Area Connections button Phase 1, of the IPSec connection should look like this:
|
| Caption |
Value |
Description
|
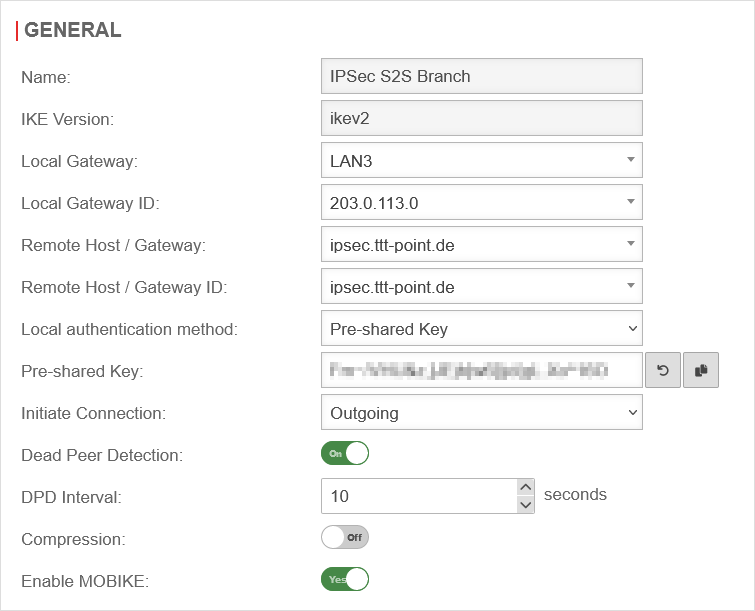 Phase 1 configuration for SDSL Phase 1 configuration for SDSL
|
| IKE Version: |
ikev2 |
Selection of the IKE version.
When using IKE v2 it is possible to combine multiple subnets under one SA (default for newly created connections).
|
| Local Gateway: |
LAN3 |
|
| Local Gateway ID: |
203.0.113.0 |
Any string.
The gateway ID flows into the authentication. This can be an IP address, a host name or an interface. On the remote gateway, this value must be configured exactly the same way.
If an email address should be used as Gateway ID, it is necessary to insert a double @@ in front of the ID (mail@... becomes @@mail@...). Otherwise the ID will be treated as FQDN Automatically filled in for certificate authentication method after certificate selection.
|
| Remote Host / Gateway: |
ipsec.ttt-point.de |
|
| Remote Host / Gateway ID: |
ipsec.ttt-point.de |
|
| Local authentication method: |
Pre-Shared Key |
|
| Start up behavior: |
Outgoing |
|
|
|
Rulebook
To grant access to the internal network, the connection must be allowed.
It is possible, but not recommended to do this with implied rules under section VPN to configure this.
However, these Implied Rules release the ports used for IPSec connections on all interfaces.
|
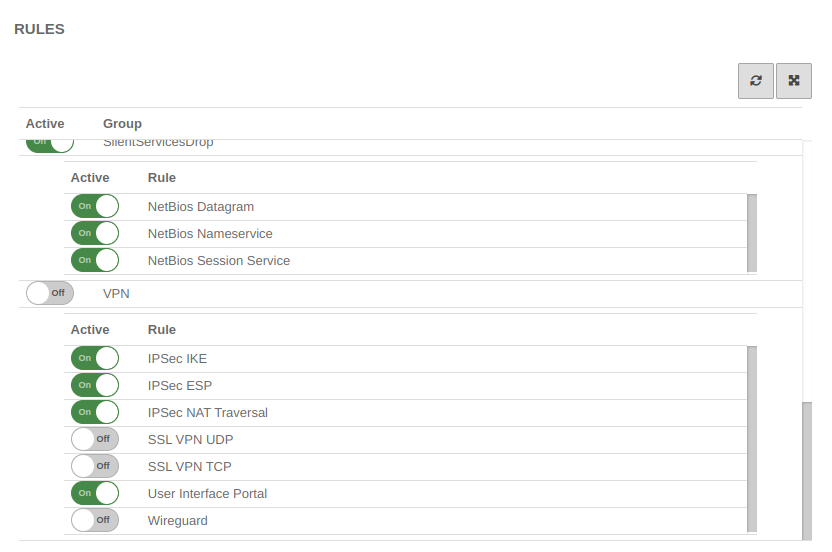 Implied rules Implied rules |
notemptyAs a general rule:
Only what is needed and only for the one who needs it is released! |
Create network object
A network object must be created for the remote network.
button Add Object
If several subnets exist on the remote gateway, a network object must be created for each subnet.
If the corresponding authorizations are to be assigned, these can be combined into network groups.
|
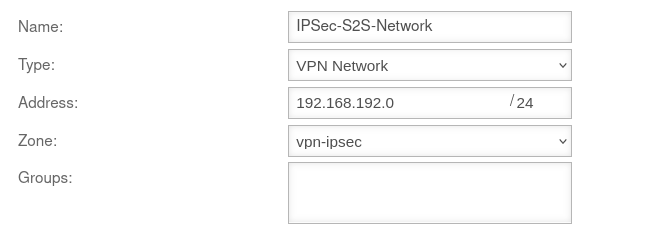
| Name: |
IPSec-S2S |
Name for the IPSec S2S network object
|
|
| Type: |
VPN network |
Type to be selected
|
| Address: |
192.168.192.0/24 |
The IP address of the local network of the opposite side, as entered in the Installation Wizard in Step 4 - Remote Gateway in the line Share networks.
So in this example the network 192.168.192.0/24.
|
| Zone: |
vpn-ipsec |
Zone to be selected
|
| Group: |
|
Optional: One or more groups to which the network object belongs.
|
|
|
Packet filter rule
|
|
|
|
|
| First rule
|
| Source: |
internal-network |
Host or network (-pool), which should get access to the internal network
|
 Packet filter rules Packet filter rules
|
| Destination: |
IPSec network |
Host, network or network group to which access is to be granted. Here, for example, a group of rdp servers.
|
| Service: |
benötigter Dienst |
Service or service group that is needed
|
| NAT: |
Hidenat Exclude |
|
| Network Objects: |
external-interface |
|
|
|
| Second rule
|
| Source: |
IPSec network |
Host or network (-pool), which should get access to the internal network
|
| Destination: |
internal-network |
Destination
|
| Service: |
benötigter Dienst |
Service or service group that is needed
|
| NAT: |
|
No NAT
|
|
|
Configuration of the second gateway
notemptyIt should be noted that the IKE version is identical on both sides.
Use of a Securepoint UTM
On the remote gateway, the settings must be made in a similar way
- A new IPSec VPN connection is created using the IPSec wizard
- A network object for the IPSec network is created
- Packet filter rules are created
Remote Gateway step 2
- The same authentication method must be selected
- The same authentication key (PSK, certificate, RSA key) must be available
- The same IKE version must be used
Remote Gateway step 3
- As Local Gateway ID the Remote Gateway ID from step 4 of the first UTM must now be used
- Under Share Networks the (there remote) network from step 4 of the first UTM must also be used
Remote Gateway step 4
- The public IP address (or a hostname that can be resolved via DNS) of the first UTM must be entered as Remote Gateway.
(This address was not required in the wizard of the first UTM).
- The Local Gateway ID from step 3 of the first UTM must be used as Remote Gateway ID
- Under Share networks the (there local) network from step 3 of the first UTM must also be used.
Create network object of the remote gateway
- The network object of the remote gateway represents the network of the first UTM.
Correspondingly, the network address of the local network of the first UTM must be entered under Address.
In the example 192.168.218.0/24
Notes
 Transparent rule
The transparent HTTP proxy
If a server behind the Site-to-Site connection is to be accessed from the internal network via HTTP, the transparent HTTP proxy may filter the packets.
This can lead to errors while accessing the target.
To prevent this from happening, a rule Exclude must be created in the Area Transparent mode button Add transparent rule menu with source internal-network to target name-vpn-network-object and protocol HTTP.
Troubleshooting


