Jump to:navigation, search
Wiki


notempty
Dieser Artikel bezieht sich auf eine nicht mehr aktuelle Version!

notempty
Der Artikel für die neueste Version steht hier

notempty
Zu diesem Artikel gibt es bereits eine neuere Version, die sich allerdings auf eine Reseller-Preview bezieht


    • Tab General → Button Add TAP }}


De.png
En.png
Fr.png


Configuration of SSL-VPN Roadwarrior connections
Last adaptation to the version: 12.4.0
New:
notempty
This article refers to a Resellerpreview

12.2.2 12.2 11.8.7 11.7.1 11.7 11.6.12

Access: UTM-IP:Port or UTM-URL:Port
Port as configured at Network / Appliance Settings / Webserver
Default-Port: 11115
i.e.: https://utm.ttt-point.de:11115
Default: https://192.168.175.1:11115
→ VPN →SSL-VPN


Introduction

A roadwarrior connection links individual hosts to the local network. This allows, for example, a field worker to connect to the headquarters network.
SSL-VPN uses the TLS/SSL standard to encrypt the connection.

Multiple clients can be connected with a SSL-VPN Roadwarrior connection on the UTM.

There is a separate article for creating certificates on the UTM: Certificates


Preparations

A CA, a server certificate and a user certificate are required for setting up the roadwarrior.
These certificates can also be created during setup if necessary.


Internal hostname resolution in SSL-VPN

If servers in the SSL-VPN are to be accessible to Roadwarrior under their host name, the following settings are required:


Push DNS/WINS

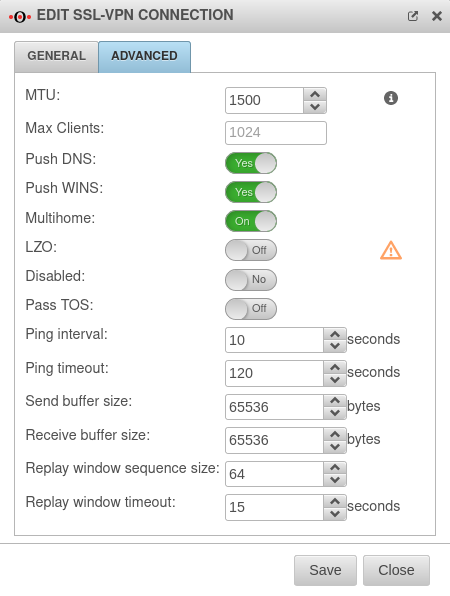
In order for DNS/WINS to be transmitted, the configured VPN connection must be edited and enabled in the Advanced tab.

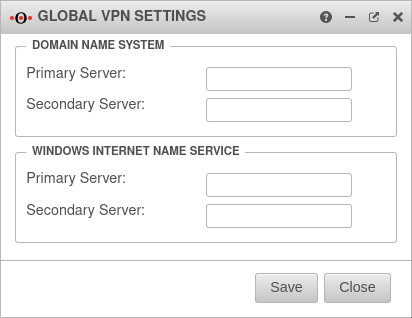
UTM v12.2 VPN Globale VPN-Einstellungen-en.png
Enter the IP of the DNS server in the UTM network as the primary DNS server / WINS server.
UTM v12.4 DNS-WINS aktiviert-en.png
In order for DNS/WINS to be transmitted, the configured VPN connection must be edited and enabled in the Advanced tab.


Search Domain

If available, enter domain.

UTM v12.4 SSL-VPN Allgemeine Search-Domain-en.png
Predefine Search Domain


Block Outside DNS

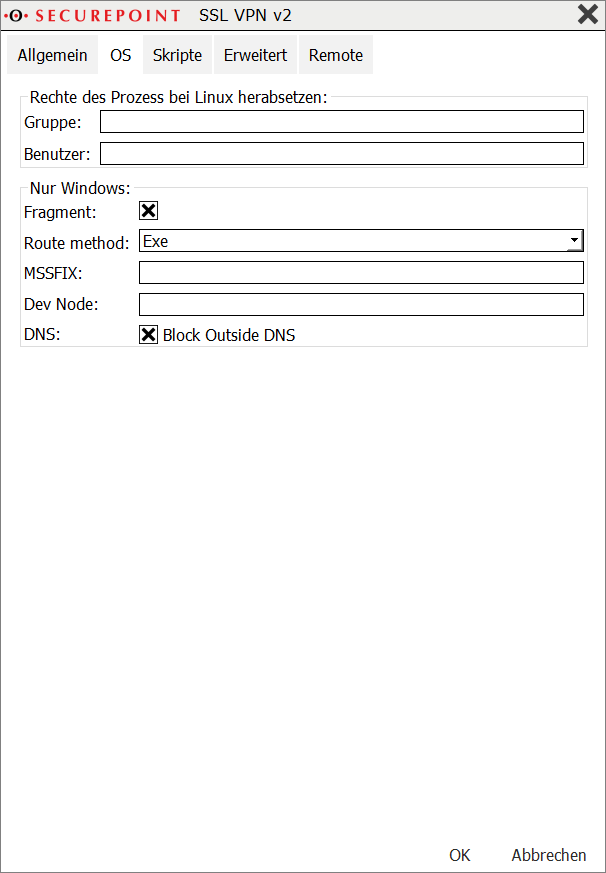
For some Windows 10 clients, it may be necessary to set the "block-outside-dns" option in the configuration of the SSL-VPN client:
Right click on the desired connection in the Securepoint SSL-VPN Client, menu  Settings Advanced button tab OS Entry DNS  Block Outside DNS

SSL-VPN Client Einstellungen OS.png


Roadwarrior configuration

Setup Wizard

After the login on the firewall's administration interface (by default: https://192.168.175.1:11115), the setup wizard can be called up with → VPN →SSL-VPN Button Add SSL-VPN connection.


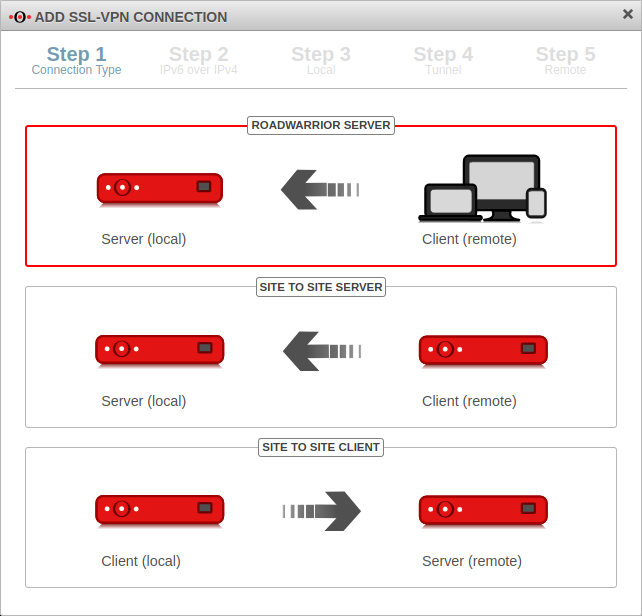
Step 1
UTM v11.8.8 VPN SSL-VPN Roadwarrier Schritt1-en.png
In installation step 1, the connection type is selected.
The following connections are available.
  • Roadwarrior Server
  • Site to Site Server
  • Site to Site Client

For the configuration of the Roadwarrior Server this one is selected.

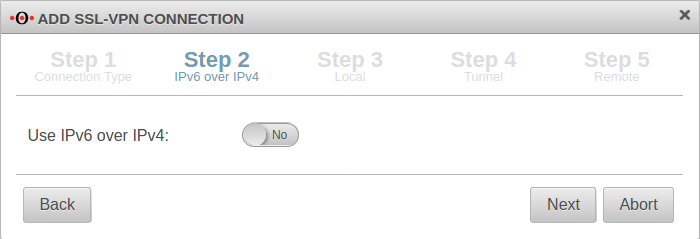
Step 2
UTM v11.8.7 VPN SSLVPN S2Ss2-en.png
If IPv6 is to be used in the source and destination network, this must be enabled here.
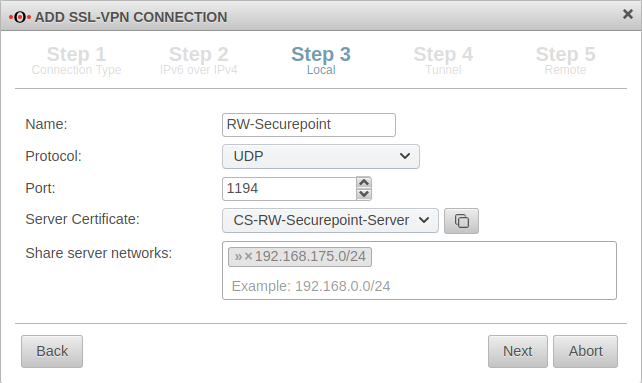
Step 3

Local settings for the Roadwarrior server can be made in step 3.

Caption Value Description
Name: RW-Securepoint Distinctive label, freely selectable
Protocol: UDP Desired protocol
Port: 1194Link= Default port for the first SSL-VPN connection. May not be used for any other purpose. For further connections, the next free port is selected.
Server certificate: Server certificate Selection of the certificate with which the server authenticates itself.
If there is no server certificate yet, this (and if necessary also a CA) can be created in the certificate management. Call with
  • Creation of a CA in the tab CA with the button Add CA
  • Create a server certificate in the Certificates tab using the Add Certificate.
    Please note: activate Server certificate: Enable
  • Creation of the client certificate with the button Add certificate
  • A separate user certificate should be created for each user
  • .
  • Both certificates (server CS and client CC) must be created with the same CA!
  • The client certificate and the associated CA are also needed to configure the remote peer (client). They must be exported using the button.

  • Further notes in the wiki article on the use of Certificates.
    Share server networks »192.168.175.0/24 Network IP for networks behind the UTM that should be reachable via the SSL-VPN connection (as specified in the wizard in step 3) can be edited.
    UTM v11.8.8 VPN SSL-VPN Roadwarrier Schritt3-en.png
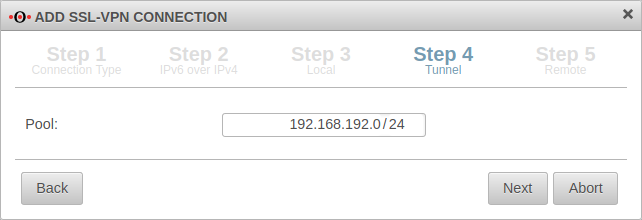
    Step 4
    UTM v11.8.8 VPN SSL-VPN Roadwarrier Schritt4-en.png
    In installation step 4, the transfer network for the Roadwarrior is entered.
    The transfer network can be freely selected, but must be otherwise unused on the UTM.
    Step 5
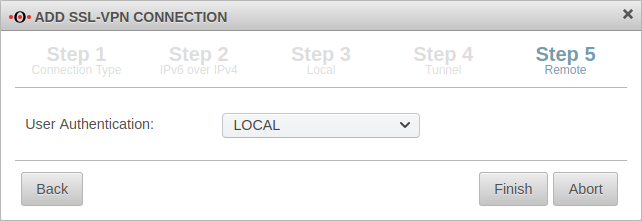
    UTM v11.8.8 VPN SSL-VPN Roadwarrier Schritt5-en.png
    The user authentication is selected in the last step.
    After that, the setup wizard can be completed.
    • None = Authentication only via the certificates.
    • Local = Local users and AD groups.
    • Radius = Radius Server.
    Completion
    UTM v11.8.8 VPN SSL-VPN Roadwarrier Schritt 6-en.png

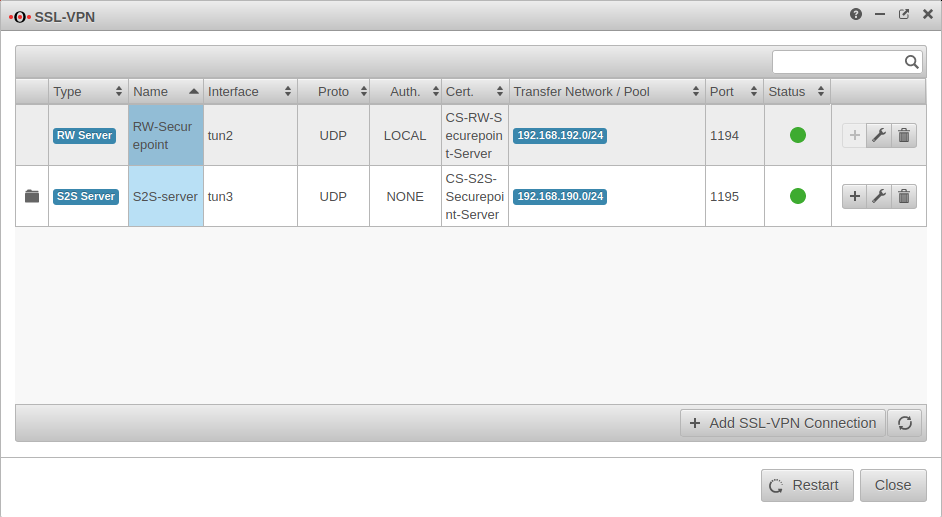
    In the SSL-VPN overview all configured connections are displayed.

    In order for the connection to become active, the SSL-VPN service must be restarted: Restart

  • This will interrupt all SSL-VPN tunnels!
  • Only one Roadwarrior server is needed to connect multiple VPN users!
  • In order for DNS/WINS to be transmitted, the configured VPN connection must be edited and enabled in the Advanced tab.

  • Tab: General
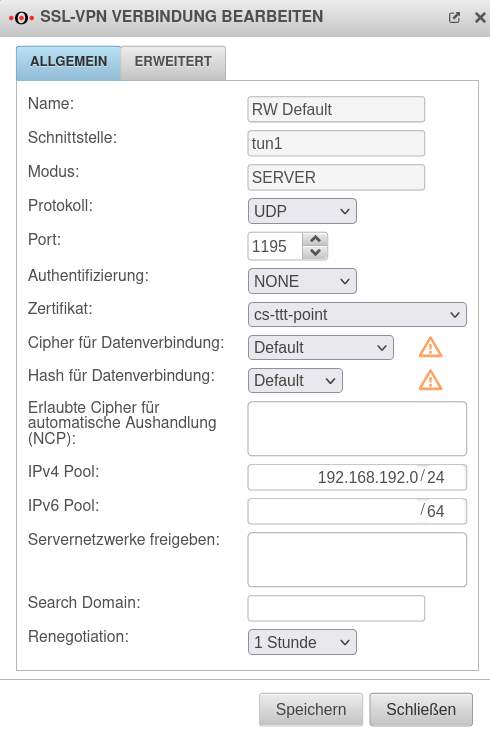
    Caption Value Description UTM v12.4 VPN SSL-VPN RW Reiter Allgemein Einstellungen-en.png
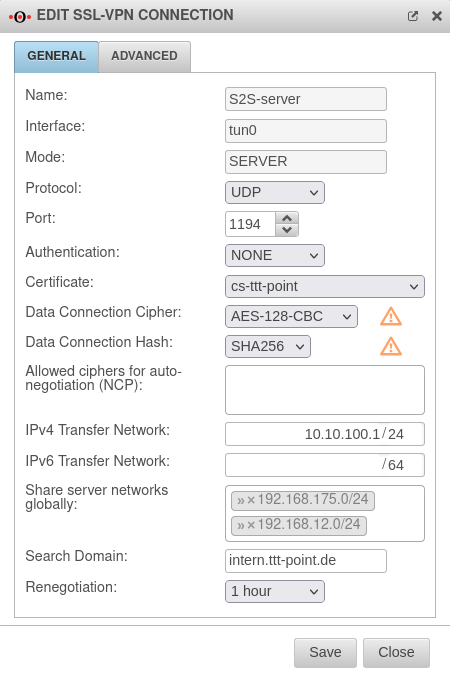
    Name: RW Default Name of the SSL connection
    Interface: tun1 Used interface
    Modus: Server Depending on the connection type (as selected in step 1 of the wizard)
    Protocol: UDP (Default)
    TCP
    Select preferred protocol (UDP and TCP can be limited to IPv4 or IPv6 respectively).
    Port: 1194Link= Default port for the first SSL-VPN connection. May not be used for any other purpose. For further connections, the next free port is selected.
    Authentication: NONE (Default)
    LOCAL
    RADIUS
    Select appropriate authentication method
    Certificate: cs-ttt-point The used certificate can be changed here
    Cipher for data connections: Default Default settings of OpenSSL are used.
    All remote stations must use the same cipher!
    BF-CBC DES-EDE-CBC DES-EDE3-CBC CAST5-CBC AES-128-CBC AES-192-CBC AES-256-CBC AES-128-GCM AES-192-GCM AES-256-GCM
    Hash for data connection: Default Default settings of OpenSSL are used.
    All remote stations must use the same hash procedure!
    SHA1 SHA224 SHA256 SHA384 SHA512 whirlpool
    New as of 12.4
    Allowed ciphers for automatic negotiation (NCP):
    ×AES-192-CBC Individual ciphers can be selected from a list
    IPv4 Pool: 192.168.192.0/24 Enter pool address
    IPv6 Pool: /64 Enter pool address
    Share server networks:     Network IP for networks behind the UTM that should be reachable via the SSL-VPN connection (as specified in the wizard in step 3) can be edited.
    Search Domain:     If available, enter domain.
    Renegotiation: Never
    1 Hour (Default)
    2 Hous
    4 Hous
    8 Hous
    12 Hous
    Time period from which the connection will be rebrokered.
    Save Saves the settings
    Extended
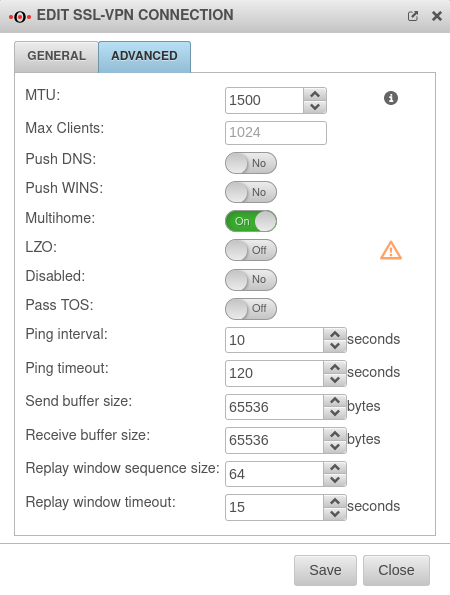
    MTU: 1500Link= Maximum transmission unit of the largest packet (byte) UTM v12.4 VPN SSL-VPN Erweitert Default Einstellungen-en.png
    Maximum Clients: 1024
    Maximum number of clients
    If no value is specified, the default value of 1024 applies
    Transmit DNS: No Allows DNS transmission
    Transmit WINS: No Allows the WINS transmission
    Multihome: On Allows the use of multiple default routes
    LZO: Of LZO compression
    After changing this option, the corresponding client remote stations must adjust their configuration!
    Deaktiviert: No
    Pass TOS: Of Allows forwarding of TOS packets
    Ping Intervall: 10Link= Seconds Interval of the ping requests
    Ping waiting time: 120Link= Seconds
    Outgoing buffer size: 65536Link= Bytes
    Incoming buffer size: 65536Link= Bytes
    Replay window sequence size: 64Link=
    Replay window waiting time: 15Link= Seconds
    Save Saves the settings


    Policy

    Implied rules
    UTM v11.8.8 SSL-VPN RW-Implied-Rules-en.png

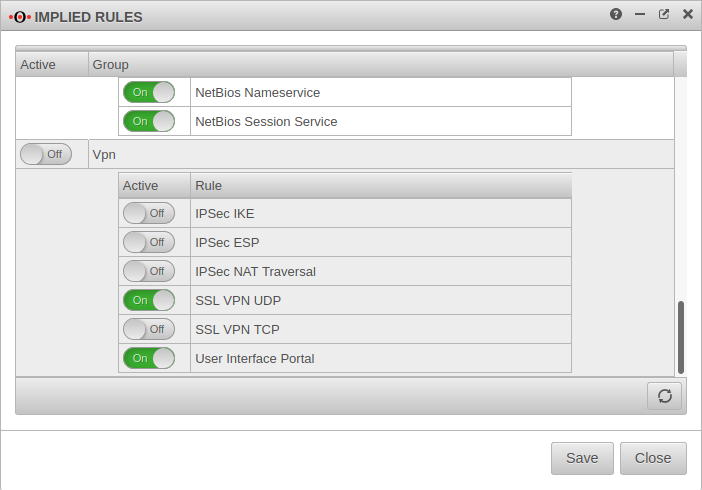
    Under → Firewall →Implied rulesTab VPN the protocol used for the connection can be enabled.

    In the example On SSL-VPN UDP

    This Implicit rule frees the ports used for SSL-VPN connections on the WAN interface.
    If the user is to download the client from the user interface, this must be additionally enabled here:
    On User Interface Portal

    If necessary, the user interface must be placed on a different port, if port 443 has been forwarded to an internal server.


    Network objects

    A TUN interface was created when the connection was set up. It automatically receives the first IP from the transfer network configured in the connection and a zone "vpn-ssl-<servername>".

    The Roadwarrior clients will receive an IP from this network and will be located in this zone.
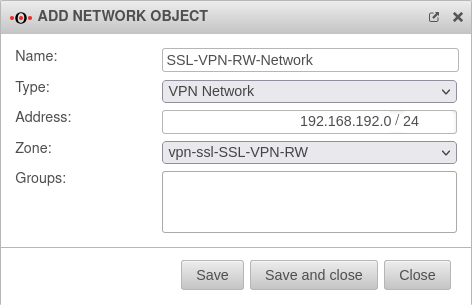
    To grant the roadwarriors access to your own network, a network object must be created.

    Caption Value Description UTM v12.2 Firewall Netzwerkobjekt SSL-VPN-RW-en.png
    Network object for the tunnel network
    Name: SSL-VPN-RW-Network Distinctive label, freely selectable
    Type: VPN network Select suitable type
    Adress: 192.168.192.0/24 The network IP that was specified as the tunnel pool in step 4.
    Zone: vpn-ssl-RW-Securepoint The zone over which the tunnel network is addressed.
    Groups:     Optional assignment to network groups
    Save Saves the settings


    Port filter rule
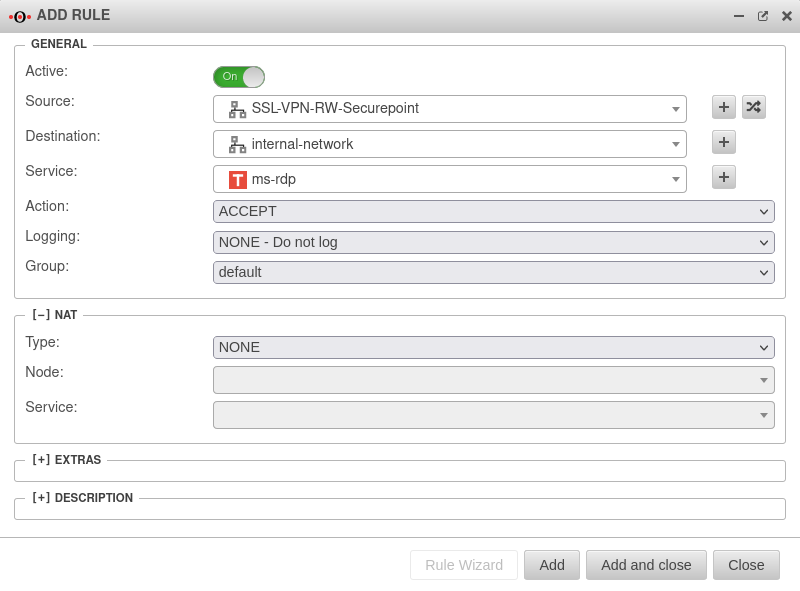
    Menu → Firewall →Port FilterTab Port Filter Button Add Rule
    A rule allows RW clients to access the local network:
    UTM v12.4 Firewall Portfilter SSL-VPN-RW-en.png
    General
    Source SSL-VPN-RW-Network Inbound rule
    Destination internal-network The destination must be internal-network
    Service Tcp.svg ms-rdp Only services that are actually needed should be released!
    Action Accept


    Creating users and groups

    Group
    SSL-VPN settings for the group

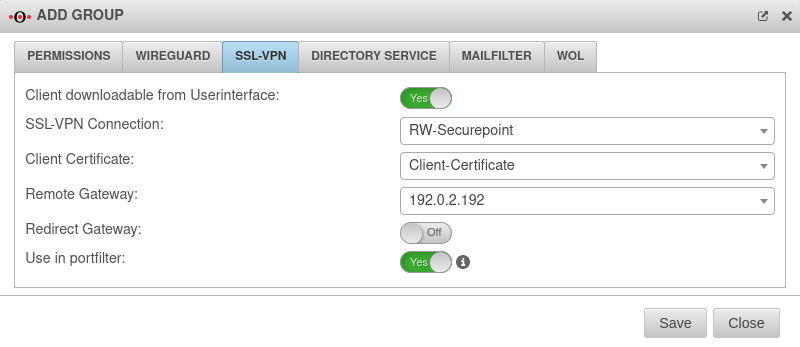
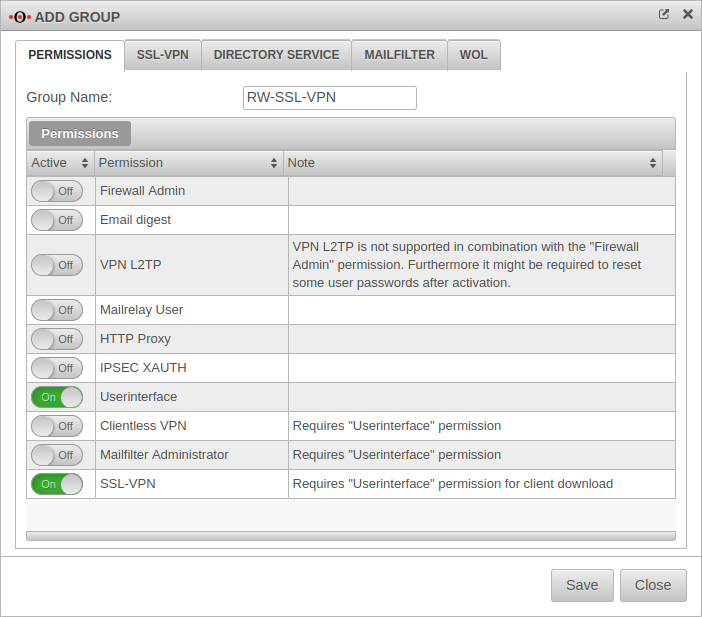
    Under → Authentication →UsersTab Group Button + Add Group.
    The following authorisations must be given:

    • On Userinterface
    • On SSL-VPN

    Settings in SSL-VPN tab UTM v12.4 Authentifizierung Benutzer Gruppe hinzufügen SSL-VPN-en.png
    Client downloadable in the user interface: On Per default over the port 443, so e.g. under https://192.168.75.1 accessible
    SSL-VPN connection: RW-Securepoint Select just created connection
    Client certificate: Client certificate Selection of the client certificate described in Step 3 of the setup wizard.
  • Server and client certificate must be created with the same CA!
  • Remote Gateway: 192.0.2.192 The remote gateway is the address of the external interface. This address must be accessible external.
    Redirect Gateway: Of When activated, requests from roadwarrior clients to the Internet or networks outside the VPN are also redirected via the local gateway. As a result, these connections also benefit from the protection of the UTM.
    Available in the port filter: Ein Enables Identity-Based Firewall (IBF) for SSL-VPN


    User
    If no group assignment was made in the previous step (create a group) in the Directory Service tab, each user must also be created on the UTM.

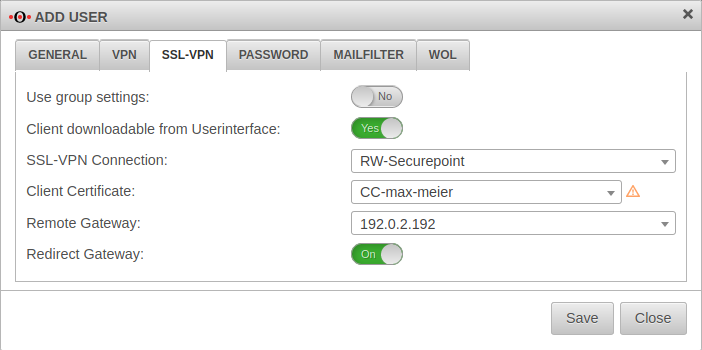
    → Authentication →UserTab User Button Add User or Edit User .

    General UTM v11.8.8 Authentifizierung Benutzer RW-en.png
    SSL-VPN settings for the users
    Groups ×RW-SSL-VPN The user must be assigned the previously created group.
    SSL-VPN
    Use settings from the group On If settings have already been made for the group, these can be adopted here instead of individual values.
    Installer
    Portable Client
    Configuration
    If the information has been saved, the corresponding files can already be downloaded by the administrator at this point.
    Further information on users can be found in the article on User Management.


    The SSL-VPN Client

    Downloading the SSL-VPN client in the user interface

    Userinterface

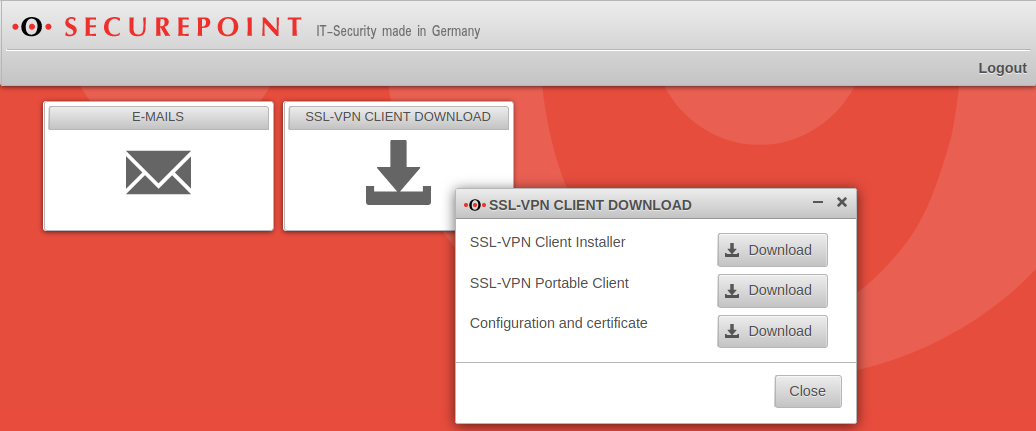
    For users who wish to connect to the UTM via SSL-VPN, the appliance provides a pre-configured SSL-VPN client:
    .

    • This client contains the configuration files and all required certificates.
    • Logon to the user interface of the UTM by default via port 443, e.g. at https://192.168.75.1.
    • The user interface is reached via the internal interface of the Securepoint appliance.
    Access from external users is only possible if the Implied SSL rule is enabled under → Firewall →Implied Rules, which allows access from the Internet to the external interface via HTTPS.


    The client is offered as:

    • SSL-VPN Client Installer
      • The installation must be performed with administrator rights.
      • Required processor architecture: x86 / x64


    • SSL-VPN Portable Client
      • The portable version can be copied to a USB stick, for example, and can thus be run on other computers.
      • This requires administration rights, as a virtual TAP device must be installed and routes set.
      • Required processor architecture: x86 / x64


    • Configuration and certificate
      • For use in other SSL-VPN clients
      • In addition to the SSL-VPN client, the compressed folders contain
      • a configuration file
      • the CA and client certificates
      • and a driver for the virtual TAP network interface.
      • To install the virtual TAP interface, the user needs administrator rights on the machine being used.


    As of Windows 10, older SSL-VPN clients < V2 can no longer be used


    Installation: Hints for the installation can be found on our wiki page for the VPN client.


    Establish SSL-VPN connection as client

    Active SSL-VPN connection

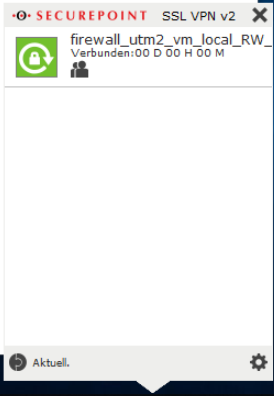
    Double-click on the lock icon in the taskbar to open the SSL-VPN client.
    Start the connection by clicking SSL-VPN-Client-Doppelpfeil.png


    Multiple VPN servers as targets for one connection

    In the settings of a connection under Advanced/Remote additional VPN servers with IP or hostname can be stored as destination.
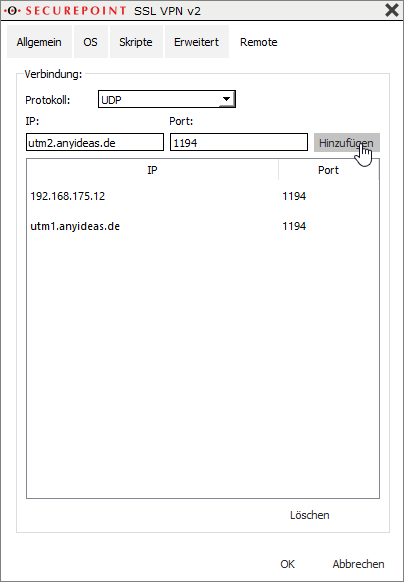
    VPN-Client Remoteziele1.png
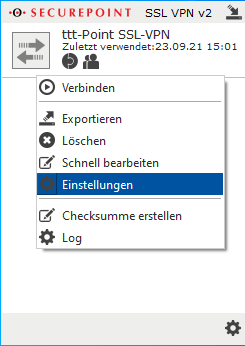
    • Right mouse click on the connection
    • Context menu Settings
    VPN-Client Remoteziele2.png
    • Button Advanced
    VPN-Client Remoteziele3.png
    • IP: utm1.anyideas.de
    • Port: 1194
    Enter host name or IP and port used
    Apply details with  Add 
    Close window with OK.
    VPN-Client Remoteziele UAC.png
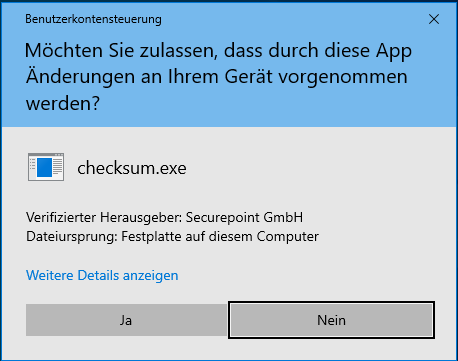
    Confirm UAC user accounts message.


    Use multiple VPN profiles

    Multiple VPN profiles can be imported and used at the same time.
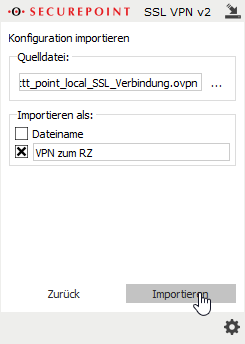
    VPN-Client Profil Import1.png
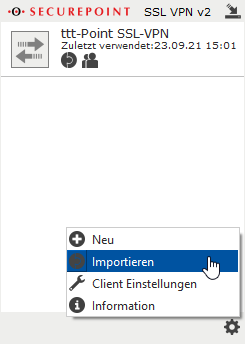
    • Left click on the gear icon in the client window
    • Context menu Import
    VPN-Client Profil Import2.png
    • By clicking ... in the
      source file:
      section, a file in .ovpn format can be selected.
    • In the
      Import as:
      section, either the filename or any custom identifier can be selected, which will then be displayed in the client window for that connection.
    • Finish with the Import button.
    SSL-VPN Client Einstellungen Allgemein.png
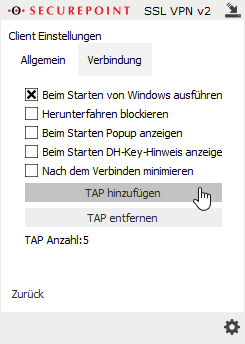
    • If several VPN profiles are to be used simultaneously, additional TAP drivers must be added:
      • Left click on the cogwheel symbol
      • Menu {spc


    • By clicking ... in the
      source file:
      section, a file in .ovpn format can be selected.
    • In the
      Import as:
      section, either the filename or any custom identifier can be selected, which will then be displayed in the client window for that connection.
    • Finish with the Import button.


    Notes

    Encryption

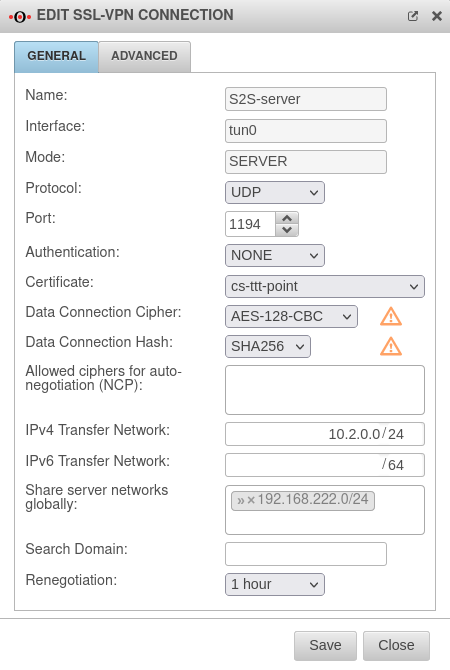
    By default, an AES128-CBC method is used. The encryption method can be customized in the server or/and client profile.

    Adjustment of the default cipher as of v12.2.2

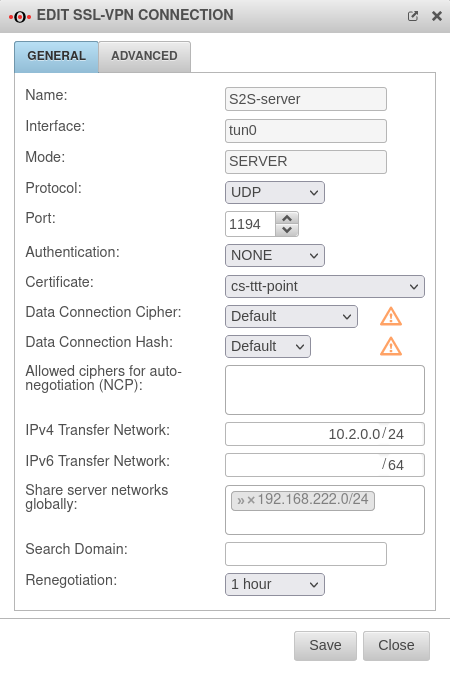
    As of v12.2.2, the Default setting of the Cipher for data connection no longer includes Blowfish-CBC.
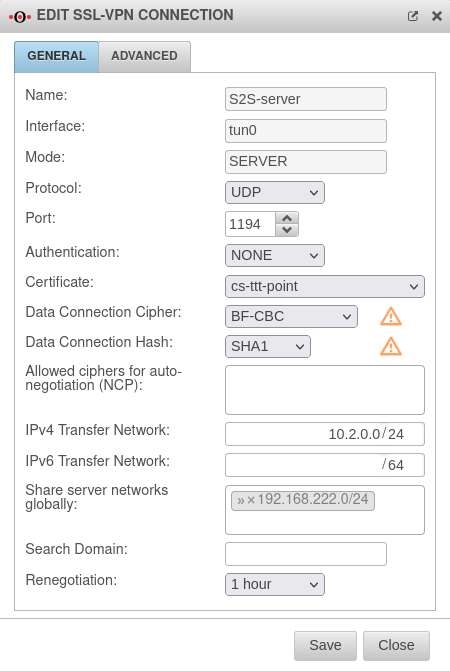
    If the client uses this cipher and is not able to handle NCP, with which the cipher is negotiated automatically, no connection is established. The cipher must be adjusted.
    It is strongly recommended to stop using the BF-CBC cipher because it is considered not secure.
    If the BF-CBC cipher is to be used anyway, it can be selected explicitly.
    Adjustment on the UTM with the button of the respective connection in the General tab in the Cipher for data connection field.

    UTM v12.4 SSL-VPN bearbeiten Default-en.png
    Cipher and hash with default settings
    Not compatible with Blowfish
    UTM v12.4 SSL-VPN bearbeiten Blowfisch-en.png
    Cipher with Blowfish compatible settings
    Not recommended
    UTM v12.4 SSL-VPN bearbeiten AES128-en.png
    Recommended setting


    The parameters must be identical on the server and client side. Otherwise data transfer is not possible.


    Hash method

    By default, a SHA256 hash method is used. The hash method can be customized in the server or/and client profile.

    The parameters must be identical on the server and client side. Otherwise data transfer is not possible.


    QoS

    For the VPN connection, the TOS fields for automatic QoS can be set in the packets. This setting can be enabled in the VPN connection settings under "Advanced".


    Note on upstream routers/modems

    There are always problems with the stability of the connection if a router/modem in front of the appliance also has an active firewall. Please do not use any firewall functionality on these devices.

    It must be ensured that the required ports are forwarded.


    IPv6 for incoming connections

    In the settings of the roadwarrior server , the protocol UDP6 or TCP6 for IPv6 can be activated under General / Protocol.


    Troubleshooting

    For advice on troubleshooting SSL-VPN, see the Troubleshooting Guide SSL-VPN (pdf document).