


Instructions for setting up an IPSec IKEv2 connection with LANCOM routers
New article: 06.2024
notempty
This article refers to a Beta version
-
Preliminary remark
The following shows how to configure an IPSec IKEv2 connection with LANCOM routers and where to find the relevant settings in the router web interface.
The following local example networks should be accessible via the S2S connection:
| Local router network | 172.30.0.0/24 |
| Shared UTM networks | 172.31.2.0/24 & 192.168.250.0/24 |
Configuration of the UTM
notempty
The connection is set up on the UTM as described in the wiki article IPSec Site-to-Site.
The following configurations are then adjusted:
The following configurations are then adjusted:
UTMuser@firewall.name.fqdnVPNIPSec 

Fig.1
The following configurations must be adjusted under Area Connections button :
When using an email address as an ID, it is essential to pay attention to the double @ in front of the email address! (Example: @@mail@anyideas.de)
- MOBIKE must be deactivated
- It is also recommended with regard to gateway IDs:
- with fixed, public IPs on both sides: IP addresses
- in all other cases: Email addresses
UTMuser@firewall.name.fqdnVPNIPSec 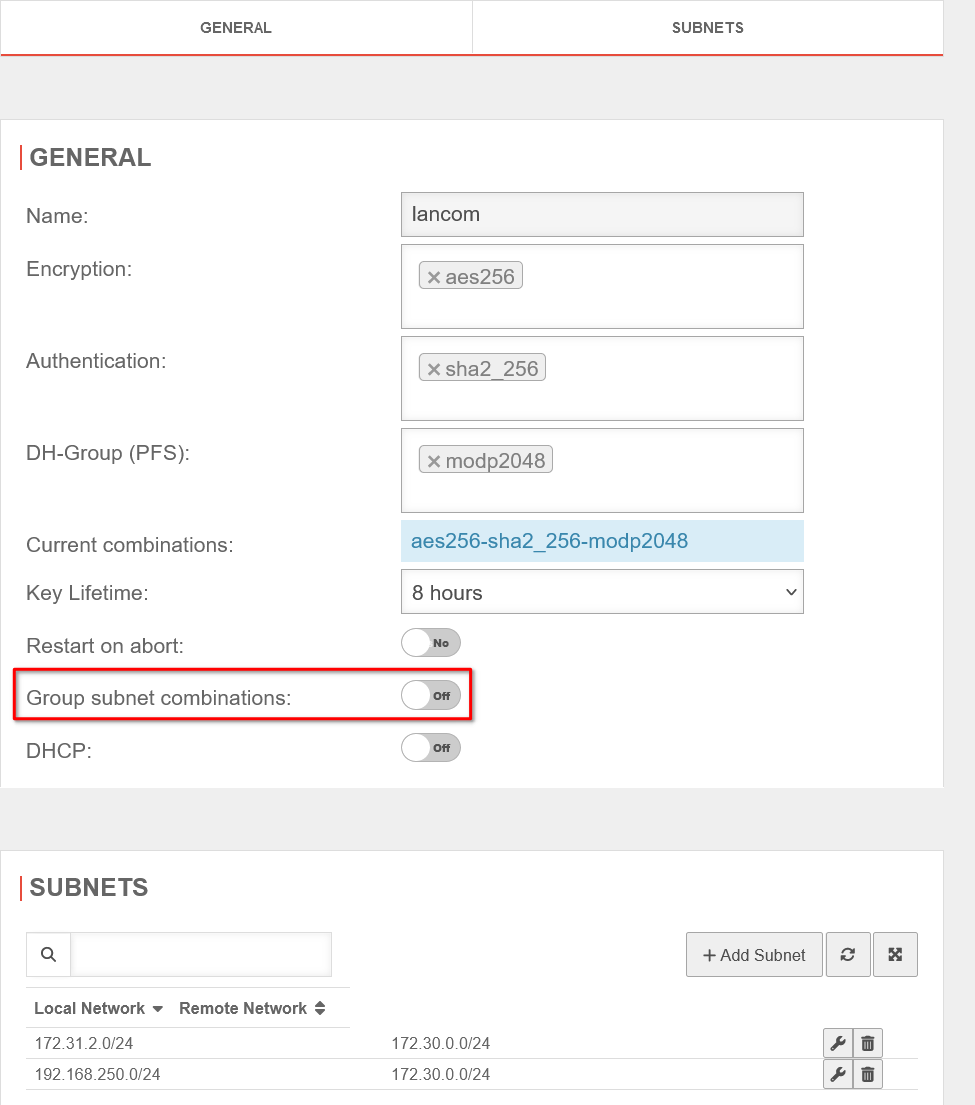

Fig.2
Under Area Connections button the grouping of subnet combinations must be switched off.
Configuration of the LANCOM router
The connection parameters are then configured on the LANCOM router.
To do this, the various data records must first be created. This is done in the web interface of the router, mainly under Configuration → VPN → IKEv2/IPSec, exceptions are the IPv4-Rules and the Routing.
The data records can always be edited by clicking on the name highlighted in blue and new data records can be created using the button, which can be found at the bottom center.

Fig.3
Encryption
Encryption
Here you will find a list of data records that contain cipher suites. It is not absolutely necessary to create your own data set here. The default data set contains the most common ciphers that are also supported by the UTM. However, if the proposal negotiation fails, this would be the first place to troubleshoot.

Fig.4
Authentication
Authentication
The parameters required for authentication in phase 1 are configured here in the unique data records for the corresponding remote station.

Fig.5
Connection-parameters
Connection-parameters
The DPD interval and the target port for UDP encapsulation can be changed here. The default values generally do not need to be changed.

Fig.6
Validity period
Validity period
The lifetimes of the IKE-SA and the child SA(s) are configured here. It is also possible to use the DEFAULT data set, in which case the values (24h phase 1, 4h phase 2) must be transferred to the UTM.

Fig.7
IPv4-Rules
IPv4-Rules
This point corresponds to the subnet configuration in phase 2 on the UTM, i.e. the local and remote subnets are configured here.

Fig.8
A data record must be created here to match the values on the UTM. The corresponding local or remote networks are entered in the corresponding labeled fields, separated by spaces.

Fig.9
Connection list
Connection list
Now that all the data records required to configure the connection have been created, a new connection can be created and configured using the button.

Fig.10
For this connection, the appropriate data records must now be selected for the following points:
In addition, the VPN registration must be configured manually 5 with the previously created data set 6.

Fig.11
Routing
Routing
Finally, routing entries must be created here for the remote subnets 1 with the corresponding IPSec connection as router 2, as the corresponding policy-based routing is not automatic, unlike with the UTM.
Checking/troubleshooting
| You can see whether a configured connection has been established in the dashboard in the "VPN" line (scroll down a little if necessary). |  Dashboard
|
| In addition, the actions of the router can be tracked under System information → Syslog to identify possible problems. |  Syslog
|
Location of relevant settings in the router web interface
| The following table shows where the settings known from the UTM can be configured in the web interface of the Lancom router. notempty
$NAME is a placeholder for the name of a data record that must be opened by clicking on it. | |
Phase 1GeneralGeneral
| |
| Bezeichnung Securepoint UTM | Bezeichung Lancom |
|---|---|
| Local Gateway | No suitable counterpart available |
| Local Gateway ID | Configuration → VPN → IKEv2/IPSec → Authentication → $NAME → Local identity If this is set, the remote identity type must also be set in any case! |
| Remote Host / Gateway | Configuration → VPN → IKEv2/IPSec → Connection list → $NAME → Remote gateway |
| Remote Host / Gateway ID | Configuration → VPN → IKEv2/IPSec → |
| Authentication method | Configuration → VPN → IKEv2/IPSec → Authentication → $NAME → Local authentication Configuration → VPN → IKEv2/IPSec → Authentication → $NAME → remote authentication |
| Pre-Shared Key | Configuration → VPN → IKEv2/IPSec → Authentication → $NAME → Local password Configuration → VPN → IKEv2/IPSec → Authentication → $NAME → Remote password |
| Starting behavior: Incoming | Configuration → VPN → IKEv2/IPSec → Connection list → $NAME → Hold time: 0 |
| Starting behavior: Outgoing | Configuration → VPN → IKEv2/IPSec → Connection list → $NAME → Hold time: 9999 |
| Dead Peer Detection / DPD Interval | Configuration → VPN → IKEv2/IPSec → Connection-parameters → $NAME → Dead Peer Detection |
IKEIKE
| |
| Encryption | Configuration → VPN → IKEv2/IPSec → Encryption → $NAME → IKE-SA encryption list |
| Authentication | Configuration → VPN → IKEv2/IPSec → Encryption → $NAME → IKE-SA hash list |
| Diffie-Hellman Group | Configuration → VPN → IKEv2/IPSec → Encryption → $NAME → Allowed DH groups |
| IKE Lifetime | Configuration → VPN → IKEv2/IPSec → Validity period → $NAME → IKE SA |
Phase 2GeneralGeneral
| |
| Encryption | Configuration → VPN → IKEv2/IPSec → Encryption → $NAME → Child-SA encryption list |
| Authentication | Configuration → VPN → IKEv2/IPSec → Encryption → $NAME → Child-SA hash list |
| DH Group (PFS) | Configuration → VPN → IKEv2/IPSec → Encryption → $NAME → Allowed DH groups → PFS: Yes |
| Key service life | Configuration → VPN → IKEv2/IPSec → Validity period → $NAME → Child SA |
SubnetSubnet
| |
| Local network | Configuration → VPN → General → IPv4 rules → $NAME → Remote networks |
| Remote network | Configuration → VPN → General → IPv4 rules → $NAME → Local networks |
notempty
Local on one side is always remote on the other side! | |