Last adaptation to the version: 14.0.3
- Default value for the Cipher for data connection updated to ‘'AES-256-GCM’'
Introduction
- SSL-VPN can also be used to establish site-to-site connections. Since this requires the corresponding instance of the service to run explicitly in client or server mode, it is possible to create multiple instances of the SSL-VPN service.
Site-to-Site Server
- This method is used when the remote terminal is the initiator of the connection. For this, the service must explicitly start in server mode.
Site-to-Site Client
- This method is used when the UTM itself is the initiator of the connection. For this, the service must explicitly start in client mode.
Site-to-Site Server Configuration
The BSI recommends—as of January 2025—key lengths of 3000 bits or more and SHA256
BSI – Technical Guideline – Cryptographic Methods: Recommendations and Key Lengths BSI TR-02102-1 | Chapter 2.3: RSA encryption
The default setting of the UTM for new certificates is RSA encryption with 3072 bits and SHA256 as the hash algorithm
SSL-VPN Connection
Set up the connection under button menu.
Installation wizard
Step 1
UTMuser@firewall.name.fqdnVPNSSL-VPN 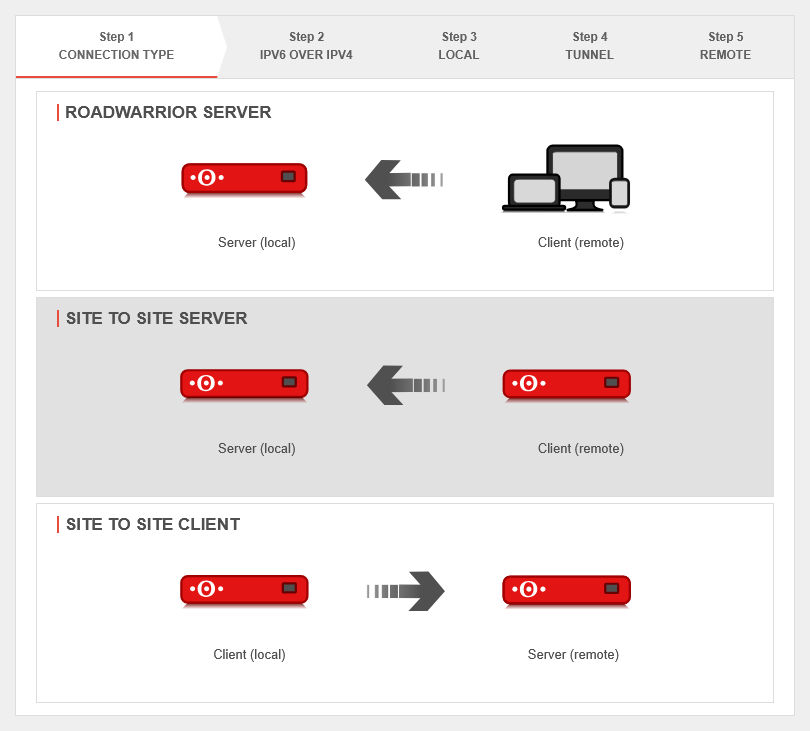 Installation step 1
In installation step 1 the connection type is selected, the following connections are available:
- Roadwarrior Server
- Site-to-Site Server
- Site-to-Site Client
For the configuration of the Site-to-Site server this is selected.
Step 2

If a local IPv6 network is to be connected, the option Use IPv6 over IPv4: must be enabled Yes.
Step 3
Local settings for the site-to-site server
| Caption | Value | Description | 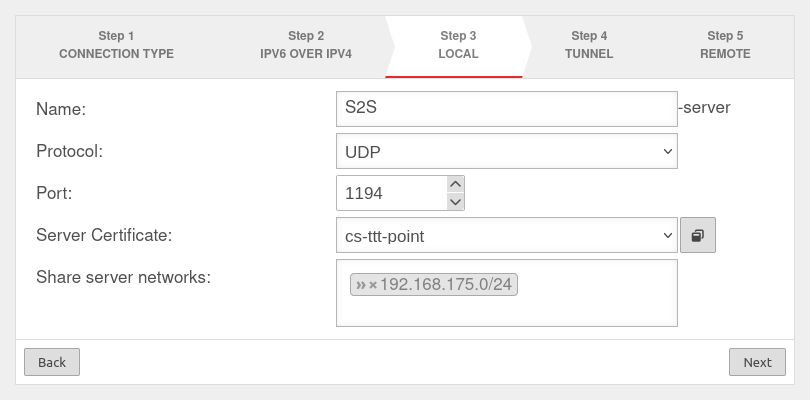 |
|---|---|---|---|
| Name: | S2S-server | Unique name | |
| Protocol: | Choose desired protocol | ||
| Port: | 1194 | Default port for the first SSL VPN connection. May not be used for any other purpose. For further connections, the next free port is selected. | |
| Server certificate: Only certificates with a private key can be selected |
Selection of the certificate with which the server authenticates itself If a server certificate does not yet exist, it can be created (and if necessary also a CA) in the certificate management. Open with
Both certificates must be created with the same CA! The Client certificate and the associated CA are also needed to configure the remote terminal (client). They must be exported with the button. For use with a UTM as client, the -format is required.Further notes in the Wiki article on the use of certificates.
notempty
| ||
| Share server networks: | » 192.168.175.0/24 | Network located at this appliance (VPN server) that is to be accessible via SSL-VPN. | |
Step 4
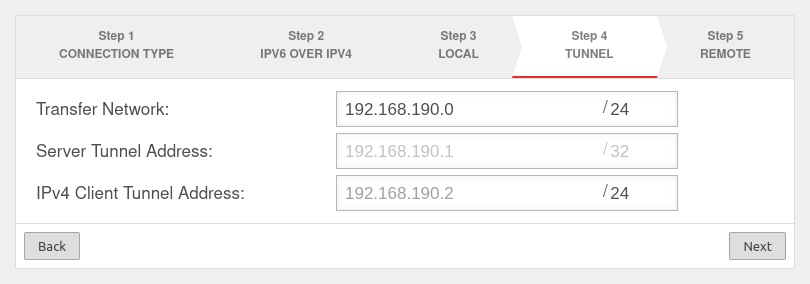
In installation step 4, the transfer network for the site-to-site server is entered.
Step 5
Section General
General S2S Server
Already created SSL VPN connections can be edited under button .
| Caption | Value | Description | UTMuser@firewall.name.fqdnVPNSSL-VPN 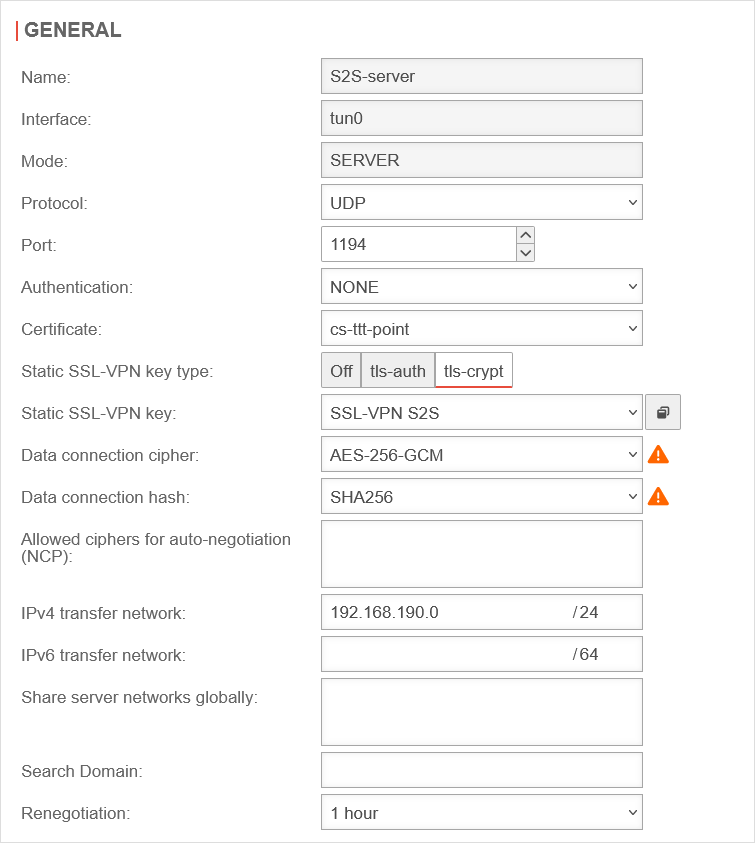 Section General Section General
|
|---|---|---|---|
| Name: | S2S-Server | Name of the SSL connection | |
| Interface: | tun0 | Used interface | |
| Modus: | SERVER | Depending on connection type | |
| Protocol: | (Default) |
Select preferred protocol (UDP and TCP can each be limited to IPv4 or IPv6). | |
| Port: | 1194 | Default port for the first SSL VPN connection. May not be used for any other purpose. For further connections, the next free port is selected. | |
| Authentication: | (Default) |
Select the appropriate authentication method | |
| Certificate: | The certificate used can be changed here
notempty
| ||
| Static SSL-VPN key type: |
| ||
| Static SSL-VPN key: notempty New as of v12.6.1 |
Key for securing the connection The remote terminal must use the same key! The key is created on one side and then must be copied to the other side | ||
| Open key management | Opens the key management interface to create a key | ||
| Data Connection Cipher: | AES-256-GCM is used by default notempty Since v14.0.3 notempty The remote peer must use the same cipher! | ||
| Data Connection Hash: | Default settings of OpenSSL are used. notempty The remote terminal must use the same hash! | ||
| Allowed ciphers for auto-negotiation (NCP): | Individual ciphers can be selected from a list | ||
| IPv4 Transfer network: | 192.168.190.0/24 | Enter pool address | |
| IPv6 Transfer network: | /64 | Enter pool address | |
| Share server networks globally: | Network IP for networks behind the UTM that are supposed to be accessible via the SSL VPN connection can be edited. | ||
| Search Domain: | Alternatives: 1. Always write out the domain in full | ||
| Renegotiation: | (Default) |
Period of time from which the connection is rebrokered | |
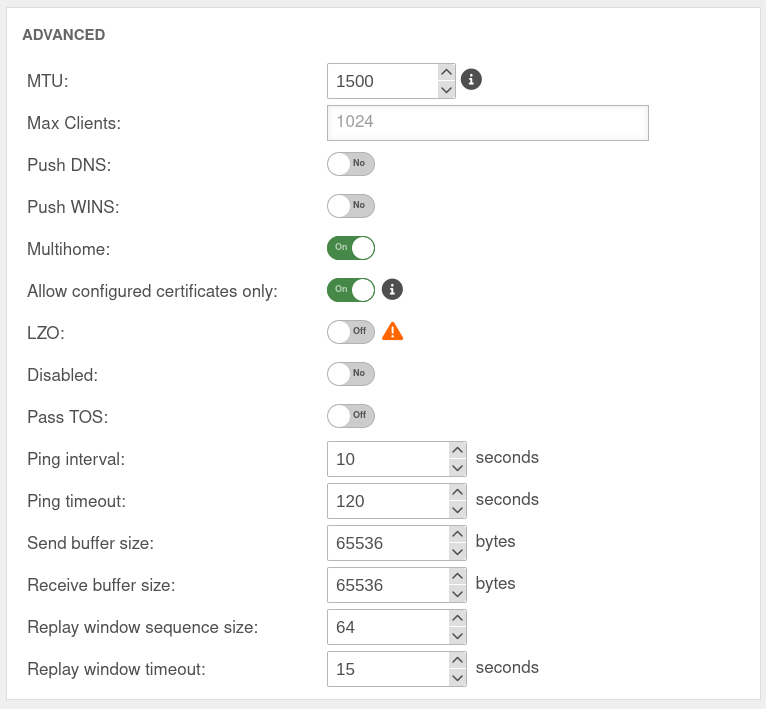
Section Advanced
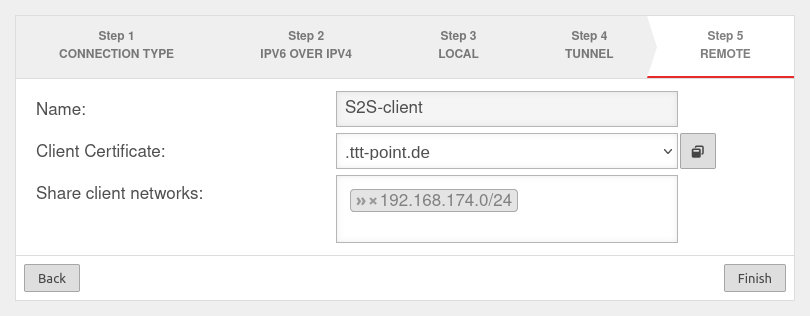
Other client remote terminals
UTMuser@firewall.name.fqdnVPN 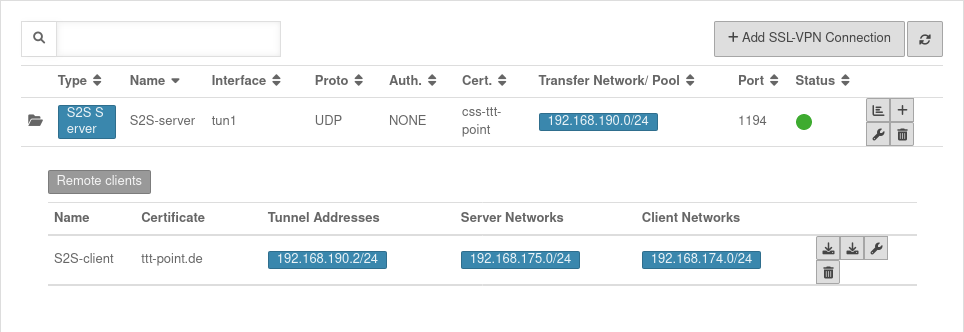 Overview of SSL-VPN connections
Additional remote sites that are to be connected via this site-to-site server can be added via the button.
Display of remote sites by clicking on the folder icon .
UTMuser@firewall.name.fqdnVPNSSL-VPN 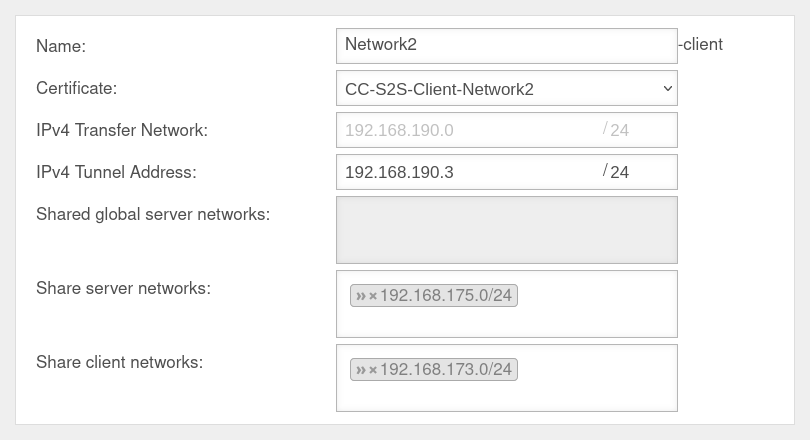 Other remote terminals of the S2S-SSL-.VPNs
Rulebook
Implied rules
UTMuser@firewall.name.fqdnFirewall 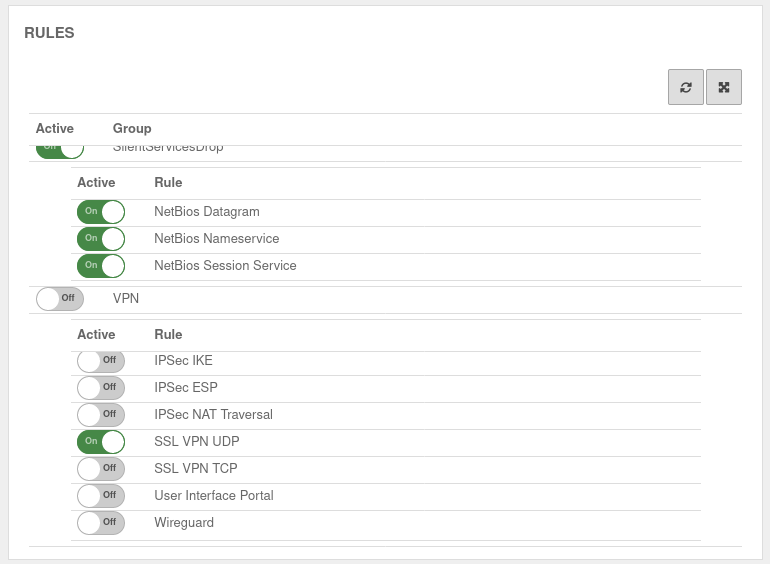 Implied rules
Under section VPN the protocol used for the connection can be enabled. Here On SSL-VPN UDP. This implicit rule frees the ports used for SSL-VPN connections on the WAN interface.
Network objects
A TUN interface was created when the connection was set up. It automatically receives the first IP from the transfer network configured in the connection and a zone "vpn-ssl-<servername>".
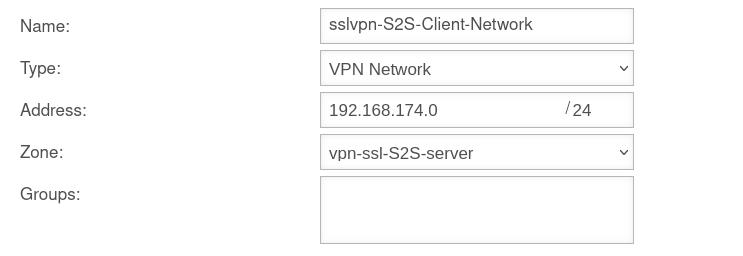
To be able to reach the client network of the remote terminal, a network object must be created under button .
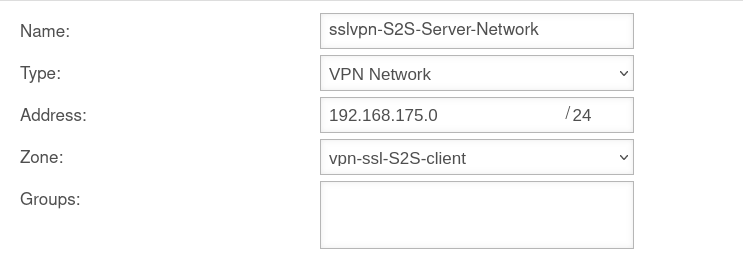
The TUN interface of the site-to-site client also receives an IP from this network. This serves as a gateway to the subnet of the site-to-site client. The subnet of the client must be created as a network object and is located in the zone on the associated TUN interface.
Packetfilter rules
UTMuser@firewall.name.fqdnFirewall 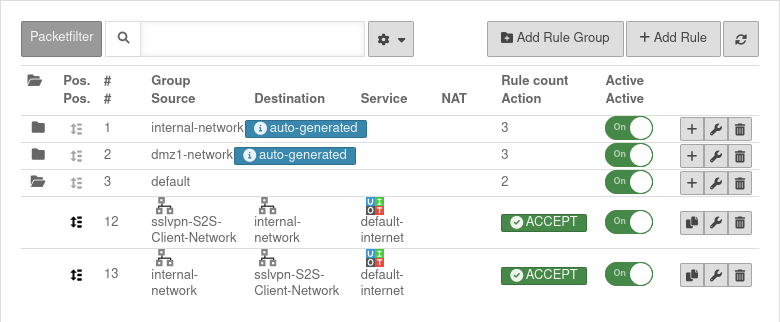 Packetfilter rules
Menu Button
Two rules allow access to or from the S2S client network:
Routen
The routes are set automatically.
However, when using VoIP through the tunnel, routes should be set to ensure that the phones connect correctly to the PBX.
Menu Area Routing button .
A route should be set so that the network of the remote terminal can be found reliably.
Site-to-site client configuration
SSL-VPN Connection
Installation wizard
The BSI recommends—as of January 2025—key lengths of 3000 bits or more and SHA256
BSI – Technical Guideline – Cryptographic Methods: Recommendations and Key Lengths BSI TR-02102-1 | Chapter 2.3: RSA encryption
The default setting of the UTM for new certificates is RSA encryption with 3072 bits and SHA256 as the hash algorithm
Step 1
UTMuser@firewall.name.fqdnVPNSSL-VPN 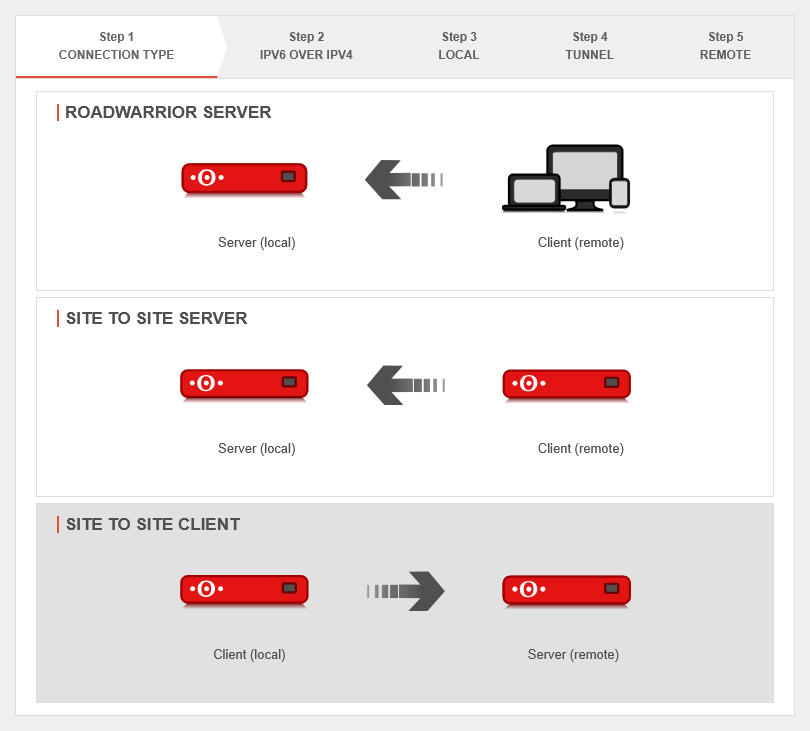 Installation step 1
In installation step 1 the connection type is selected, the following connections are available:
- Roadwarrior Server
- Site-to-Site Server
- Site-to-Site Client
For the configuration of the Site-to-Site Client this is selected.
Step 2

If a local IPv6 network is to be connected, the option Use IPv6 over IPv4: must be enabled Yes.
Step 3
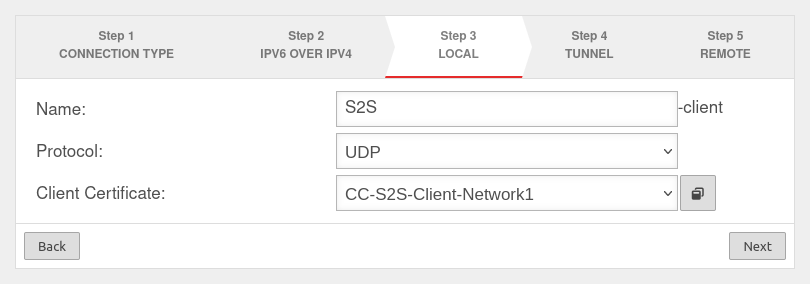
Local settings for the Site-to-Site Client can be made in step 3. Here you can enter a name for the connection, select protocol, choose a server certificate - by clicking the button with the window you can import a CA and a certificate.
Step 4
This installation step is omitted for the site-to-site client.
Step 5
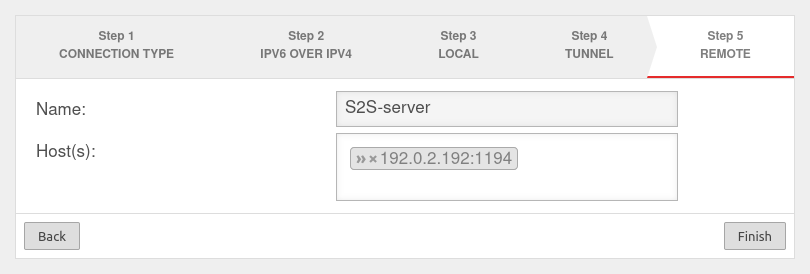
notempty
If port 1194 is used, this specification can be omitted.
Section General
General S2S Client
Already created SSL VPN connections can be edited under button .
| Caption | Value | Description | UTMuser@firewall.name.fqdnVPNSSL-VPN 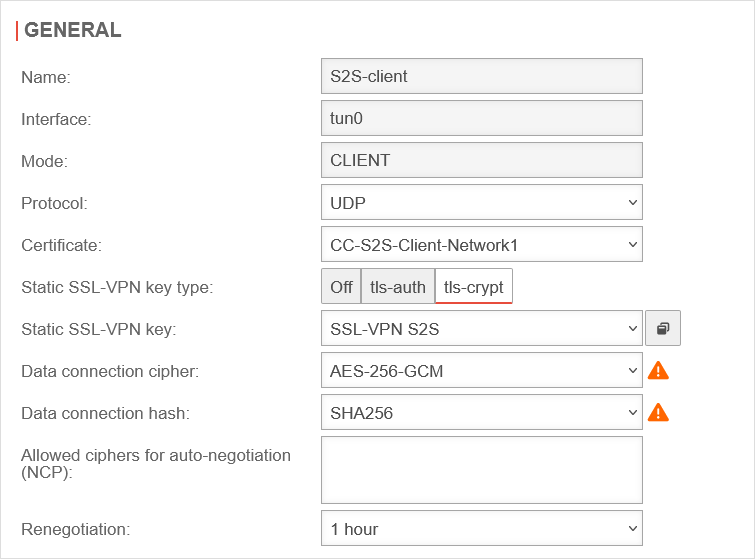 Section General Section General
|
|---|---|---|---|
| Name: | S2S-client | Name of the SSL connection | |
| Interface: | tun4 | Used interface | |
| Modus: | CLIENT | ||
| Protocol: | (Default) |
Choose desired protocol | |
| Certificate: | The certificate used can be changed here
notempty
| ||
| Static SSL-VPN key type: notempty New as of v12.6.1 |
| ||
| Static SSL-VPN key: notempty New as of v12.6.1 |
Key for securing the connection | ||
| Data Connection Cipher: | AES-256-GCM is used by default notempty Since v14.0.3 notempty The remote peer must use the same cipher! | ||
| Data Connection Hash: | Default settings of OpenSSL are used. notempty The remote terminal must use the same hash! | ||
| Allowed ciphers for auto-negotiation (NCP): | Individual ciphers can be selected from a list | ||
| Renegotiation: | (Default) |
Period of time from which the connection is rebrokered | |
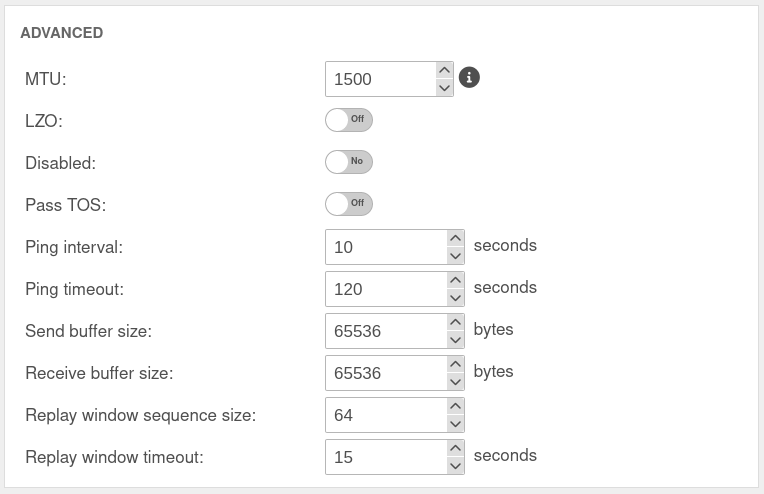
Section Advanced
S2S Client Rulebook
S2S Client Implied rules
Since the site-to-site client establishes the connection to the S2S server and outgoing connections from the firewall itself are always allowed by default, no implicit rules are necessary.
S2S Client Network objects
A new network object can be created under button .
S2S Client Packetfilter rules
UTMuser@firewall.name.fqdnFirewall 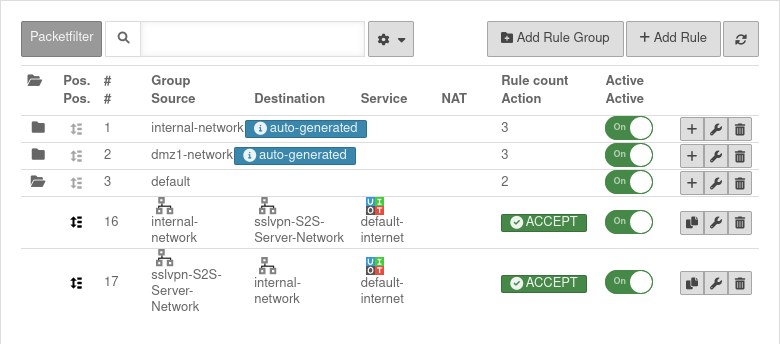 Packetfilter rules in the
Menu button .
Two rules allow access to or from the S2S server network or from the network:
| # | Source | Destination | Service | NAT | Action | Activ | |||
| 5 | Accept | On | |||||||
| 4 | Accept | On |
S2S Client Routen
The routes are set automatically.
However, when using VoIP through the tunnel, routes should be set to ensure that the phones connect correctly to the PBX.
Menu Area Routing button .
A route should be set so that the network of the remote terminal can be found reliably.
Note
Multipath
For multipath on the client side, the VPN connection in the client must be bound to an interface.
To bind a client connection to an interface, the CLI command must be used openvpn get to locate the ID of the connection.
The command openvpn set id $ID_DES_TUNNELS local_addr $IP_DES_INTERFACES can then be used to set the outgoing IP.
In addition, a rule route via the corresponding tunX interface is required in the outgoing rule (internal-network → VPN network → $DIENST).
The transparent HTTP proxy
When accessing a server behind the site-to-site connection from the internal network via HTTP, the transparent HTTP proxy may filter the packets. This can lead to errors in the accesses to the target.
To prevent this from happening a rule must be added in the Area Transparent Mode button menu:
|
UTMuser@firewall.name.fqdnApplicationHTTP-Proxy | |
| Protocol: | |
| Type: | |
| Source: | |
| Destination: | |
Connection Rate Limit
Throttling of access from certain source IPs to recurring ports
notempty
The function can initially only be configured via the CLI
SSL-VPN accesses can be protected against aggressive scans or login attempts, for example.
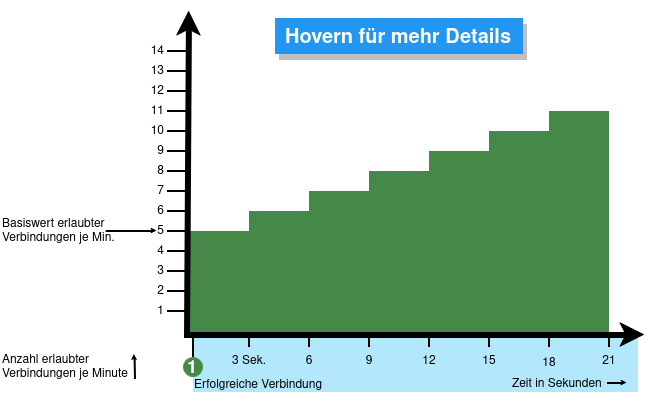
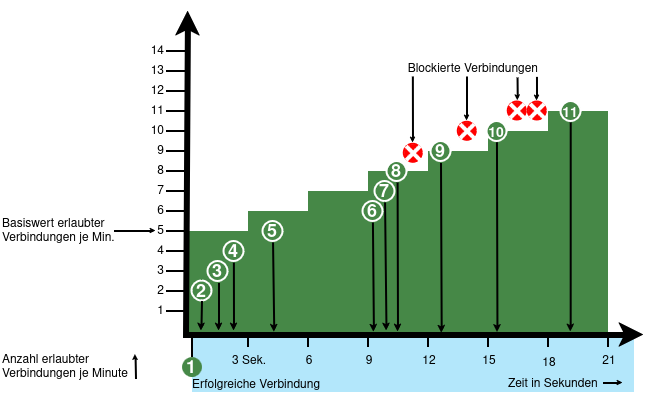
From v12.6.2, the UTM can limit the number of TCP and/or UDP connections from an external IP address to one port.
The following conditions apply:
- Only incoming connections for which a default route exists are monitored
- The connections from an IP address to a port of the UTM are counted within one minute
- When activated, 5 connections / connection attempts per minute are permitted.
The connections are then limited:- The additionally permitted connections are distributed evenly within 60 seconds of the first connection.
- With a CONNECTION_RATE_LIMIT value of 20, an additional connection is added every 3 seconds.
- 10 seconds after the first login, 3 further connections could be established (each from the same IP address to the same destination port)
- Blocking an IP address only affects access to the port that has been used too often.
Other ports can still be accessed.
- The function is activated by default for new installations on 20 UDP connections / minute on all ports
- For Updates the function must be manually activated
| extc-Variable | Default | Description |
|---|---|---|
| CONNECTION_RATE_LIMIT_TCP | 0 | Number of permitted TCP connections of an IP address per port 0 = Function deactivated, no blocking is performed |
| CONNECTION_RATE_LIMIT_TCP_PORTS | Ports to be monitored. Empty by default=all ports would be monitored (if activated). Individual ports are separated by spaces: [ 1194 1195 ] | |
| CONNECTION_RATE_LIMIT_UDP | 20 / 0 Default setting for new installations from v12.6.2: 20 For update installations the value is 0, so the function is deactivated. |
Number of permitted UDP connections of an IP address per port |
| CONNECTION_RATE_LIMIT_UDP_PORTS | Ports to be monitored. Empty by default=all ports are monitored (only for new installations!). Individual ports are separated by spaces: [ 1194 1195 ] |
Configuration with CLI commands
| CLI command | Function |
|---|---|
| extc value get application securepoint_firewall Alternatively as root user: spcli extc value get application securepoint_firewall | grep RATE |
Lists all variables of the securepoint_firewall application. The variables beginning with CONNECTION_RATE_LIMIT_ are responsible for the connection limit. application |variable |value --------------------+-------------------------------+----- securepoint_firewall |… |… |CONNECTION_RATE_LIMIT_TCP |0 |CONNECTION_RATE_LIMIT_TCP_PORTS| |CONNECTION_RATE_LIMIT_UDP |20 |CONNECTION_RATE_LIMIT_UDP_PORTS| |
| extc value set application securepoint_firewall variable CONNECTION_RATE_LIMIT_TCP value 20 system update rule |
Limits the allowed number of TCP connections from a single IP address to a specific port to 20 per minute
A change is made directly by a rule update. The value must not be set to 0 first! |
| extc value set application securepoint_firewall variable CONNECTION_RATE_LIMIT_TCP value 0 system update rule |
Deactivates the monitoring of TCP connections |
| extc value set application securepoint_firewall variable CONNECTION_RATE_LIMIT_TCP_PORTS value [ 443 11115 ] system update rule |
Restricts the monitoring of TCP connections to ports 443 and 11115 There must be spaces before and after the square brackets [ ]! |
| extc value set application securepoint_firewall variable CONNECTION_RATE_LIMIT_TCP_PORTS value [ ] system update rule |
There must be spaces before and after the square brackets [ ]! |
| extc value set application securepoint_firewall variable CONNECTION_RATE_LIMIT_UDP value 20 system update rule |
Limits the allowed number of UDP connections from a single IP address to a specific port to 20 per minute Default setting for new installations from v12.6.2: 20 For update installations the value is 0, so the function is deactivated. The value must not be set to 0 first! |
| extc value set application securepoint_firewall variable CONNECTION_RATE_LIMIT_UDP value 0 system update rule |
Deactivates the monitoring of UDP connections |
| extc value set application securepoint_firewall variable CONNECTION_RATE_LIMIT_UDP_PORTS value [ 1194 1195 ] system update rule |
Restricts the monitoring of UDP connections to ports 1194 and 1195. (Example for 2 created SSL-VPN tunnels). There must be spaces before and after the square brackets [ ]! |
| extc value set application securepoint_firewall variable CONNECTION_RATE_LIMIT_UDP_PORTS value [ ] system update rule |
There must be spaces before and after the square brackets [ ]! |
extc value set application securepoint_firewall variable CONNECTION_RATE_LIMIT_TCP value 20 notempty Finally, the CLI command system update rule must be entered so that the values in the rules are applied. |
For example, to allow a maximum of 20 connections per minute per IP address and port. For TCP, monitoring is restricted to ports 443 and 11115. All ports are monitored for UDP connections. |


