This article includes descriptions of third-party software and is based on the status at the time this page was created.
Changes to the user interface on the part of the manufacturer are possible at any time and must be taken into account accordingly in the implementation.
All information without warranty.


Last adaptation to the version: 2.17 (05.2026)
- Betriebsmodus wird beim Enrollment automatisch eingestellt
- Beschreibung des Betriebsmodus BYOD
- Nach einem BYOD-Enrollment wird ein Geräteeigentümer ausgewählt
- COBO: Die AGBs müssen nicht mehr bei jeden Geräteenrollment einzeln akzeptiert werden und der Abschnitt ABGs und Lizenz ist obsolet
- Es muss eine Default-Lizenz ausgewählt werden, bevor das Enrollment von iOS Geräten starten kann
Introduction
This HowTo describes the enrollment of iOS / iPad devices in the Securepoint Mobile Security Portal. This integrates these iOS / iPad devices into the Securepoint Mobile Device Management (MDM) portal.
The device profile, users and apps can be assigned in advance, even though the device is not yet fully registered with MDM.
As soon as the iOS / iPad device is connected to the Internet and initialised, these configurations are automatically downloaded and implemented.
Auswahl des Betriebsmodus
Der Betriebsmodus des iOS-/iPad-Gerätes wird automatisch beim Enrollment ermittelt
Folgende Betriebsmodi sind möglich:
- BYOD: Bring your own device - Privates Gerät mit beruflicher Nutzung
- COBO: Company owned, business only - Firmeneigentum ohne private Nutzung
- COPE: Company owned, personal enabled - Firmeneigentum mit privater Nutzung / COBO mit privater AppleID
- COSU: Company owned, single use - Firmeneigentum mit einer einzigen Anwendung / COBO mit nur einer App
BYOD: Bring your own device
Privates Gerät mit beruflicher Nutzung:
- Jede Mitarbeiterin und jeder Mitarbeiter verwendet sein privates Gerät
- Apps und Daten für Arbeitszwecke werden in einem Arbeits-Container gespeichert
Übersicht der Enrollment-Schritte:
- Entscheiden, ob eine verwaltete Apple-ID genutzt werden soll
- Falls eine verwaltete Apple-ID verwendet werden soll, dann die Enrollmentschritte aus dem Wiki-Artikel Account-basiertes Benutzer-Enrollment von iOS- / iPad-Geräten folgen
- Falls keine verwaltete Apple-ID verwendet werden soll, dann wird das veraltete BYOD-Enrollment angewendet, welches hier beschrieben wirdLegacy-BYOD-Enrollment
- notemptyDies wird nicht empfohlen! Wenn möglich, dann das BYOD-Enrollment mit verwalteter Apple-ID!
- Vorbereitungen im MDM-Portal:
- Voraussetzung erfüllt: Lizenz vorhanden, Gerät kompatibel
- Apple Push Zertifikat im MDM-Portal vorhanden
- Geräteprofil im Portal angelegt
- Im Portal neuer Benutzer hinzugefügt, oder über Entra ID eingebunden
- Geräteeinbindung:
- Im Portal durch die Schaltfläche Neues Gerät anmelden den QR-Code im Dialogfenster scannen
- Im Portal erzeugte Gerätekachel auswählen
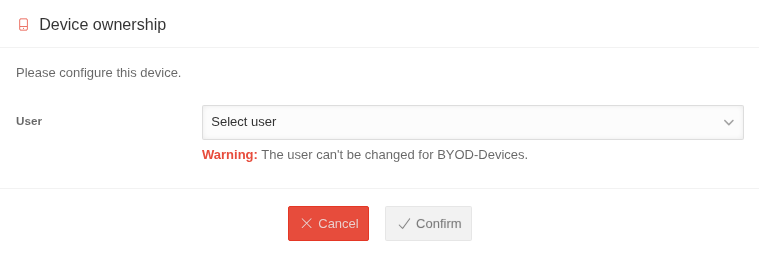
- notemptyIm Dialogfenster Geräteeigentümer den Benutzer auswählenNew as of: 2.17Screenshot anzeigenausblendenKlicken für dauerhafte Anzeige
- Zuordnungen von:
- Gerätenamen vergeben
- Apptags
- Geräteprofil

- Automatic enrollment after a factory reset
- Interaction-free installation and updates of apps without Apple ID
- Reenrollment
- The devices can be permanently removed from the MDM from the end device
COBO: Company owned, business only
Company property without private use
- The devices are only intended for use in a corporate environment
- The IT administrator has full control over the smartphone
- Private data is strictly prohibited on the device
Overview of the enrolment steps:
- Preparations in the MDM portal:
- Prerequisite fulfilled: Licence and Appl Business available, device compatible
- Apple Push Certificate, DEP token and VPP token available in the MDM portal
- DEP profile and DEP PIN created
- Device added to the Apple Business with a Mac or the iOS app Configurator
- Device profile created in the portal
- Apps purchased in Apple Business assigned by tags
- New user added in the portal, or integrated via Entra ID
- Device integration
- Device assigned to the Securepoint MDM server in Apple Business
- Accept the ABG device tile generated in the portal and select the licence
- Assignments of:
- Assign device names
- assign users
- app tags
- device profile
- Continue setting up on the device
Requirement
- iOS or iPadOS version 14 or higher
- a Mobile Device Management (MDM)- license musst exist
- Access to Apple Business Manager must be available
- notemptyThe devices may not be added to the Apple Business/Apple School Manager of the reseller! This would be a violation of Apple's terms and conditions!
It is appropriate that each end customer has their own Apple Business/Apple School Manager account and the devices are added there accordingly.
- If the iOS or iPad device is to be stored with an Apple DEP profile, a separateApple DEP PIN must be set up beforehand
- notemptyAs of portal version 2.8, a PIN must be available, otherwise enrollment for iOS/iPad devices with DEP profiles is no longer possible for security reasons.
Registration in Apple Business
There are two different ways to register the iOS/iPad device in the Apple Business:
- with the Apple Configurator iOS app
- with an Apple MAC with Apple Configurator installed

- The iPad must be reset for enrollment
- Here is a description of that


- Log in to Business/School Manager
- Settings → Share WLAN notemptyThe WLAN must not be unencrypted!
- MDM Server Assignment → Determined → Select Securepoint MDM

- Either
- Scan the image in the System Wizard of the iPad using Apple Configurator.
- or
- Pair manually: Pair manually in the System Wizard of the iPad and then click Pair manually in the Apple Configurator. Den angezeigten 6-stelligen Code eingeben.

- The iPad is added
- Continue the system wizard

- notemptyDo not erase the iPad yet!
- If necessary, check whether the iPad has been correctly assigned to the MDM server in Apple Business/Apple School Manager under Devices

- The iPad appears in the MDM Portal.
- Under the iPad is assigned a DEP profile:
- create a new DEP profile via the Add profile button and add the iPad under Devices, or
- select an existing DEP profile and add the iPad to it under Devices.

- Activation of Internet sharing for the connected Apple device:
Once the iOS/iPad device has been connected to the Mac, you can go to System Preferences → General → Share → Internet Sharing - Activate the port via which the device is connected to the Mac.
- Set the Share connection accordingly and activate Internet sharing.
Menu File / New profile section WLAN:
WLAN can be configured here.


Allow devices to pair with other computers

Server: New Server...
- If another device has already been added, a server can be selected here.
- Otherwise the configuration data can be stored in the next step.

Name Unique name (choose freely)
Host name or URL: leave empty. This only registers the device with Apple Business. The assignment to the MDM server takes place later.

Since the macOS does not yet know the certificate of the individual customer access to the Securepoint Mobile Security Portal, the URL cannot be verified. But it still is correct!
As no server has been entered, no certificate can be added. Simply click on Next.


Start-up
The following steps are necessary for commissioning the iOS/iPad device in MDM:
- Apple Push certificate, Apple DEP token and Apple VPP token are available
- Existing DEP profile with DEP PIN
- Device profile has been created
- Apps purchased in Apple Business and apps summarised into app groups using tags
- Users created or linked via EntraID
Push certificate / DEP token / VPP token
The following steps are taken under :
- at Apple Push Certificate check whether a token is available
- If one is available, check whether it has not yet expired
- If none is available, an Apple Push certificate is added via the { Add button
- at Apple DEP check if a token is available
- the following Wiki article describes how to add an Apple DEP token
- then by Set DEP profile PIN enter an own 6-digit PIN and Save
- Enable option Enable Apple Re-Enrolment activate
- at Apple VPP / Apple Business / Apple School Manager check if a token is available
- If one exists, check whether it has not yet expired
- If none exists, an Apple Push certificate is added via the Add button
Further information can be found in the corresponding Wiki article.
Create DEP profile
Make sure, that in under Apple DEP at Set DEP profile PIN an own PIN has been entered.
Under with the button Add profile a new DEP Profile can be created.
Further information can be found in the Wiki article DEP profiles in the MDM portal.
Create device profile
In with the button Add profile a new profile for the device can be created.
- For an iOS device and iPad, the Type is selected in the General tab device profile is selected
- For a Shared iPad, the type is selected in the General tab Shared iPad is selected different users on one device
Continue the configuration of the profile accordingly. Further information on the configuration of iOS/iPad devices or Shared iPad devices can be found in the corresponding wiki articles.
Apps
If the required apps for the iOS/iPad device are not yet available, they can be purchased in the Apple Business.
In , the newly acquired apps are added using Add app.
Use tags to summarise the apps in the required app groups.
Further information can be found in the Wiki article Apps.
Create user
A new user is created in the portal under . Two different options are available for this:
- The Add user button is used to add a user directly in the portal
- The user is imported via CSV or Entra ID using the Import user button
Further information on Add user and Import user via Entra ID can be found in the corresponding wiki articles.
First device login
The following steps are required to log an iOS/iPad device into MDM for the first time:
- Assign device in Apple Business to the Securepoint MDM server
- Accept the terms and conditions in the generated device tile and select the licence
- Configure device tile (assign suitable name, assign user, assign device profile, assign app tags)
- Continue setup on the device
Assign device in Apple Business to the Securepoint MDM server
These steps are necessary to assign the iOS/iPad device to the Securepoint MDM server in the Apple Business:
- Under Apple DEP Add profile to download the Apple push certificate (*.pem file)
- Upload this certificate in the Apple Business or Apple School Manager menu
 Settings (click on the user name in the menu bar)
- Apple Business: If a corresponding MDM server has not yet been created:
- Apple Business: Menu Settings / Your MDM server / Add
- Apple Business: MDM server name unique name
- Apple Business: MDM server settings Select file: Upload the .*.pem file previously downloaded from the Securepoint Mobile Security Portal and save
- Apple Business: Menu
- Apple Business: Selection of the appropriate MDM server ttt-point-mdm-Server-123456.sms
- Apple Business: Download the dep token with button Load token (*.p7m-file) in the Apple Business or Apple School Manager in the menu
- Apple Business: If a corresponding MDM server has not yet been created:
- Upload the *.p7m file in the dialogue window opened under point 1 in the Securepoint Mobile Security Portal. Finalise with Finish
Further information can be found in the following Wiki-Artikel.
Configure device tile
This device tile is configured. The following steps are necessary:
- Use the button on the device tile or in the device details to enter a suitable name and save it using
- The previously created device profile is assigned to the device tile by selecting the device tile in the
profile tab under the Devices optionGeneral {{{2}}} - Under Tags the app tags and thus the app groups to be installed on the device are selected
- The desired user is assigned to the device under User
Continue device setup
The setup on the iOS/iPad device can be continued and completed. The previously defined DEP PIN must be entered.
The enrolement of the device in the MDM portal is now complete.
Apple Re-Enrollment
- When a device is re-enrolled, the configurations of the previous device are automatically transferred
- Provided that this device is still present in the Securepoint Portal
- This device will be marked with the icon Signed out
- If you want to prevent the transfer of settings for a specific device, it is necessary to remove the device from the system before it is re-enrolled